decordip Garden and patio decoration inspiration
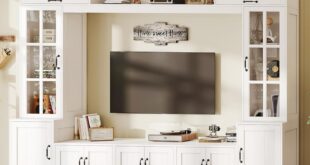
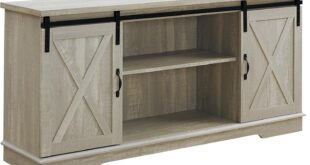
 Sunlight skims the luminous-white surface and you promptly notice how the console settles into the room without shouting for attention. This YITAHOME TV Stand with Drawers — a farmhouse-style, bright white media console — fills the wall beneath the screen and reads like a practical piece of furniture rather than an accent. Run your hand along the painted top and the finish feels slick and even; the tempered glass panels are cool under your fingertips and the drawers close with a quiet, measured glide.At dusk the thin LED strip throws a soft halo around the base and the tucked-away outlets become oddly reassuring when you crouch to plug something in.
A quick look at the YITAHOME TV stand and what you find in the box
When you lift the outer carton you first notice how the larger panels are wrapped and stacked to protect the finish; the bright white surfaces and the glass doors arrive with protective film still in place, and the LED strip and its remote sit in their own padded pocket. You’ll find the legs and support pieces tucked into a corner of the box rather than already attached,so there’s a short stretch of assembly where you line up panels,slide in drawers or drawer fronts,and secure the base. Cables for the built-in power module are bundled separately, and the instruction booklet is laid on top so it’s the first thing you see when you open the package.
In the box:
- Wrapped cabinet panels and glass doors — ready to be assembled
- Legs and support pieces, including the central support elements
- LED strip, remote control, and a small packet of batteries for the remote (often packaged together)
- Power cord and outlet/power module components bundled with internal wiring
- Hardware kit with screws, dowels, and an Allen key, plus a printed assembly manual
| Component | What to expect on unpacking |
|---|---|
| Main panels & doors | Individually wrapped; labels or numbers on edges for matching steps |
| Legs & supports | packed separately; some pieces are adjustable |
| Electronics | LED and power module in protective packaging with cables tied |
| Hardware & manual | Clear parts list and a small tool included |
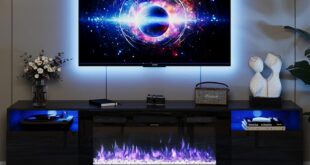
How it settles into your living room and the first details your eye catches

When you first slide this piece into place, it reads more like a frame than a chunk of furniture — the raised legs and the white surface let light travel underneath and around it, so the whole wall feels less blocked.Up close, the glossy paint and the glass-fronted sections give the face of the unit a layered look: reflected highlights from a nearby lamp, faint smudges that show on the white surface, and the way the glass picks up room reflections all happen without you having to look for them. In everyday use you’ll find yourself making minor adjustments — nudging it a few inches off the wall to tuck cords away,angling the TV slightly to line up with seating — small,habitual moves that help it sit naturally in the room rather than dominate it. In dimmer moments the integrated lighting becomes a framing element, casting a soft rim of color that immediately redirects the eye from the screen to the console itself.
- Edge and silhouette: the tapered legs and slightly raised base create an airy border, so the unit reads as a purposeful shape rather than a heavy block.
- Surface and reflections: the white face picks up nearby colors and lighting — warm lamp glow,daylight from a window,the subtle sheen of glass — making the finish feel a bit alive during normal household activity.
- Subtle accents: metal pulls and the glass panels catch quick glances; they act as punctuation marks that break the white plane into smaller visual pieces.
| Visual element | How it registers |
|---|---|
| Raised legs | Makes the unit appear lighter and helps floor patterns remain visible beneath it |
| glass fronts | Add depth through reflections and occasional glimpses of what’s stored inside |
| Ambient lighting | Creates a halo effect that can shift attention in low light |
The LED light and built in power outlet up close and where you find the connections
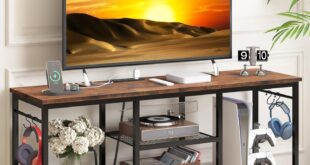
Up close the LED element reads more like an accent strip than a hidden feature — it runs along the top rear edge and throws a soft wash of light behind and below the TV rather than directly at the room. When you stand in front of the console you’ll usually notice a small dark sensor or IR window tucked near the upper back or inside the cabinet glass where the remote picks up signals; the light’s color changes and brightness are handled through that receiver or the app, so you frequently enough interact with the lighting by pointing the remote toward the front of the unit or opening the cabinet doors briefly. A few small vents and a compact controller box sit behind the rear panel; if you peer through the cable cutouts you can see the thin LED wiring bundled toward that area, which tends to keep the visible wiring neat but sometimes requires a minor shift of equipment to reach the controller.
- LED strip — along the top rear edge, visible as a soft glow from the front.
- IR receiver/controller — located near the upper back or just inside the cabinet glass.
The built-in power module is mounted on the inside rear of the cabinet, with the AC sockets and USB ports grouped together so you find all the connections in one place when you open a door or look through the rear cutout. In most cases the power cord for the whole console exits through a central rear opening; individual device cords plug into the module facing inward, which can make the outlets feel a bit crowded when you have bulky adapters. The arrangement you’ll see up close is practical: plugs sit horizontal to the back panel and the USB ports are adjacent to the AC outlets, so routing is straightforward if you route cables through the nearby grommeted holes.
| Connector | Where to find it |
|---|---|
| AC outlets | Mounted on the inside rear panel, visible through the cabinet opening |
| USB ports | Grouped with the AC outlets on the same module |
| Main power cord | Exits through the central rear cutout of the console |
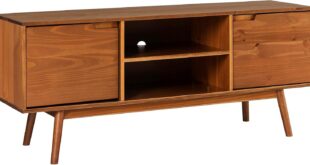
Materials, joinery and drawer action as you inspect them in your home
When you run a finger along the surfaces at home, the finish reads as a painted or laminated layer over engineered board rather than a single slab of solid wood; the edges have visible banding where the panels meet and small seam lines at the corners. The cabinet carcass is assembled from pre-drilled panels joined with cam-locks and dowels in the visible seams, with occasional screw heads tucked into recessed holes on the inside. the back panel is a thin sheet fixed with small nails, and the adjustable central support uses a threaded metal insert you can turn by hand.A quick look inside reveals plastic corner blocks and glued butt joints in some meeting points, which is typical of factory-assembled furniture.
- Top surface: laminated engineered wood with modest surface texture
- Carcass and shelves: cam-lock and dowel construction, back nailed
- Drawer fronts: veneered/MDF panels with edge banding
- Feet/supports: painted leg sections with threaded metal adjusters
| Component | Observed joinery / finish |
|---|---|
| Top & sides | Laminated engineered board, edge-banded seams |
| Rear panel | Thin nailed panel, recessed into channel |
| Leg/center support | Threaded metal insert, screw-in attachment |
The drawers slide on side-mounted metal runners and tend to move with a steady, audible glide rather than a whisper; you can feel a slight resistance just before they seat, and there’s no evidence of a soft-close damper — they meet the frame with a light thump unless you slow them with your hand. Play is minimal when drawers are empty, though a gentle wobble appears if you pull them fully out and tilt slightly; the faces line up reasonably well, with narrow, even gaps in most places but a small offset at one corner that you might notice when standing directly in front. Handles are fastened with short screws from inside, so tightening is uncomplicated if they loosen over time, and the runners sit proud enough that small debris can catch if not kept clean.
When you set a TV on the top surface, the footprint matters more than it looks on the spec sheet.The surround gives you a couple of inches behind slimmer stands for cords and the occasional HDMI switch, but larger pedestal bases will sit closer to the front edge and may leave less room for a soundbar directly beneath the screen. You’ll find yourself nudging devices back an inch or two, or angling cables to keep ventilation gaps, and that’s normal — especially if you park a streaming stick or a small media hub directly behind the TV. The two central support legs add stability under heavy sets but can interfere with where a wider media console or a low-profile soundbar sits if you like to tuck things flush to the front.
Inside the cabinets the shelf spacing and clearances shape how you arrange consoles, receivers and disc players. The middle shelves are tall enough for most game consoles laid flat, but an upright console or a receiver with big heatsinks will need the top shelf or a little extra side clearance; expect to rotate items or pull a drawer slightly forward when swapping discs or plugging in controllers. Typical clearances observed in daily use are summarized below — these are measured as the usable space once the cabinet doors and internal trim are in place, so plan for a little breathing room around vents and cables.
- Game consoles: usually fit flat; vertical placement needs extra side clearance.
- AV receivers: may require use of the top shelf for airflow and easier cable access.
- streaming boxes & routers: fit comfortably on side shelves but benefit from a few inches of front clearance for signal and heat.
| Item | Approx. usable height | Approx. usable depth | Notes |
|---|---|---|---|
| Flat game console (horizontal) | 3.5–4 in | 14–16 in | Fits most shelves with room for cables behind |
| AV receiver | 6–7 in | 16–18 in | Prefer top shelf for ventilation |
| Streaming box / Router | 2–3 in | 10–12 in | Keep a few inches front/back for airflow |
how it measures up to your expectations and the practical limits you may face
In everyday use the piece generally behaves like a multifunction media cabinet: the integrated outlets reduce the number of extension cords stretched across the floor, while the LED strip often serves as a soft accent rather than a dominant light source. The remote and app controls for the lighting work in most setups, though occasional re-pairing or brief lag can pop up if a household network is crowded. Assembly typically requires a few extra minutes beyond the advertised estimate when aligning doors and tightening legs; once set, minor tuning of the central supports is a regular, quiet task in many living rooms. Finishes and glass panels handle casual use, but frequent handling of drawers and doors tends to produce small scuffs or fingerprints over time, so periodic wiping and hardware checks become part of the maintenance rhythm.
- Cable management: Simplifies power access but placement frequently enough leaves plugs and short adapters visible behind the cabinets.
- Lighting: Creates ambient color rather than strong illumination; color shifts can appear subtle under bright daytime conditions.
- Hardware adjustments: Central supports and hinges sometimes need re-tightening after initial settling.
- Load sensitivity: Drawers and shelves perform as expected until frequently loaded near their practical limits, when glide and alignment can be affected.
| Common scenario | Observed effect |
|---|---|
| Multiple bulky power adapters | Some plugs crowd the outlet area, forcing re-routing or use of a slim power strip. |
| Frequent remote/app adjustments | Lighting responds reliably but occasional re-connect steps are required in busy Wi‑Fi environments. |
| Moving heavy electronics in and out | Shelves remain stable, though repeated heavy loading accelerates minor wear at contact points. |
Small household habits—tucking cords, shifting decorative items to avoid light washout, and checking fasteners after installation—tend to emerge once the piece is in regular use, and those routines frequently enough resolve the most recurrent practical limits without major intervention. Full specifications and current configuration details can be viewed on the product page: Product listing and specifications.
Living with it day to day and how you manage cables, lighting and storage routines
Living with the stand day to day quickly becomes a set of small habits around power and tidiness. You typically plug streaming boxes, a soundbar or a game console straight into the integrated outlets and leave shorter power cords tucked into the rear cavity; that reduces the length of visible runs but it doesn’t eliminate the occasional cable peek when you swap gear.For everyday tidying you find yourself doing little rituals — coiling extra cord length behind the cabinet, slipping cable ties around bundles, and leaving a short power strip inside a lower cabinet for devices you don’t want unplugged frequently enough. The drawers and cupboards get used in different ways: drawers for loose, frequently handled items like remotes and chargers, and the cabinets for larger equipment. Over time you notice small trade-offs — hiding everything makes for a cleaner look but sometimes means a quick cabinet-open during movie setup to check a connection or pull out a controller.
Lighting and storage routines develop naturally around evening use and display habits. The LED strip becomes an ambient cue: you change color or dim levels for late-night watching and revert to brighter, neutral tones for daytime; controlling it with the remote or app is usually straightforward, though you might swap batteries or tap the app when the remote isn’t close. You also settle into a simple maintenance pattern — occasional dusting of the top surface and glass doors, and leaving a little space around electronics inside cabinets for airflow. A few practical patterns you’ll likely repeat are listed below for clarity.
- Daily charge station: phone and tablet set on top or in a drawer overnight, plugged into the built-in USBs or ACs.
- Game-night swap: consoles stored in a cabinet and pulled forward when in use; cords retucked afterward.
- Quick-access drawer: remotes, batteries and small cables kept together so you don’t dig through shelves.
| LED Mode | typical use | notes |
|---|---|---|
| Warm dim | Evening movie nights | Soft glow, keeps the room cozy without screen glare |
| Cool bright | Daytime or cleaning | Better visibility for sorting items and dusting |
| Color accent | Casual gatherings or mood lighting | Fun for short periods; can feel overpowering if left overnight |
How the Set Settles Into the Room
At first the lines and little lights of the YITAHOME TV Stand with Drawers for TVs up to 75 Inch catch your eye, but over time you notice how it lives rather than how it looks. In daily routines it finds its place—holding remotes and stacks of paper, offering a low, steady surface for mugs, and gathering the soft scuffs and warm spots where hands and feet meet it most. As the room is used the drawers open on habit, the LED glow becomes a familiar punctuation in evening rhythms, and the surfaces take on the quiet marks of ordinary days. Over time it simply stays.