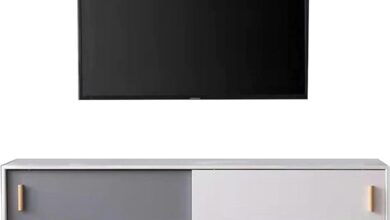
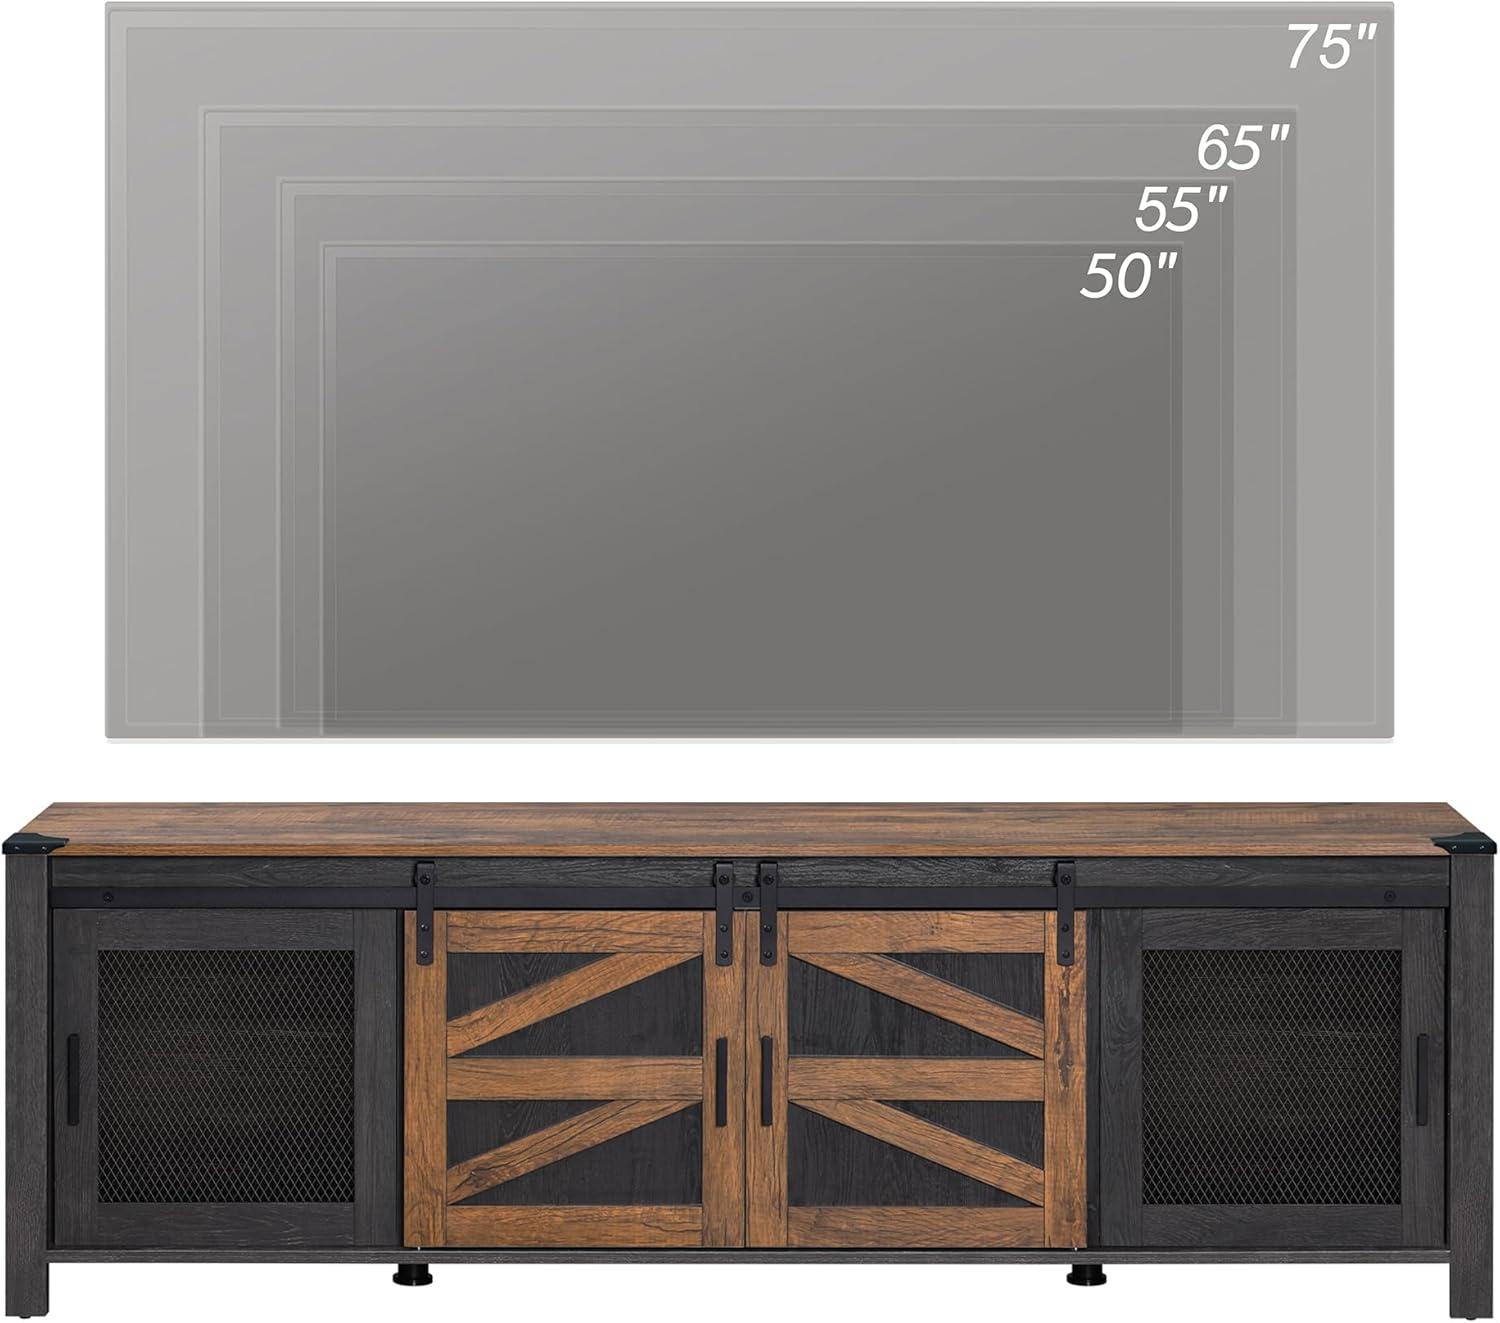
Wampat 70″ Farmhouse TV Stand — what it means for you
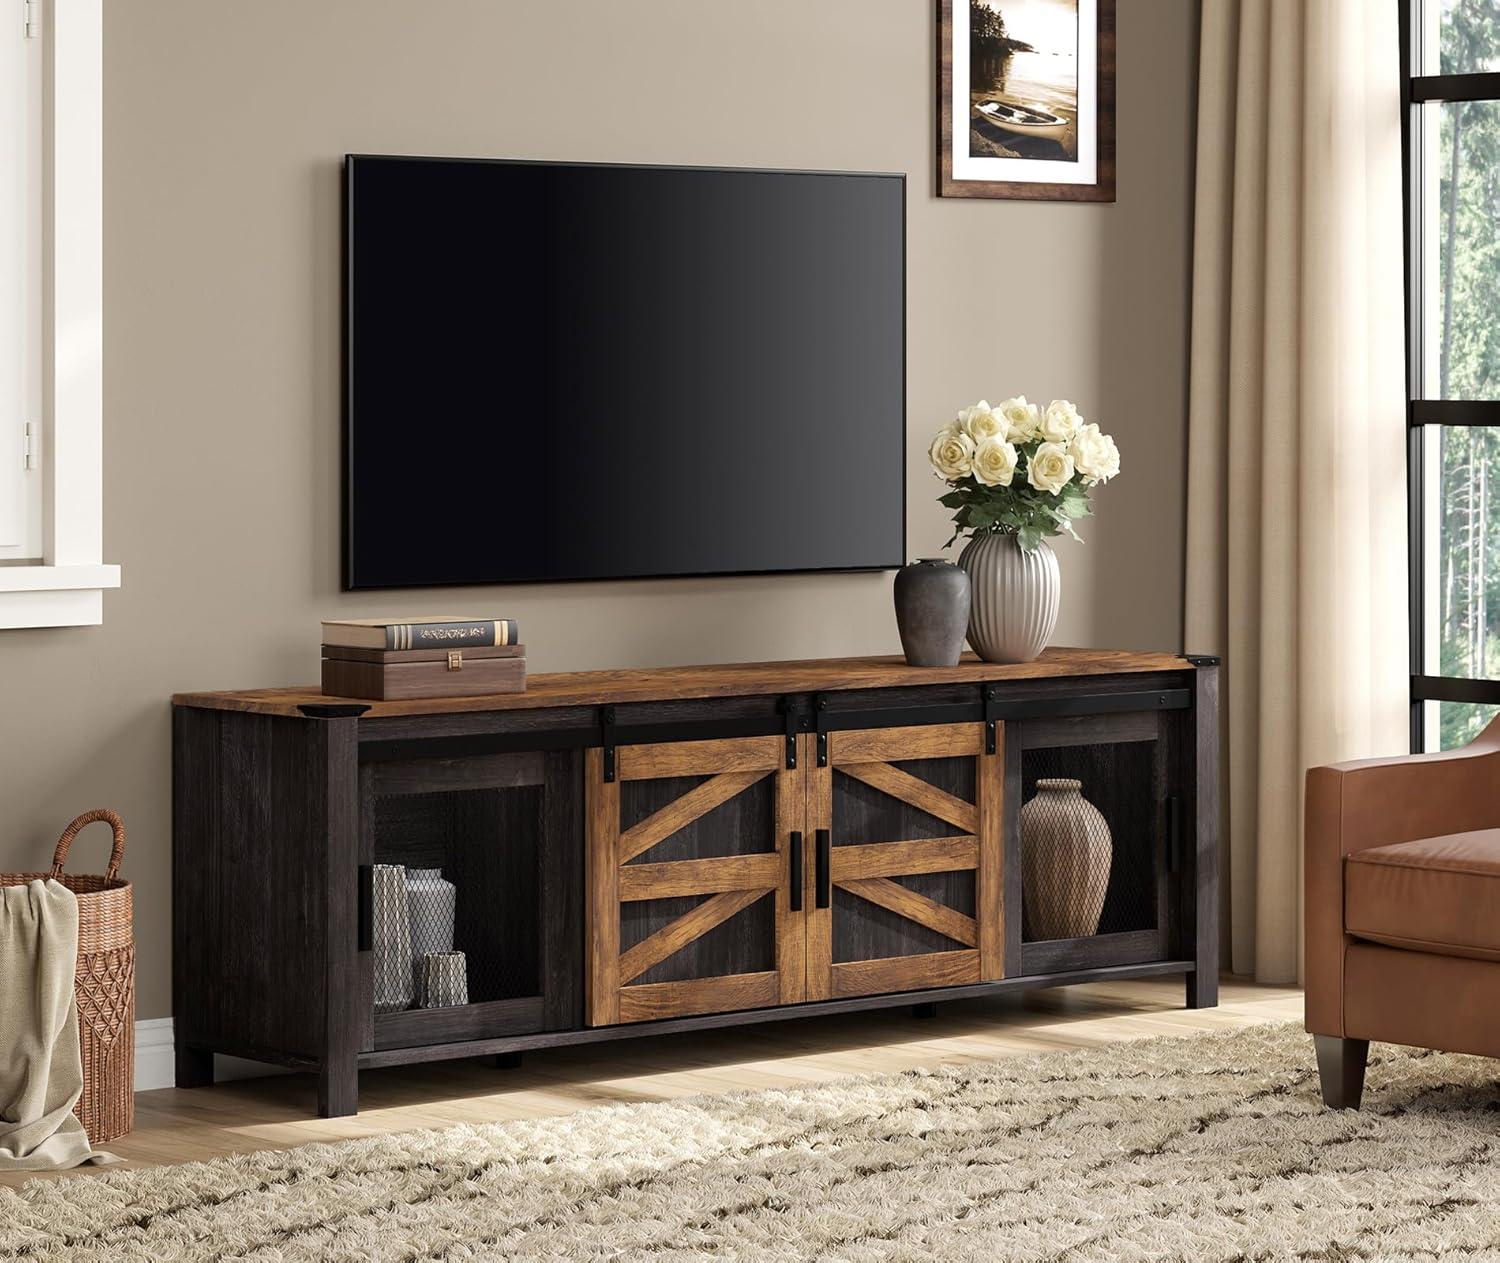
Light catches the antique-brown finish and you notice how the console quietly anchors the room, its black trim cutting a calm, graphic line across the floor. This is Wampat’s 70‑inch farmhouse TV stand, a friendlier shorthand for that long product name, and it reads here as a low, wide piece wiht mesh-front doors that let shadows and shapes peek through. Resting a hand on the top, you feel a smooth, slightly textured surface and the steadiness from the mix of wood legs and metal supports; from across the room it has presence without shouting.
When you first see the Wampat seventy farmhouse TV stand in antique brown and black

When you first see the piece in antique brown and black, it presents as a composed presence rather than an attention-seeking item.The warm brown surface and the darker trim sit against one another in a way that breaks up the horizontal mass; from across the room the finish reads as lived-in wood rather than a single flat colour, and the darker elements create a visual frame around the openings. The overall silhouette is low and horizontal, which tends to anchor the wall behind it and make the space above feel intentional; small details — a thin metal track or the pattern of a mesh panel — catch the light differently as you move, so the stand keeps revealing slightly different textures as you walk past.
On closer inspection the combination of finishes and negative space becomes more apparent: metal accents add a faint sheen while the brown surfaces show grain and subtle variation, and the raised legs give a little lift so the base isn’t visually heavy. You can spot where cords will pass through the back and where the sliding elements run, which subtly suggests how the piece will sit in a lived room rather than just on a showroom floor. A few quick visual takeaways clarify that first look:
- Color contrast: warm brown tones against matte black edges create defined planes.
- Texture: grain and slight distressing versus smoother metal highlights.
- Silhouette: low,horizontal profile that anchors the wall without overwhelming it.
- motion hint: sliding elements and tracks introduce implied movement even when stationary.
In certain lights the darker trim reads crisp and defined; in others it can show dust or fingerprints more readily — a small, situational trade-off you’ll notice during normal use.
How its farmhouse silhouette mesh doors and two tone finish read in your living room

The piece’s farmhouse silhouette reads as a quiet choreographer in the room: a low, horizontal line that grounds the TV and a slightly sculpted outline that breaks up otherwise boxy electronics. The mesh doors introduce a layer of visual texture — from a few feet away they mute and blur what’s behind them, creating soft shapes rather of sharp gadget outlines; up close the tiny perforations catch light and cast a subtle shadow pattern. The two‑tone finish works like a frame-and-canvas arrangement: the darker trim gives definition and contrast, while the warmer brown planes pull in wood‑adjacent tones from othre furniture and textiles, so the stand can both anchor and echo existing color notes without shouting for attention.
How it shows up in everyday use depends on where you put it and what you keep on or behind it. In practice you might find yourself nudging a lamp or swapping a decorative object to play up the wood tone or to soften the black edges; the mesh encourages a looser, layered styling because objects read as silhouettes rather than detailed displays. A few quick observations that clarify common looks:
- Against pale walls: the contrast reads crisp, the two tones define the TV area without dominating.
- With richer colors or patterned rugs: the darker trim ties into deeper hues, while the brown avoids feeling too heavy.
- under mixed lighting: the mesh softens glare but also lets electronics’ lights peek through as subdued spots.
| Lighting | How the finish reads |
|---|---|
| Natural daylight | Brown warms up, black appears matte and grounding |
| Evening lamp light | Contrast softens; mesh shows more texture than detail |
Note that the semi‑transparent nature of the mesh tends to reward modest curating behind the doors — shapes and cords are less obvious, but they are still part of the composition and can influence the overall impression.
What the wood grain metal mesh and hardware reveal about its construction for your everyday use
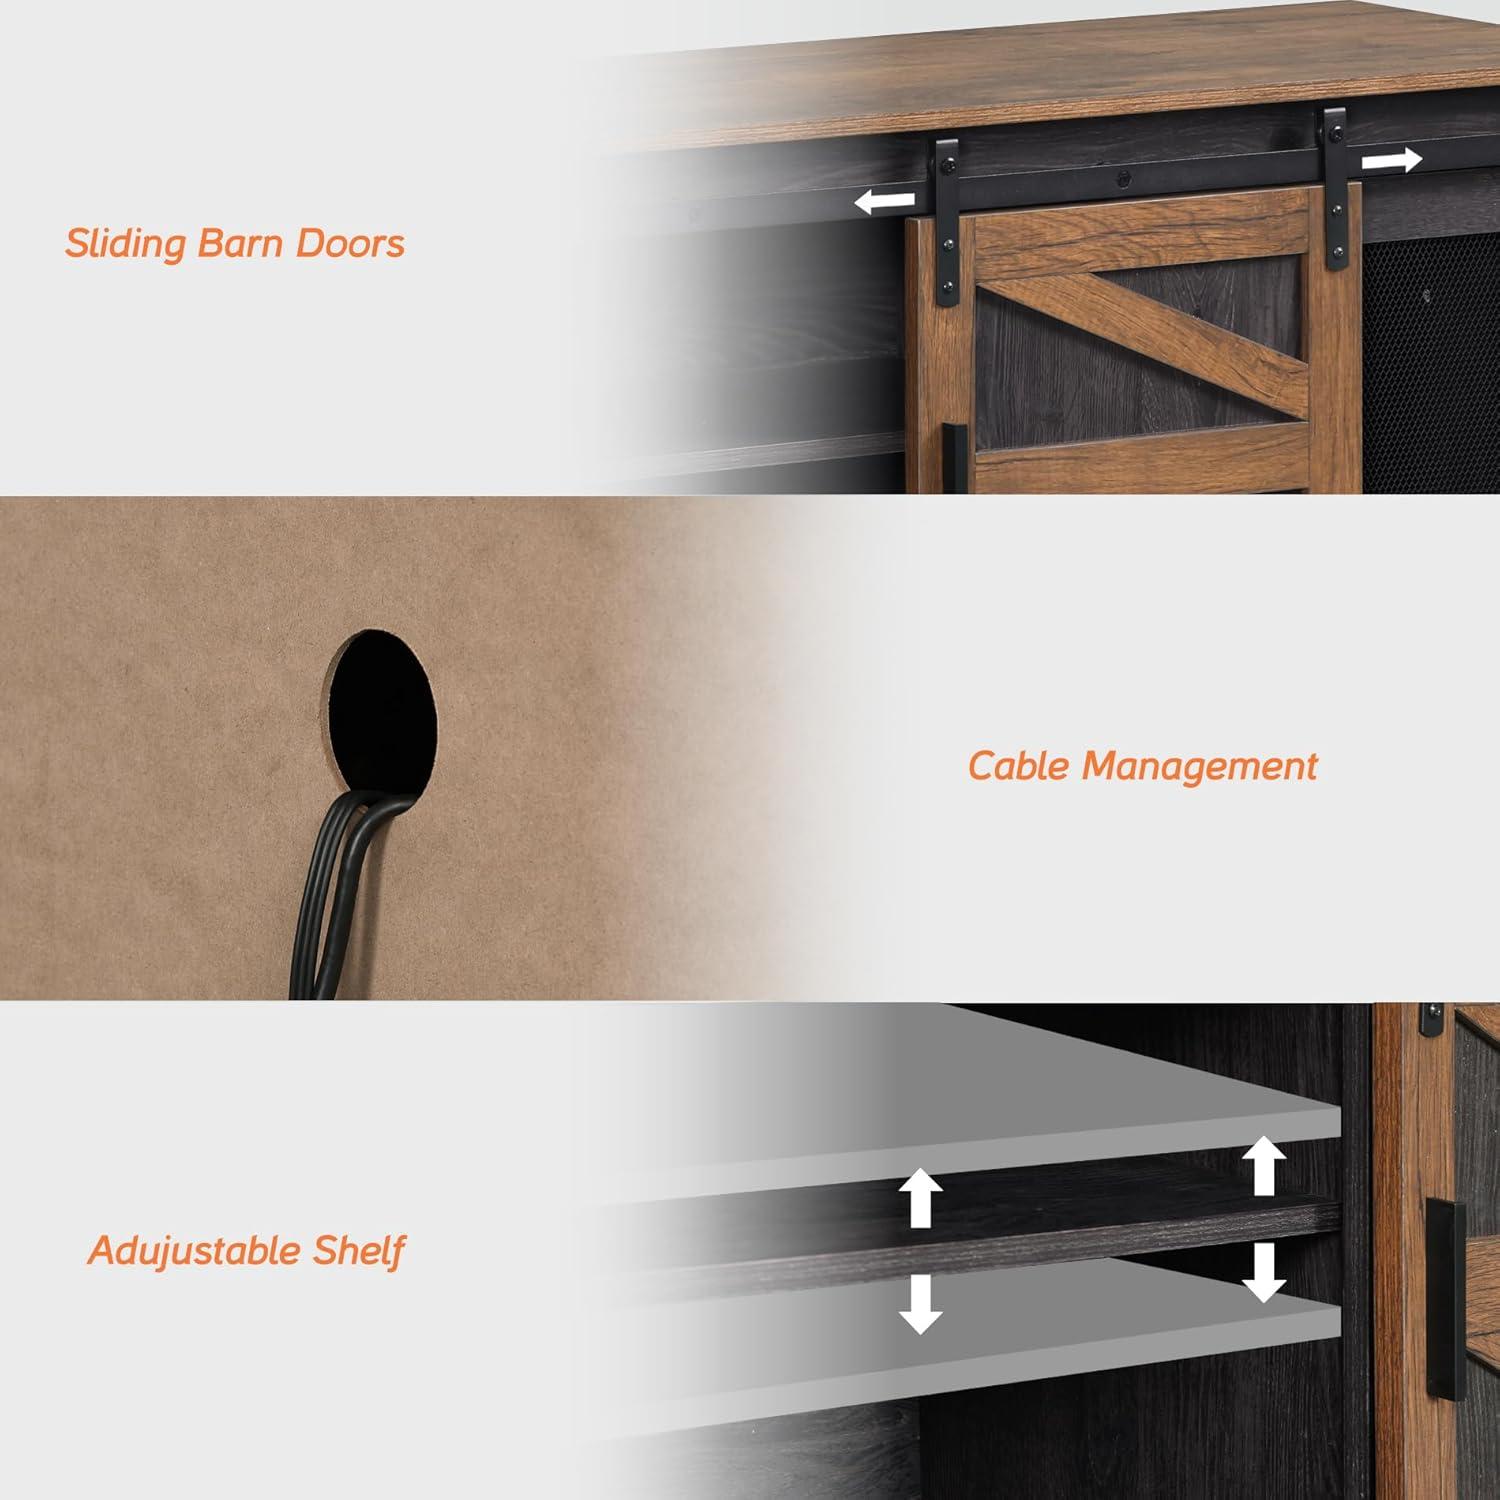
The visible wood grain, the metal mesh panels and the exposed hardware together describe how the piece is put together and how it behaves in everyday use.The grain pattern and surface finish suggest panels that hide minor abrasions and fingerprints more readily than a smooth lacquer would, and the way the grain aligns across door faces hints at where joins and seams meet — those seams can collect dust and may need occasional attention along edges. The metal mesh on the doors functions as a partial screen: it lets heat and infrared signals pass through while offering a degree of visual concealment, and the pattern density determines how much equipment shows at a glance. Exposed tracks, bolts and visible fasteners reveal a construction that can be adjusted or tightened over time; the sliding hardware in particular signals that routine checks (and occasional lubrication) are part of normal ownership rather than unexpected maintenance.
| Visible element | Everyday implication |
|---|---|
| Wood grain finish | Camouflages small scuffs, but edges and seams can trap dust; cleaning tends toward gentle wipes rather than abrasive methods. |
| Metal mesh | Provides ventilation and partial visibility of devices; mesh density affects both aesthetic concealment and how much dust passes through. |
| Exposed hardware and tracks | Indicates components that may need periodic tightening or lubrication; hardware access makes modest repairs achievable without disassembly. |
- Cleaning: A soft brush or vacuum tends to be useful around mesh and seams where dust settles.
- Noise and movement: sliding doors usually operate quietly when tracks are kept free of grit; metal-on-metal contact can feel different as parts wear in.
- Ventilation vs. concealment: The mesh balances airflow with visual screening, but finer mesh will show less of the interior equipment.
Full specifications and configuration details can be examined on the product listing page: View full listing.
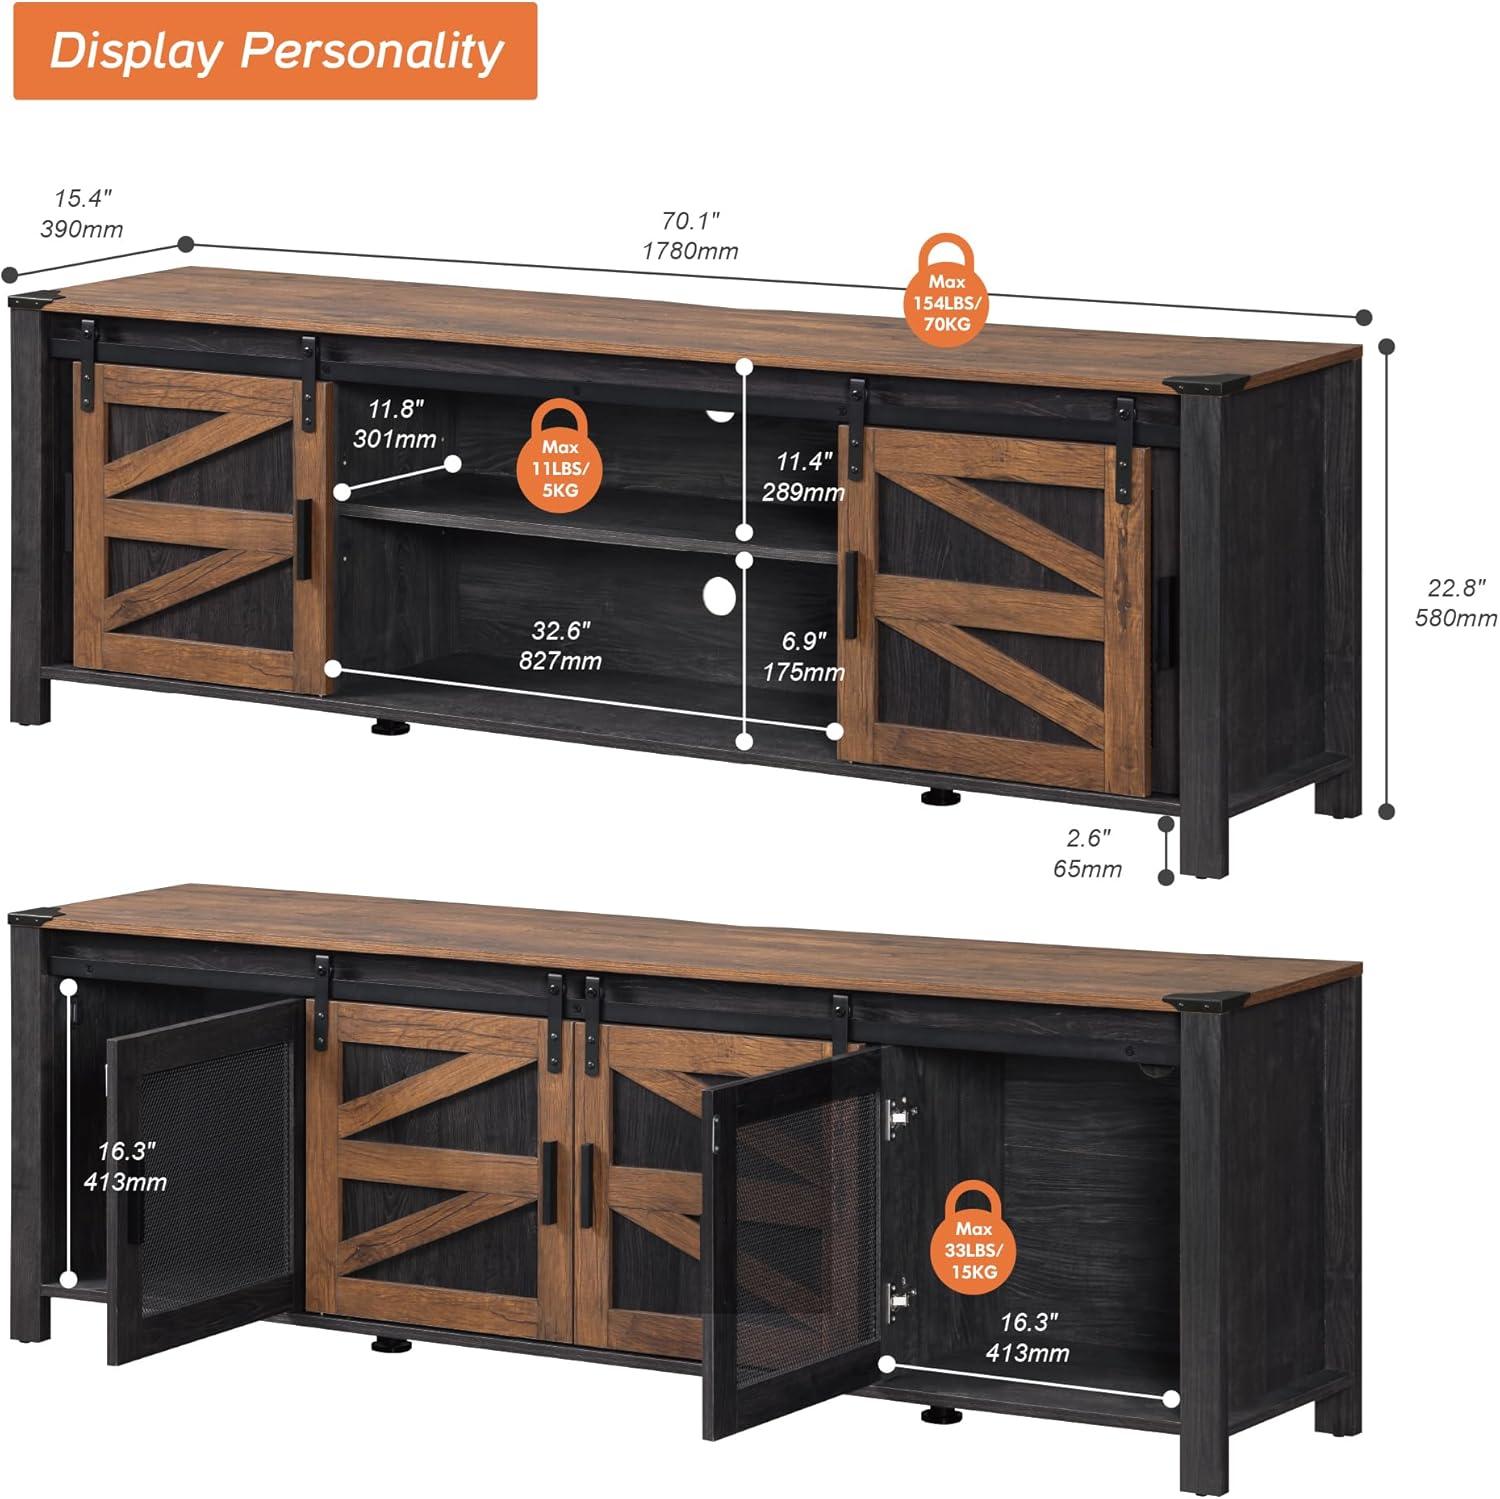
Measurements for your reference shelf heights clearances and the footprint it occupies in your room

You can picture how much floor space this piece takes up by thinking in broad strokes rather than pinpoint figures: it spans roughly 70 inches from left to right and reaches about a foot and a third to a foot and a half out from the wall. Allow an extra couple of inches behind it for the cable access and the anti‑tip bracket so cords don’t get pinched. The base lifts the lowest shelf a few inches off the floor, which ofen leaves room for a slim power strip or to tuck a cable bundle; the open middle section stacks into three levels with removable shelf positions, so you’ll likely shift one shelf up or down the first time you load electronics and boxes to get a neat fit. In everyday use you’ll find yourself nudging the unit a few inches away from a radiator or doorway to keep the sliding doors moving freely and to avoid hitting shoes or a rug edge when you walk past.
- Approximate footprint: ~70″ wide × ~15–17″ deep (front-to-back).
- Wall clearance to allow: ~2–3″ for cable routing and anti‑tip anchors.
- Floor clearance under base: ~3–5″, enough for low cables or a slim power strip.
- Shelf adjustability: three shelf levels in the open bay with repositioning increments that tend to be a few inches apart once installed.
| Area | Approx. measurement | Notes |
|---|---|---|
| Overall width | ~70″ | Measure doorway width before bringing it in; it often needs a little clearance to tilt through doorways. |
| Depth | ~15–17″ | Allow extra for cable bundles and ventilation behind devices. |
| Open shelf clearances | Variable (~several inches between positions) | Height changes once you reposition shelves to fit consoles, receivers or décor. |
where your devices discs and cables live and how the doors and adjustable shelves operate during use
When you set up media gear, the central open cavity tends to become the hub for anything that needs power and line-of-sight — game consoles, streaming boxes, and a cable modem usually sit there so you can reach ports and leave wires routed out the back. The two enclosed compartments behind the mesh doors are where discs, spare controllers, and rarely-touched accessories typically end up; the mesh lets you glance inside without opening a door, and it also means a remote signal can sometimes get through if a device is placed close to the front.Cables are most frequently enough gathered and threaded through the single back access point, so power bricks and HDMI runs collect behind the stand; you’ll probably rearrange a few times as you find the cleanest route, and occasional nudges to coax a stubborn connector into a port are part of the setup routine.
- Open shelf — active devices with easy access to front buttons and vents
- Cabinets behind doors — discs, backups, and items you only reach for occasionally
- Back access hole — power, HDMI, and ethernet routing
Sliding the doors across the metal track changes what’s reachable without moving gear; in practice one door will often cover the center when pulled aside, so you tend to slide them to expose the side you need rather than opening both fully. The adjustable shelves shift on peg increments, so changing a shelf position requires emptying that compartment or at least moving whatever sits on the shelf — it’s not a quick one-handed tweak while everything is plugged in.small practical limits show up in everyday use: deep devices reach the back hole more easily when a shelf is removed, and moving a shelf to gain extra vertical clearance can leave a neat pattern of spare peg holes that you notice when rearranging later.
| Location | Observed use during setup and daily use |
|---|---|
| Open middle shelf | Primary home for active electronics; quick access to ports and remotes |
| Behind mesh doors | Storage for discs and accessories; partial visibility and occasional IR pass-through |
| Rear cable hole | Main bundling point for power and signal cables; requires reaching behind for final connections |
How the Wampat seventy matches your expectations and where its size or storage may limit you in real rooms
In everyday rooms the piece often meets initial expectations for a mixed display-and-conceal solution: the combination of open shelving and enclosed compartments makes it straightforward to show decorative items while keeping media clutter out of immediate sight, and the sliding mesh doors allow access without swinging doors that need extra side clearance. Observers tend to notice that the textured fronts and darker trim blend into a variety of settings without calling attention to themselves, and the adjustable shelving layout typically handles a mix of game consoles, receivers, and stacks of discs with only occasional reconfiguration. Access and airflow are visible in use—components sit with some breathing room behind the mesh, and cords can be routed from the back—so performance equipment doesn’t feel completely boxed in during normal operation.
There are practical limits that show up once the stand is placed in a lived room. The sliding doors and front-facing shelves can feel restrictive in tighter traffic paths because items on the middle shelf need a clear horizontal reach to be pulled out, and the lower compartments tend to be shallow for taller floor-standing speakers or oversized decor, which means certain objects must be stored elsewhere. The mesh fronts also partially expose contents, so smaller messes remain detectable unless items are carefully arranged, and switching shelf layouts requires a little downtime to move gear around. Front clearance and visible storage are the trade-offs that most often determine whether the piece fits smoothly into a given layout or ends up prompting a quick reshuffle of nearby furniture.
Full specifications and configuration details are available on the product listing.
What assembly looks like and the practical details you will notice while you put it together
When you unpack the pieces you’ll notice the hardware comes in several small,labeled bags and the larger panels are wrapped separately — in many cases the instruction sheet shows exploded diagrams rather than long paragraphs,so you’ll be doing a lot of matching holes and dowels to the drawings. small cam locks and dowels are used at many joints,which tends to mean a little light tapping with a rubber mallet to seat parts before tightening.The sliding door rail hardware is packaged separately; the track bolts to the top edge and the door hangers hook on afterwards,so you’ll assemble the carcass first and add the doors as a near-final step. You’ll find an Allen key in the packet, but you’ll also reach for a Phillips screwdriver and a small adjustable wrench; a cordless drill on low torque makes the repetitive screws go faster but is not strictly necesary.
- Included: Allen key and multiple small hardware bags
- Useful extras: Phillips screwdriver, rubber mallet, tape measure, and a second pair of hands for lifting
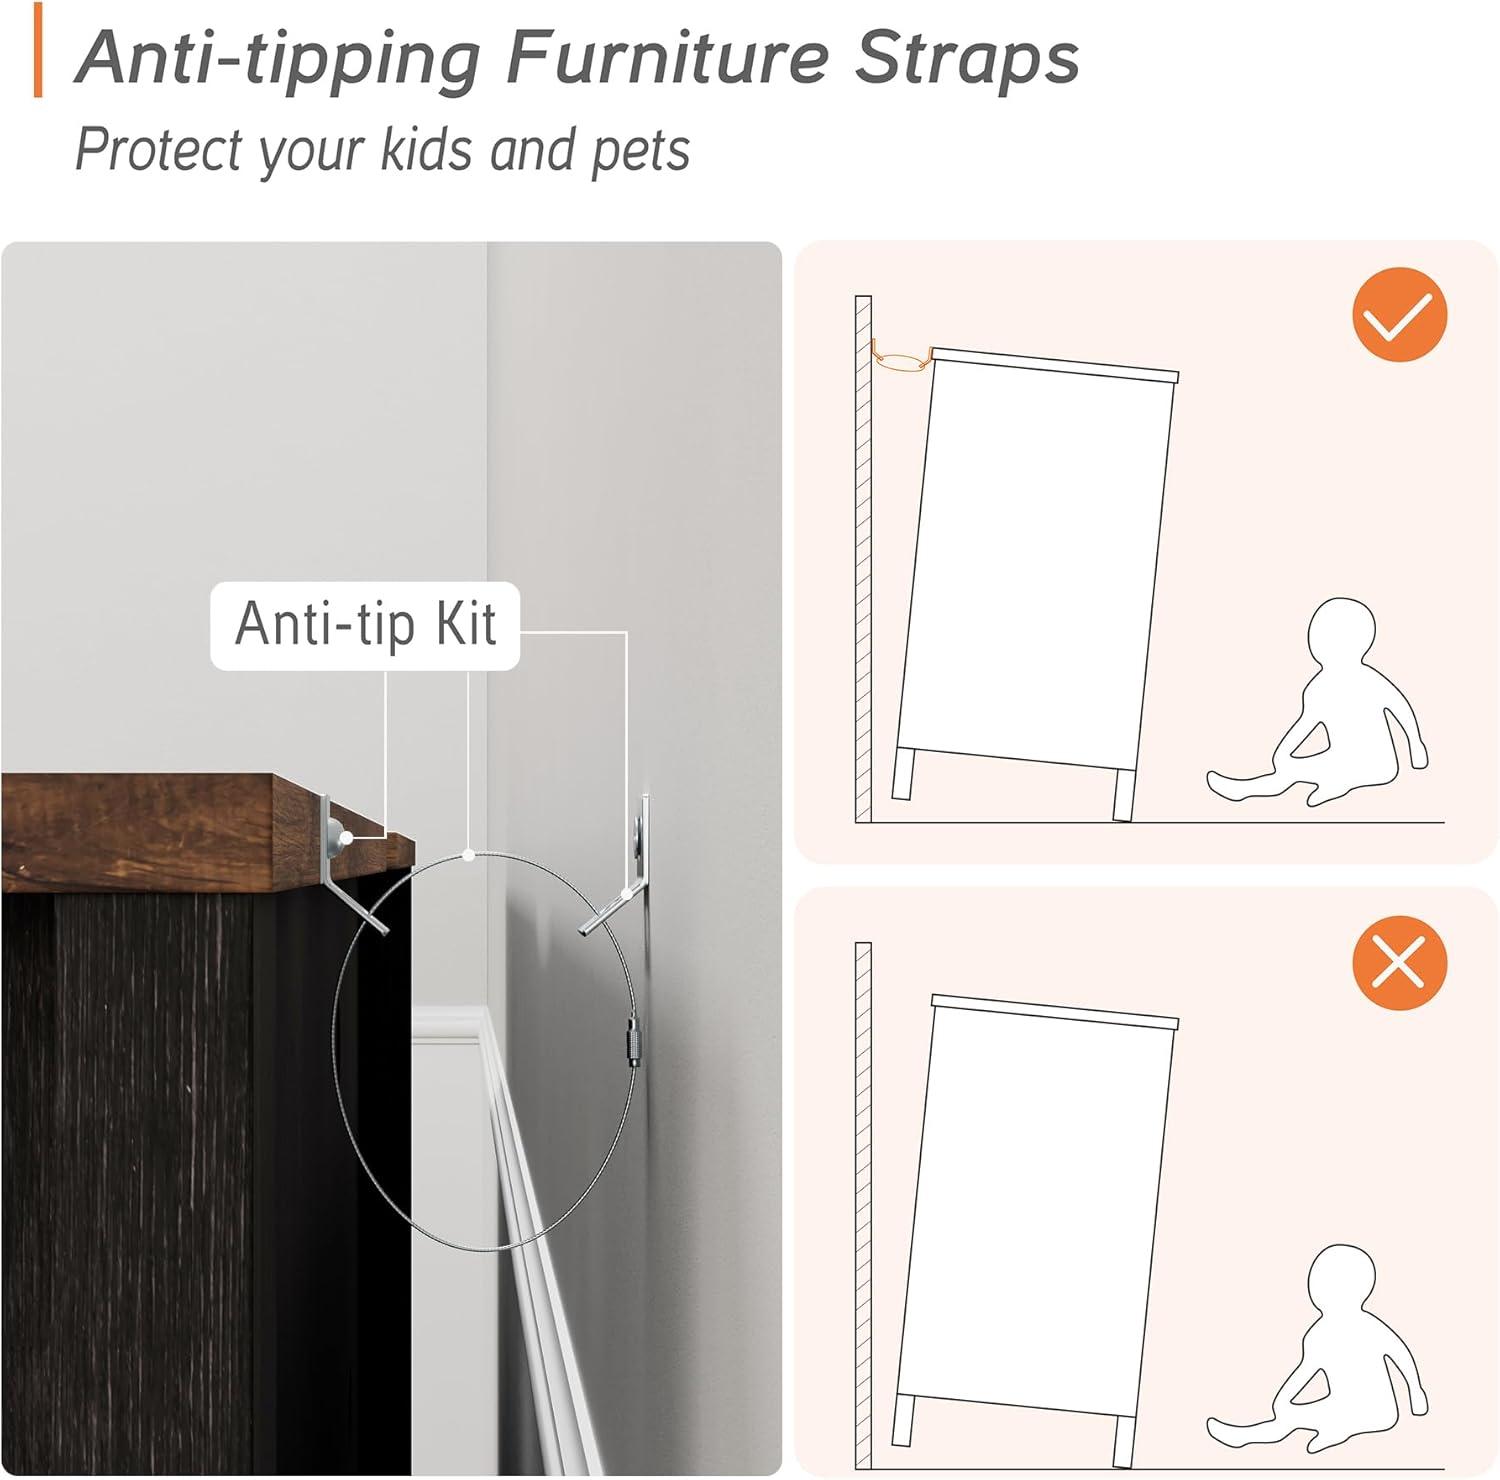
Practical details that show up as you work: the metal adjustable legs thread into pre-mounted inserts and let you level the piece on uneven floors — they’re somewhat sensitive to cross-threading, so start them by hand. The back panel fastens with small screws and exposes the cable access hole, which you’ll typically fasten last so wires can be routed before the unit is pushed against a wall. Hanging the barn doors is easier if the track bolts are square and loosely tightened first, then adjusted so the doors run smoothly; once aligned you can snug the fasteners. There’s also a small anti-tip kit in the hardware that you’ll want to locate during assembly; it attaches to the back and to the wall after the stand is positioned. A quick reference table of what to expect while assembling follows for clarity:
| Task | Typical experience |
|---|---|
| Unpacking | Multiple bags, labeled parts; take inventory before starting |
| Legs & leveling | Threaded metal legs adjust for floor unevenness; start by hand |
| sliding doors | Attach track, hang doors, then fine‑tune alignment |
| Final placement | Small screws for back panel and anti‑tip kit installed after positioning |
How It Lives in the Space
Over time you notice how the Wampat 70″ Farmhouse TV Stand with Mesh Doors, Antique Brown & Black folds into the room’s habits, not as a statement but as a place where small things gather and mornings begin. In daily routines it takes the light differently, picks up the faint scuffs of hands and cups, and settles into the quieter corners of use. You come to expect its quiet presence in regular household rhythms — where space is arranged, where comfort happens, where surfaces quietly show the marks of being lived on.And after a while it stays.