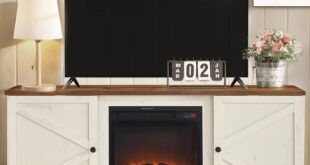
decordip Garden and patio decoration inspiration
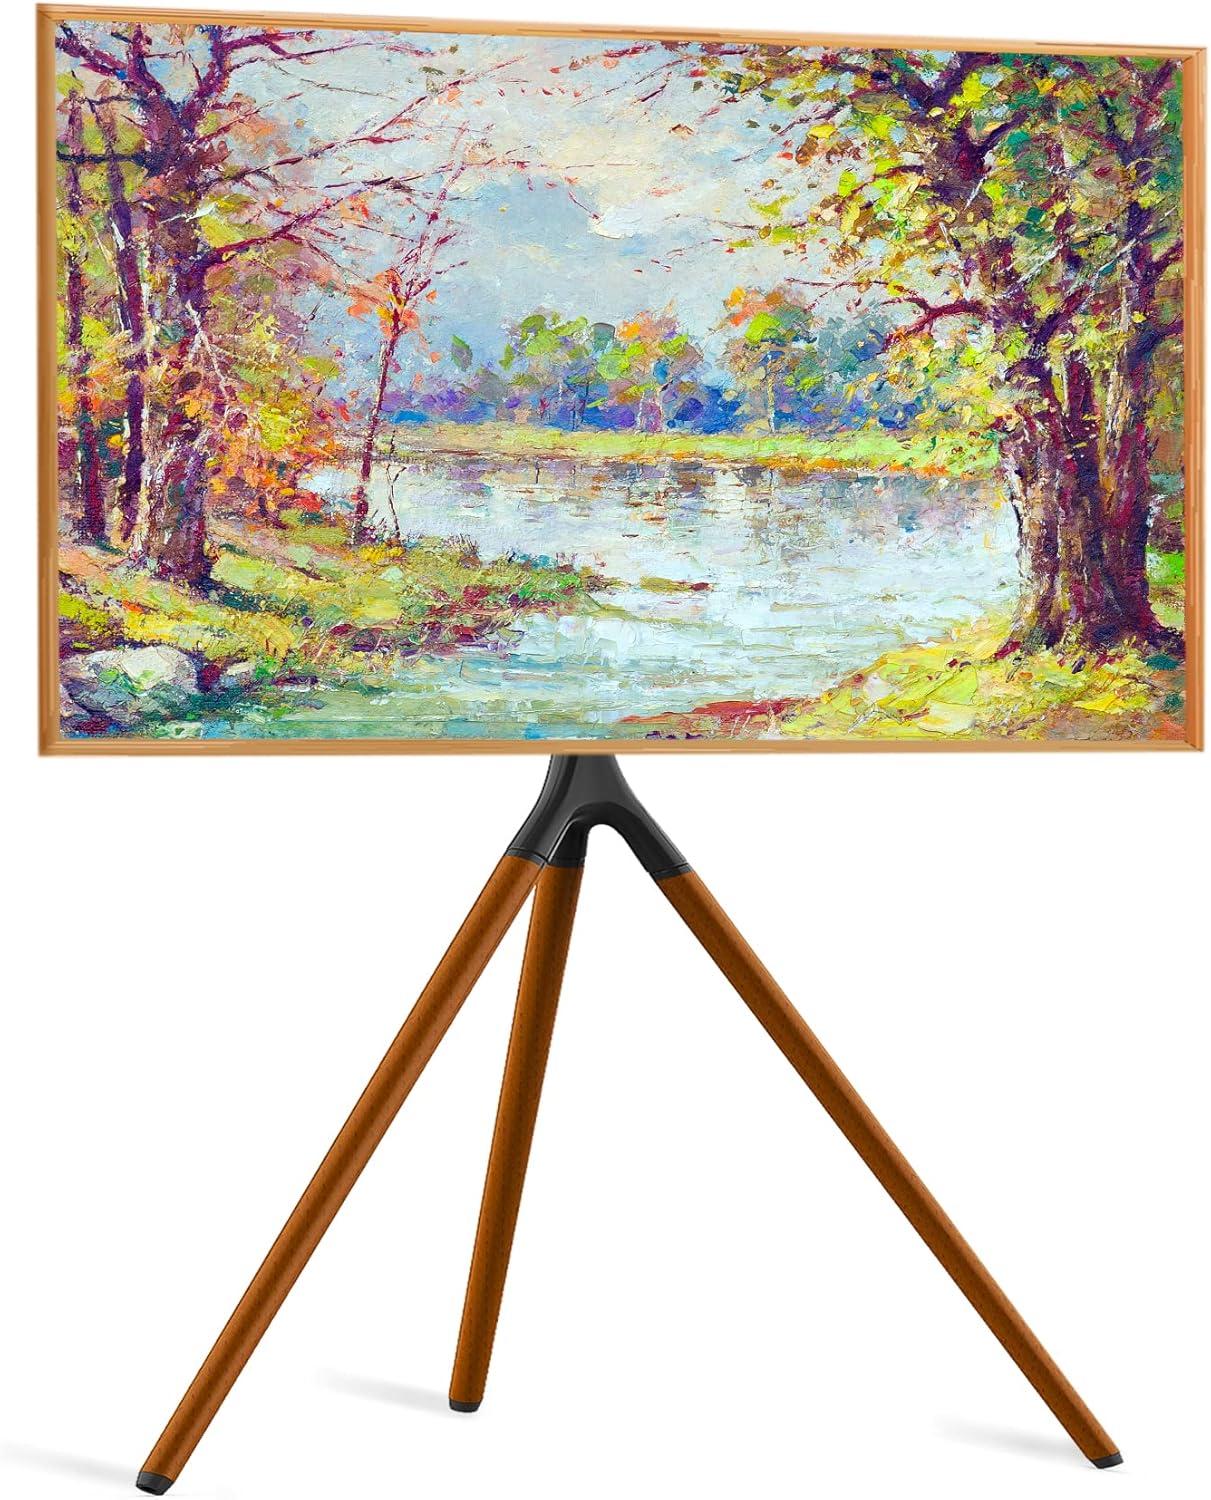
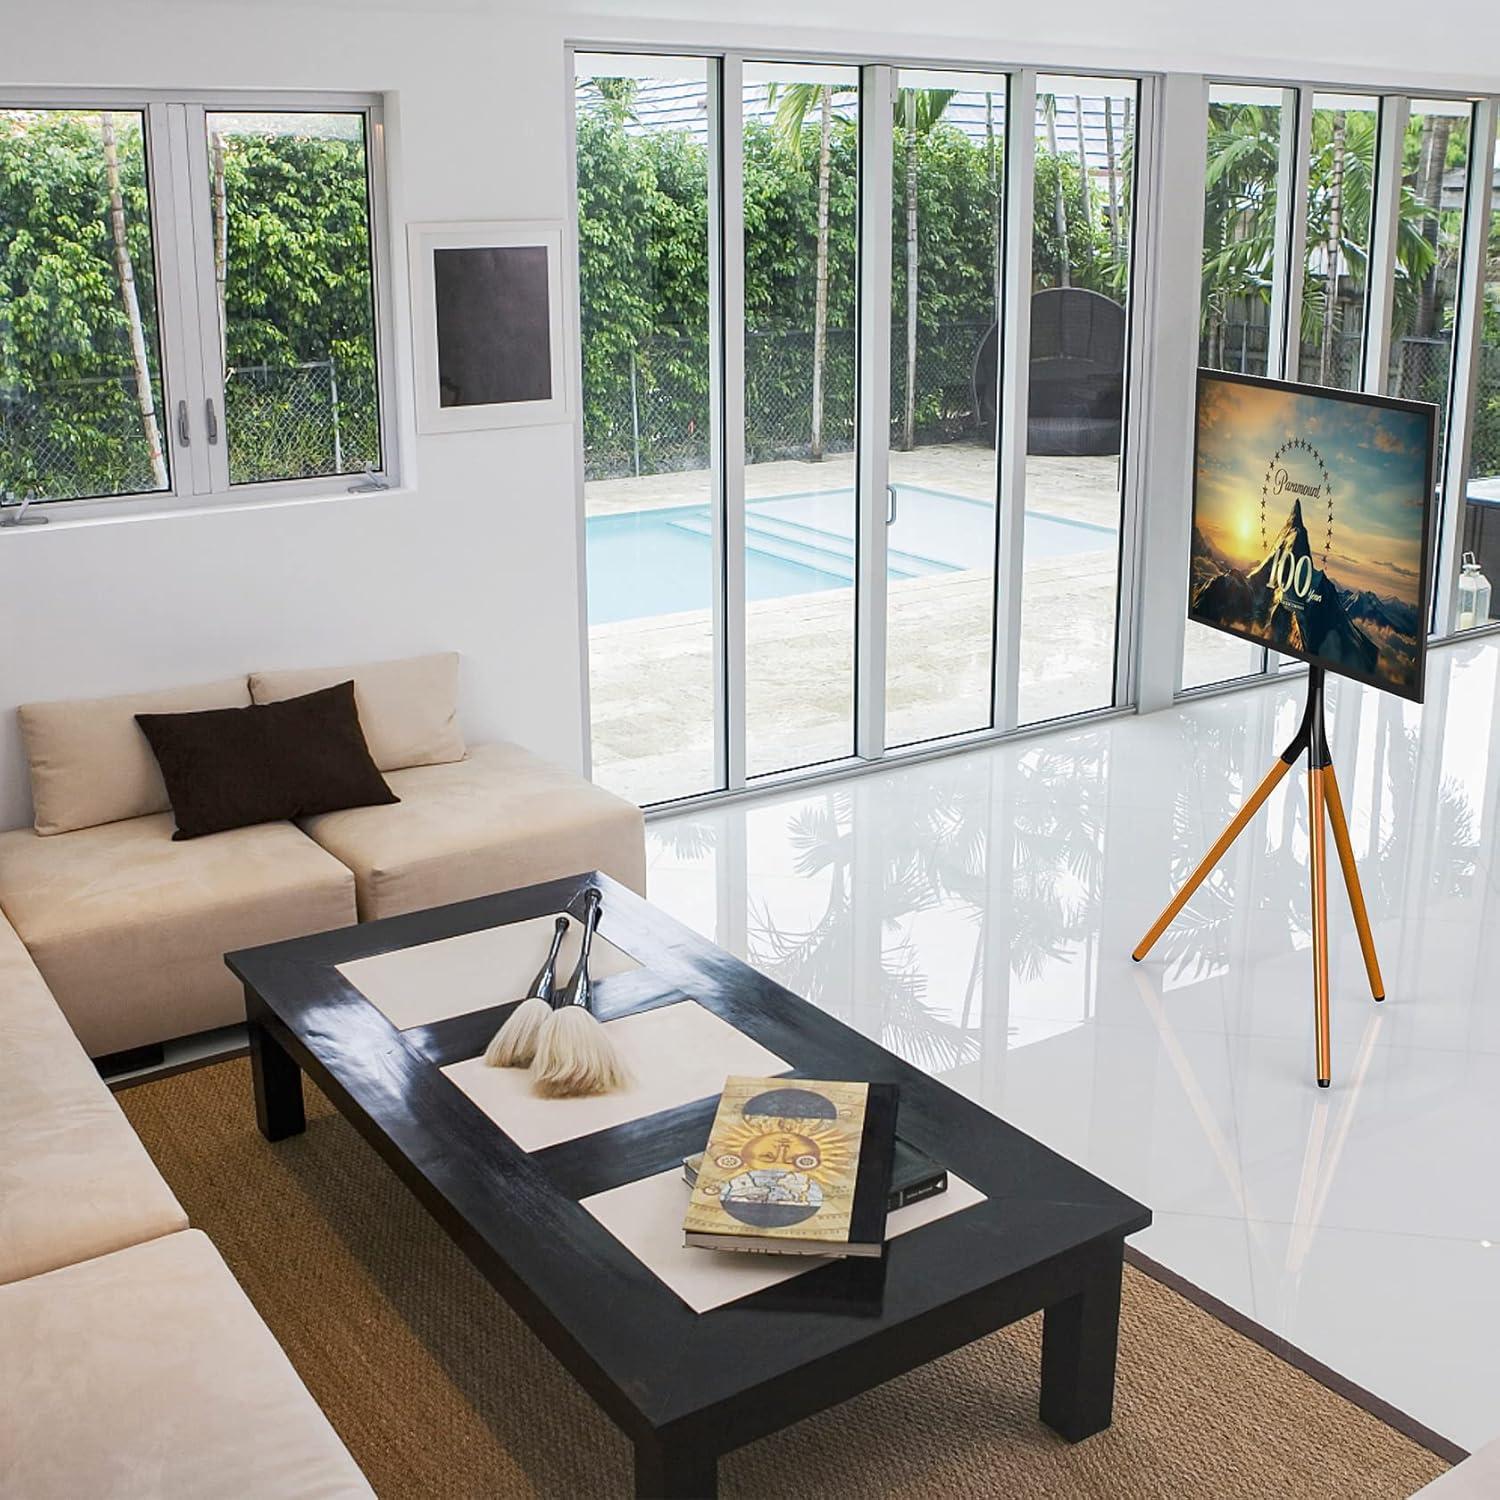
caught by the silhouette first: three wooden legs splay like a painter’s easel, their matte beech finish warming the black metal spine under the living room lamp. You notice the screen seems to float on a slim pole that rises just over four feet, giving the whole piece a light, gallery-like presence rather than the bulk of a cabinet. You can feel the coolness of the steel if you touch the pole and the slight give of rubber pads under each leg when you nudge the base; the tripod reads solid and quietly confident underfoot. You quickly recognize it as the UPGRAVITY Easel TV Stand with tripod Base, though you’d probably just call it the easel stand when pointing it out to someone. Swiveling the screen is effortless and the bundled cable ties keep the rear leg from becoming a messy spine, so from where you’re sitting the setup looks intentional and lived-in, not staged.
When you unbox the easel TV stand and take in the parts
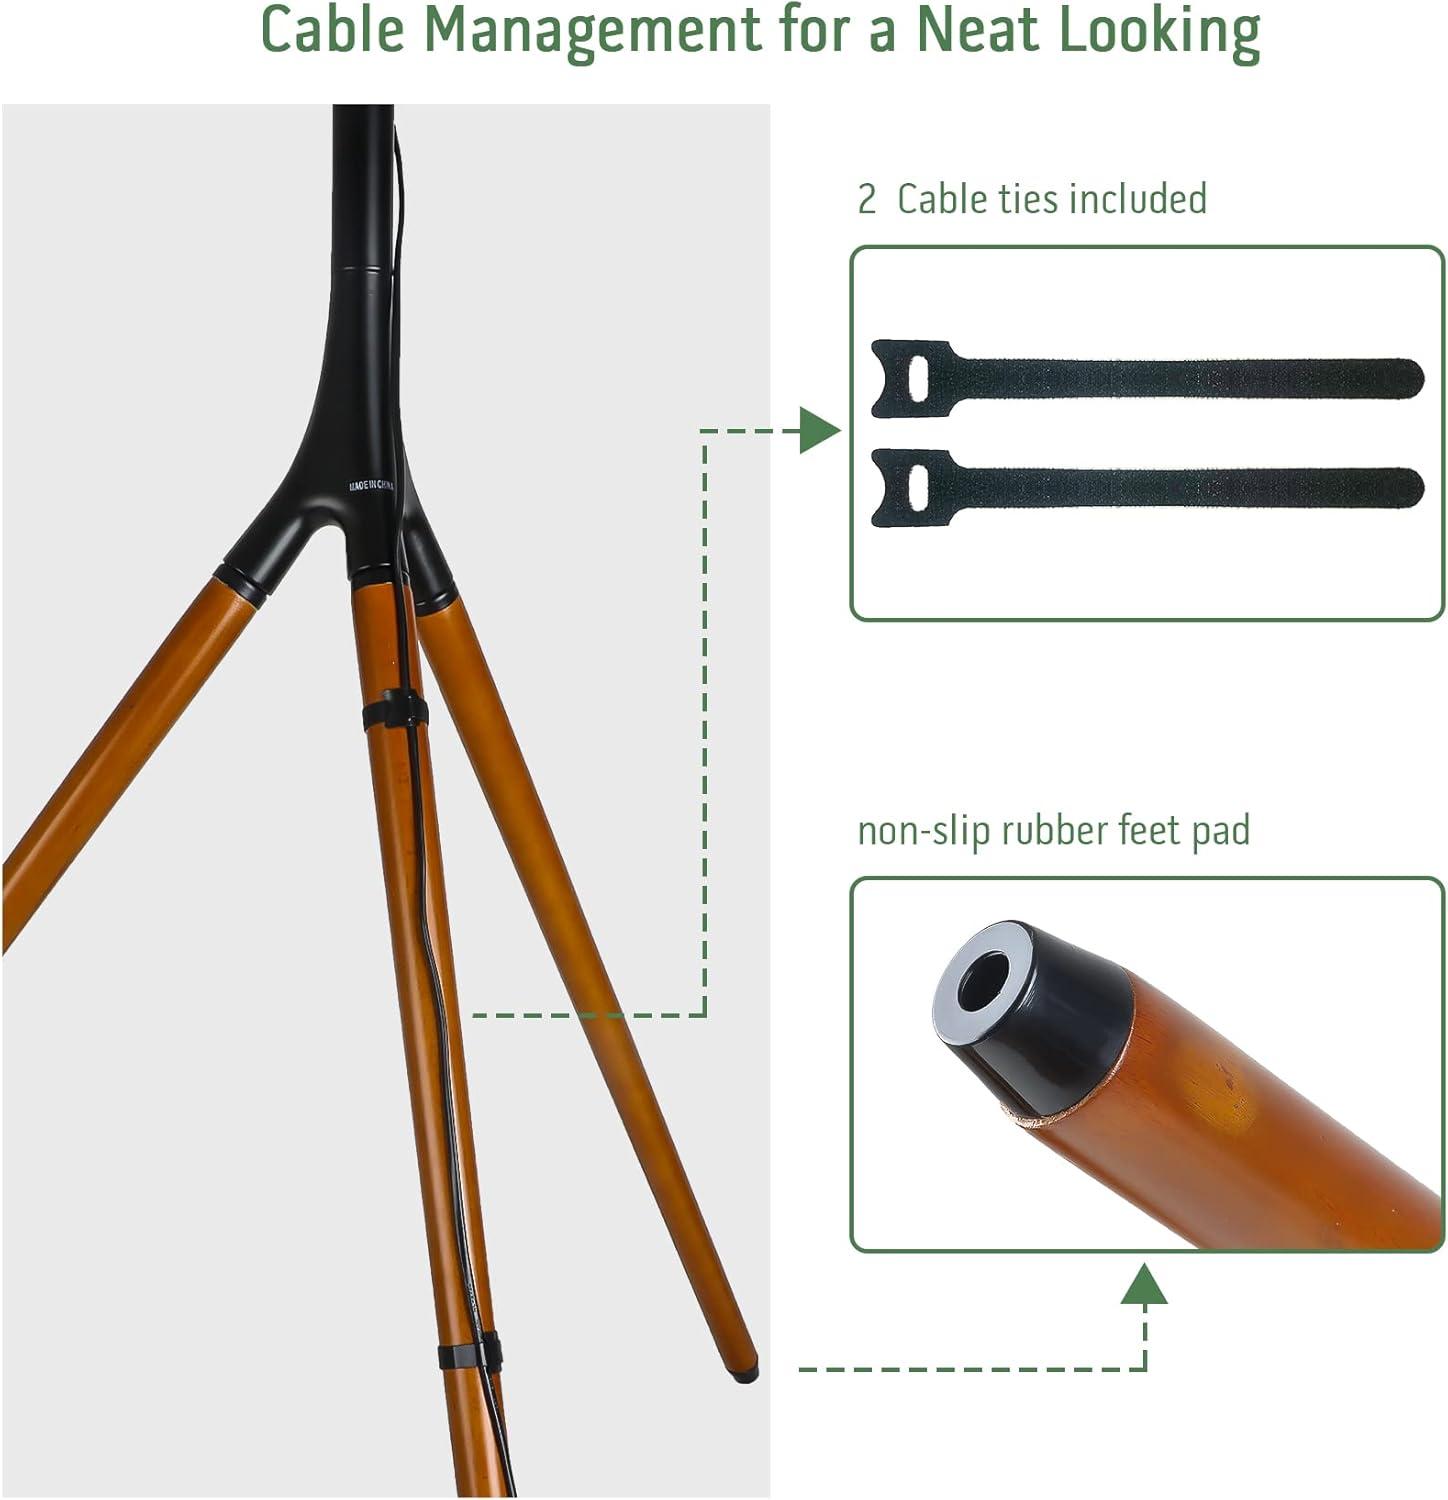
When you slice open the shipping tape and lift the cardboard lid,the first thing you notice is how the interior is organized: foam blocks and corrugated inserts keep the larger pieces separated,and most of the small parts are tucked into clear,labelled plastic bags.The wooden legs sit side-by-side, each wrapped in a thin protective sleeve that lets you glimpse the matte finish without exposing the surface to scuffs. A separately wrapped metal pole and a flat mounting plate are laid flat across the top, and the instruction sheet lies on them; the paper includes exploded diagrams so you can match bag numbers to parts. there’s a faint factory smell from the wood and packing materials, and once you start moving pieces around you find that a few tiny components — like washers and short screws — are affixed to the inside of a leg or bundled in their own packet so they don’t get lost during transit.
Out of the box, the components are straightforward to inventory.
- Wooden tripod legs — wrapped, each labelled with a position mark
- Center pole — one finished metal tube in its own sleeve
- Mounting bracket and plate — flat pieces wrapped together
- Hardware bags — assorted screws, bolts, washers and an Allen key in separate sealed packets
- Cable management kit — plastic cable ties plus two Velcro straps in a small pouch
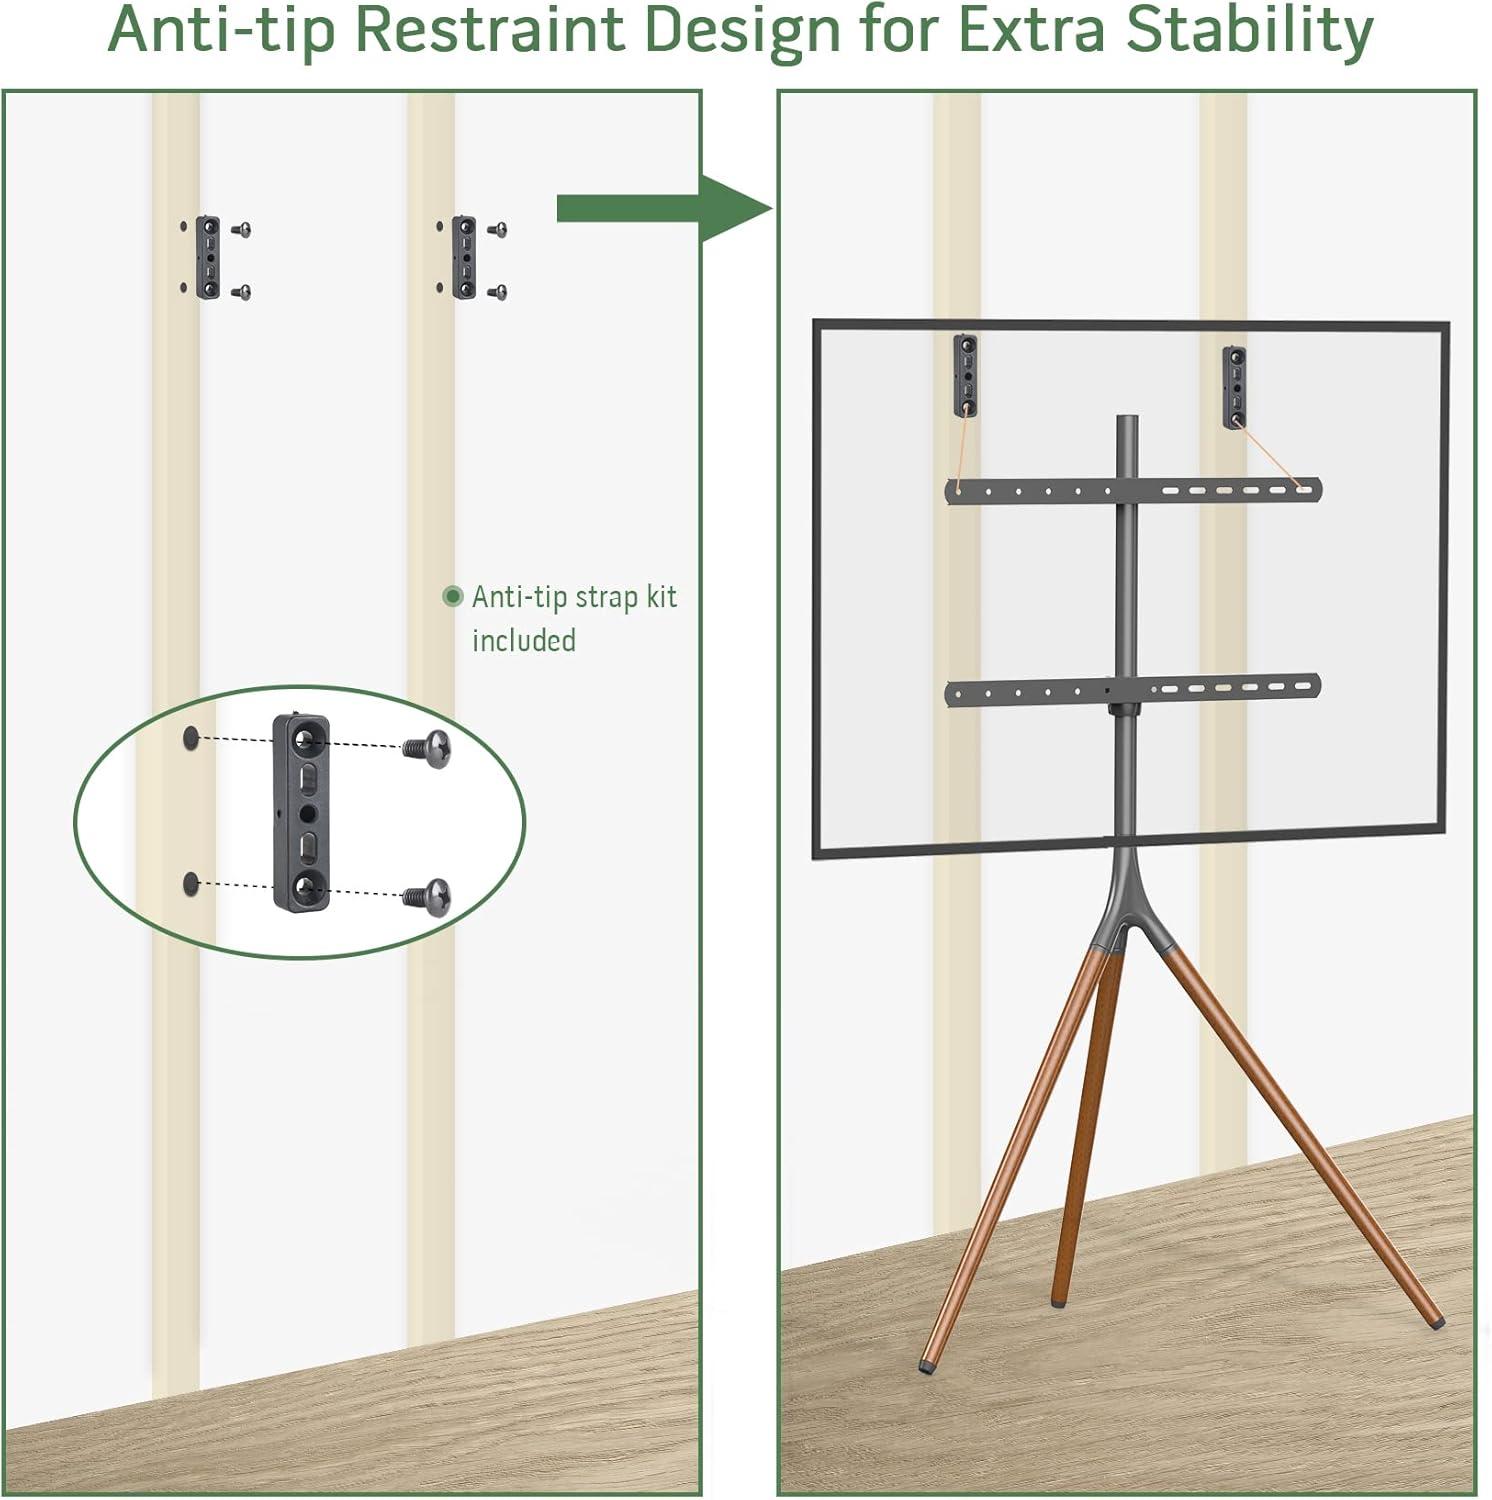
- Anti-tip strap — coiled in a clear bag with its anchor hardware
| Item | Appearance / Note |
|---|---|
| Legs | Foam-sleeved, labelled for left/center/right; finish visible through sleeve |
| Pole | Wrapped metal tube with snap-collar pre-attached in most cases |
| Mounting plate | Flat, protected between cardboard; hardware mounting holes visible |
| Hardware packets | Separated by type and stickered with small symbols matching the diagrams |
| Cable ties & Velcro | Two Velcro straps and several plastic ties in a single pouch |
| Anti-tip strap | strap, anchor screws and a small instruction slip together |
How the tripod silhouette and matte black finish sit in your living area
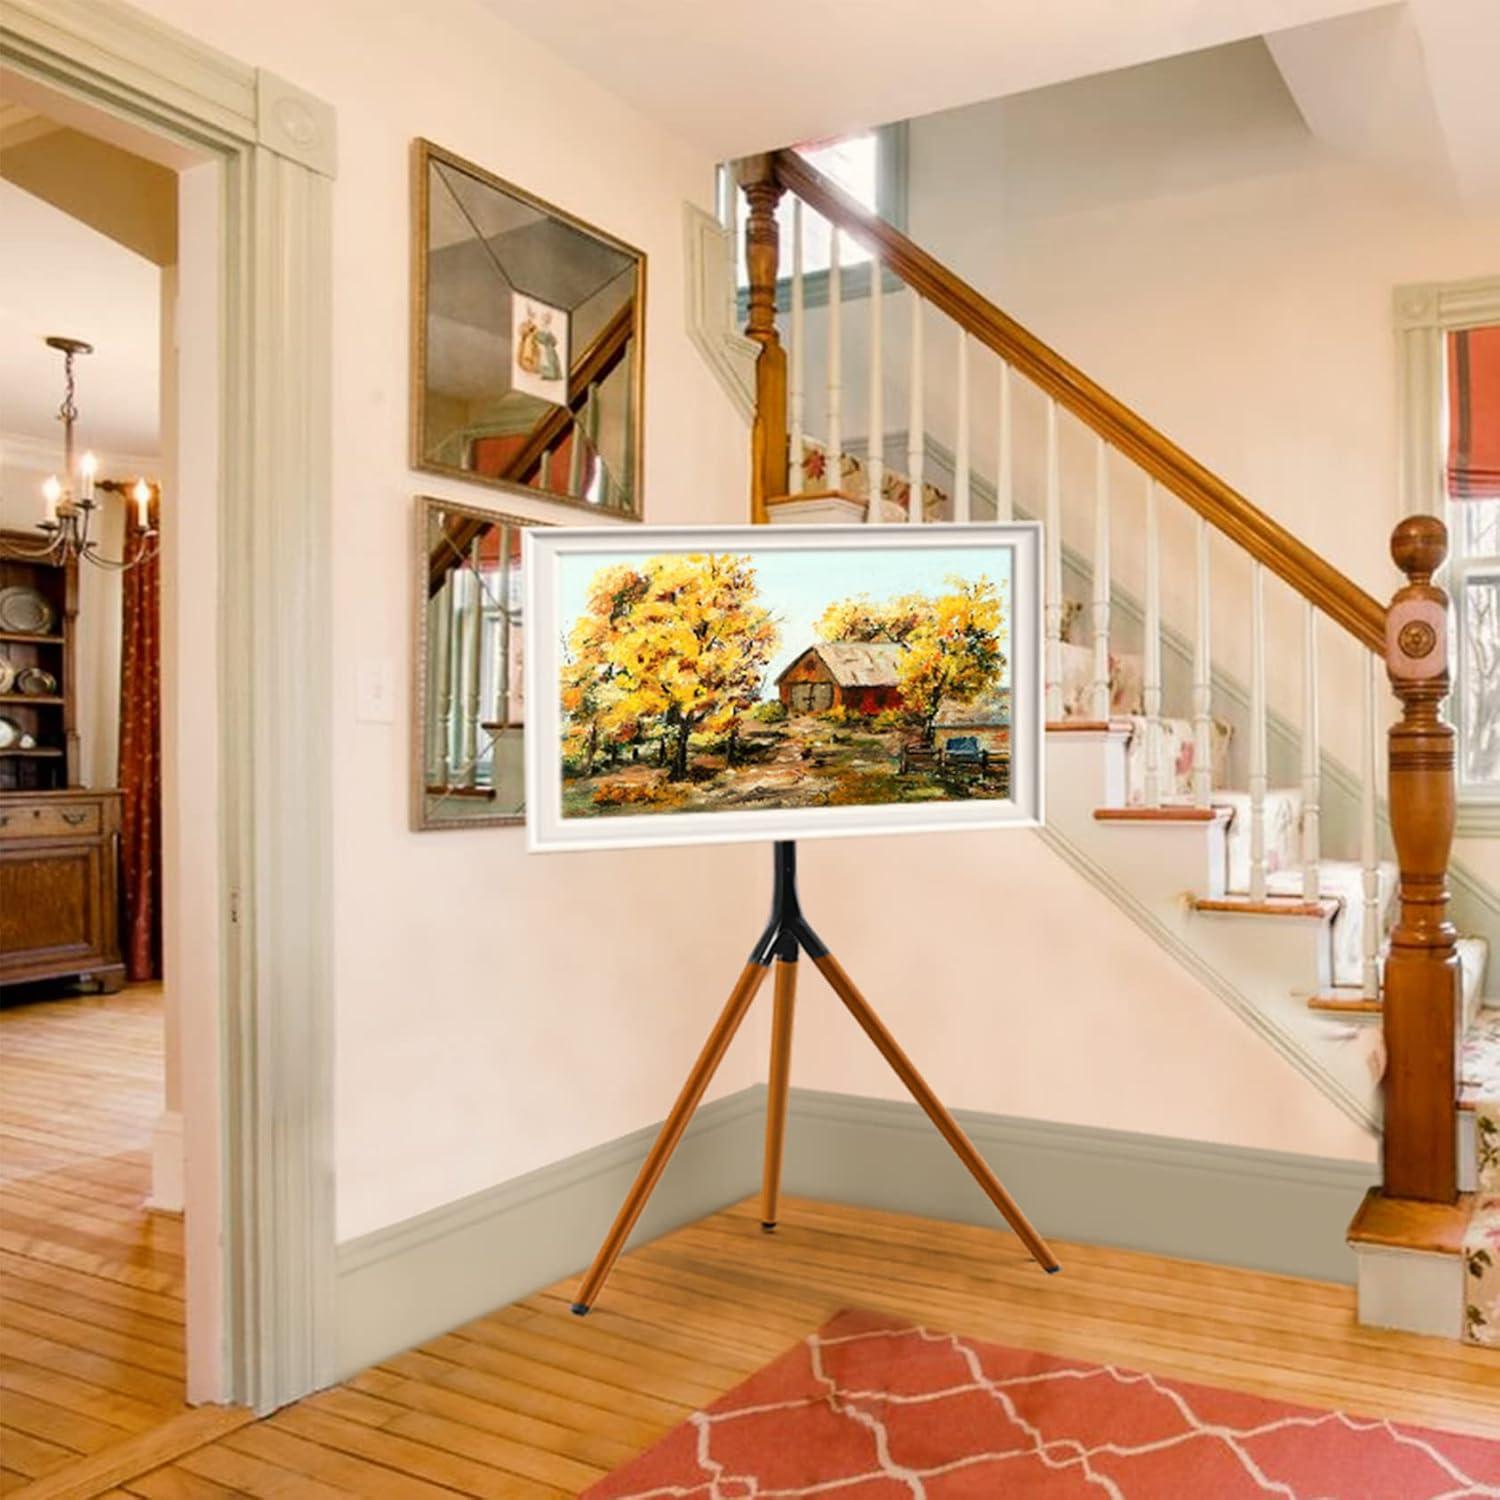
The stand’s tripod silhouette reads like a piece of furniture rather than a tech appliance: three slender legs lift the screen so it reads vertically and leaves the lower sightline open, which lets other elements—bookshelves, a rug, or a console—remain visually present. The matte black finish tends to absorb reflections,so the screen feels less like a glowing box in daylight and more like a framed image; under softer evening light the finish looks velvety and the wooden grain comes through in subtle patches. When you move around the room the easel-like profile changes its presence quickly—most frequently enough it recedes into a corner, occasionally asserts itself as a sculptural anchor if placed against a pale wall.
Observed behaviors and small trade-offs emerge over days: the finish can hide glare but can also make dust or light fingerprints more noticeable in high-traffic areas, and the tripod’s shadow patterns shift with time and lamps. some typical visual outcomes include:
- across the room — the stand reads as a slim vertical element that doesn’t block sightlines.
- Near a window — reflections are reduced, but the finish can show dust more readily in bright daylight.
- Against patterned walls — the black silhouette provides contrast that emphasizes the shape rather than surface detail.
| Lighting | Visual effect |
|---|---|
| Bright natural light | Reduced glare, finish appears flat; dust more visible |
| Warm evening lamp | Finish softens, legs read as warm accents |
How the frame materials and fastening hardware feel to your touch

You’ll notice the wooden tripod legs feel different from the metal parts the moment you lift or steady the stand. The beechwood has a matte, slightly dry surface that reads warm under your palms and gives a faint grainy texture when you run a finger along it. The central pole and mounting plate are cool to the touch; the powder-coated steel finish mutes fingerprints and feels smooth but not glassy, with the occasional millimeter of raised paint at welds or joins where your fingertips catch. Where the metal meets wood there are rounded transitions rather than sharp edges, and the rubber end pads have a soft, slightly tacky surface that grips as you press down.
- Snap collar: a short, audible click and a firm notch when you set height.
- Mount bolts: chunky, coarse threads you feel as they bite in when tightened.
- Allen key: snug engagement in the hex sockets with a little resistance before it turns.
- Cable ties / straps: fabric velcro is rough and pliable; plastic ties are stiff until cinched.
| Component | Tactile impression |
|---|---|
| Beechwood legs | Matte, warm, fine grain under fingertips |
| Steel pole & mount | Cool, smooth powder coat with slight raised seams at joins |
| Screws/bolts & washers | Metallic, solid; threads feel defined and require steady torque |
| Rubber feet & straps | Slightly tacky pads; straps range from flexible velcro to firm woven webbing |
When you handle the hardware during assembly you get a clear sense of tolerances: sockets and bolts fit closely, so you often need to hold one side steady while turning the other, and the snap-lock collar gives a reassuring tactile stop as it seats. Small imperfections — a rough bit of casting on a washer or a tiny paint burr — can be felt if you’re running your fingers over the joins, but most contact points are finished so that adjustments and routine interactions feel deliberate rather than fiddly.
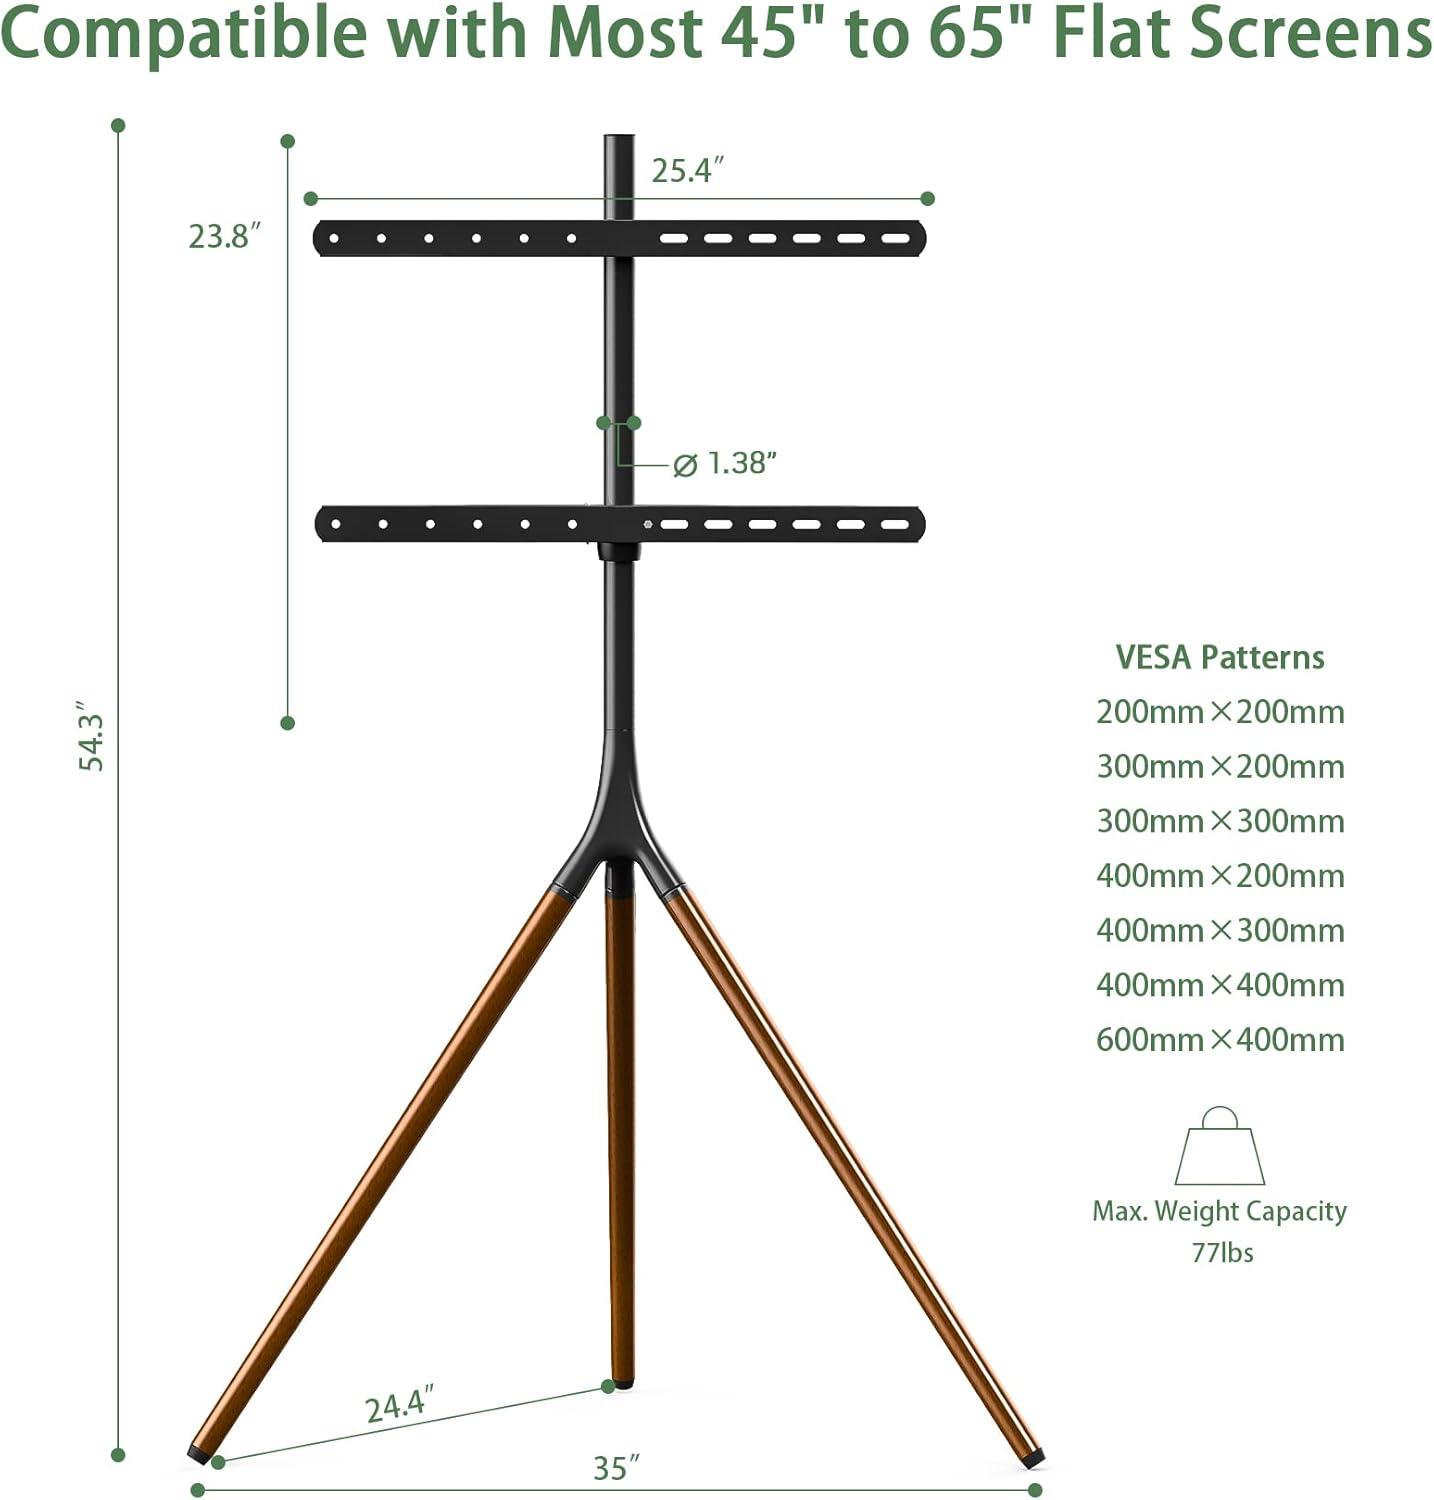
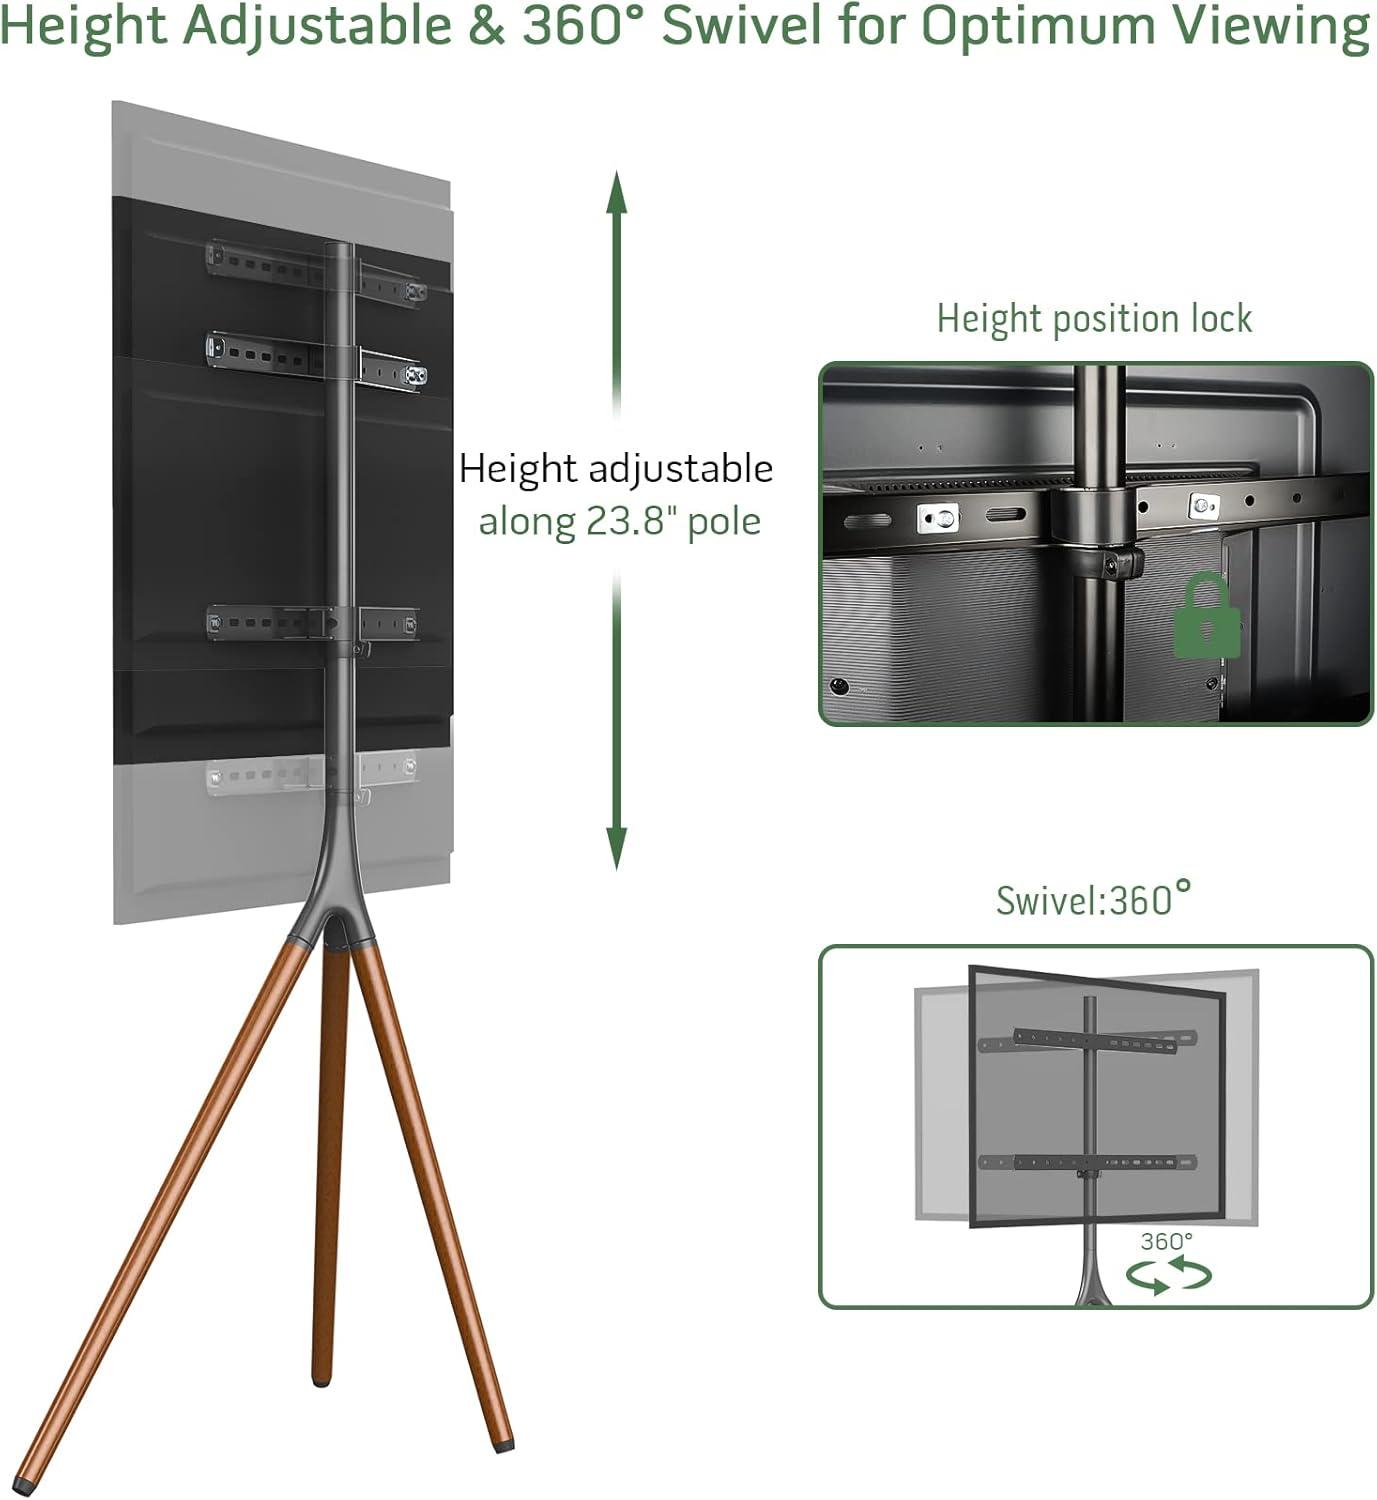
How height adjustment, bracket compatibility, and overall dimensions relate to your screen
When you actually set the screen on the tripod, the interaction between the height adjustment, the mounting bracket, and the screen’s size becomes something you notice in small, practical ways.Raising or lowering the collar shifts the TV’s optical center relative to your seating — for a given eye level you may find yourself nudging the collar a few times until the top edge “feels” right from the couch. The bracket’s VESA pattern and where its arms attach to the TV also change how the screen sits on the pole: a wider or offset pattern can put the panel a hair farther from the central post or rotate its center slightly higher or lower than expected. And because the mount swivels, a position that looks correct head‑on can feel different when you turn the screen toward a side chair; you’ll catch yourself making minor height tweaks after moving the viewing angle.
Those same small adjustments are compounded by the stand’s footprint and the screen’s overall dimensions, so take a moment to picture clearance and cable routing while you tweak. The tripod legs and overall height mean the TV won’t sit in exactly the same plane as a wall mount, and you’ll often need extra cable slack if you move the panel up or down during setup. In everyday use you might notice routines forming — nudging the height when guests sit in a different spot, or loosening cable ties to raise the set for a movie — rather than a one‑time measurement. Below is a simple reference of common, observed tendencies as screen size increases:
| Screen size (approx.) | Common adjustment behavior |
|---|---|
| 45″–50″ | Tends to be mounted slightly higher so the center aligns with seated eye level without crowding the base |
| 51″–59″ | Often requires iterative height and swivel tweaks to balance top‑edge visibility and leg clearance |
| 60″–65″ | May sit lower on the pole to keep the top from feeling too close to the ceiling; cable slack and bracket reach are more noticeable |
How the swivel movement and cable ties behave as you move and set up viewing angles
When you pivot the screen to change where you’re watching from, the mount moves through a broad, continuous arc rather than clicking between set stops. In practice that means you often rotate the display with a single hand and then make small, incidental nudges to fine‑tune the angle from a seated position. The motion feels steady for most adjustments; at wider angles you may notice a gentle resistance as the whole assembly shifts, and there are moments when you steady the panel with one hand while using the other to turn it slowly so the image settles exactly where you want it. As the display swings around the rear leg, the way cables hang behind the stand changes as you swivel, so your routine of small re‑adjustments tends to include a quick look behind the screen now and then to keep lines tidy or to prevent a loop catching on the leg.
The cable ties and straps act like a simple tether system that changes how the wire bundle behaves when you move the TV.Tying the cables tightly keeps them from slapping against the floor, but it also creates a fixed pivot point that can pull slightly when you swivel; leaving more slack or using the velcro straps lets the bundle follow the screen more freely, with a loose loop absorbing the turn. Typical behaviors you’ll notice include:
- Tightly bound zip‑tie: the wiring stays flush to the leg but can transmit a small tug to the screen as you rotate.
- Velcro strapped with slack loop: the cables shift smoothly and the loop takes up most of the motion, so there’s less pull at intermediate angles.
- Loose, unbundled cables: they tend to sway or brush the tripod base during larger rotations and may need occasional repositioning.
- Routed behind the leg with extra length: the extra length usually prevents tension at extreme angles, though it can form a visible loop that you might want to tuck or trim later.
These patterns vary a bit depending on cable length and how often you change angles, so you’ll find yourself adjusting fasteners over time to match how you actually move the screen.
Suitability for your setup: expectations versus limitations in everyday use
In everyday use the easel-style tripod behaves like a deliberately minimal piece of furniture: it makes the screen feel visually light and movable, but that economy of form brings small practical trade-offs. The swivel action allows frequent re-aiming of the display when seating arrangements change, though repeated adjustments can mean the mount is nudged out of true center on occasion and benefits from a quick re‑align. Routing cables along the rear leg keeps sightlines tidy, yet it also concentrates all connections in one place so swapping streaming boxes or game consoles can feel slightly fiddly compared with an open cabinet. The tripod footprint is unobtrusive in a corner, but the spread of the legs sometimes requires shifting adjacent chairs or side tables by a few inches to avoid contact; on uneven or thick-pile rugs a bit of nudging or re-leveling is commonly needed after the stand is moved.
Daily habits around the stand tend to emerge: occasional tightening of the height collar or bracket screws, routine use of the anti-tip strap where there is foot traffic, and a quick check of the rubber feet if the stand gets slid across a floor. Observations collected over several household setups include the following practical notes:
- Cable access: neat appearance from the front, occasional reach-around to access ports behind the screen
- Swivel use: easy to pivot for short-term viewing changes, but frequent full rotations can require small re-centering
- Mobility: lightweight to relocate room-to-room, yet wind or outdoor breezes may make the setup feel less steady when used outside
| Situation | Typical behavior in use |
|---|---|
| Corner placement | Clears sightlines well but can crowd nearby side tables unless legs are adjusted |
| High-traffic rooms | Anti-tip strap is commonly secured; legs can be brushed by passersby |
| Rented spaces | Non-invasive mounting avoids wall holes, though cable routing may be more visible at outlets |
For full specifications and configuration details, see the complete listing here.
When you open the box you’ll notice parts grouped and the small hardware packets separated — taking a moment to lay everything out makes the process smoother. Assembly follows a straightforward sequence: attach each wooden leg to the central column, secure the mounting bracket, fasten the VESA plate to the back of your screen, then lift and hook the screen onto the mounted bracket before tightening the final bolts. A few moments of fiddling are usually spent aligning the TV’s screw holes and slipping cables into the rear leg channel; the included Allen key handles most fasteners but a second pair of hands helps when you’re lifting a heavier panel. In most cases the snap-lock collar for height adjustment is simple to set, and the cable ties tuck neatly into the rear leg as you go, so you end up with a clean back profile without having to stop and chase stray cords later.
- Prep: unpack, sort fasteners, and put the tools nearby.
- legs and column: attach legs first so the stand sits solid while you work on the mount.
- Mounting the TV: fasten the VESA plate to the screen, then lift and secure it to the bracket.
- Cable routing: run cords down the rear leg and use the supplied ties before final tightening.
The tripod base spreads out in a triangular footprint so it occupies a little more floor area than a slim lamp stand; it’s easy to overlook this until you try to walk past with a cup of coffee. Give the sides enough room so the screen can swing through its swivel range without hitting furniture, and leave space behind for the cable run and occasional access to the anti‑tip strap or wall anchor. Keep a little clearance in front and to one side so you can reach the height collar when you want to raise or lower the screen, and watch how rugs or uneven flooring affect stability even with the non‑slip pads. The short table below summarizes which zones around the stand you’ll interact with most and why those clearances matter.
| Area | Why keep it clear |
|---|---|
| Front | Unobstructed sightline and walking path while seated or passing by |
| Sides | Allows full swivel and prevents bumping into the legs |
| Rear | Access for cables, power connections, and the anti‑tip anchor |
| Underneath | Space for cable ties and to protect floors from the leg pads |
How It Lives in the Space
You notice, over time, how the Easel TV Stand with Tripod Base settles into the room’s rhythms rather than standing out, its shape easing into the furniture and the flow of movement. It sits at the edge of attention — a glance during breakfast, a casual reach at night — and the swivel becomes a small, unremarked part of your routines. Light scuffs and dust collect where hands brush and cleaning passes through, cords tuck against its legs, and it takes on the gentle signs of being used as the room is used. in regular household rhythms, you see that it simply stays.