decordip Garden and patio decoration inspiration
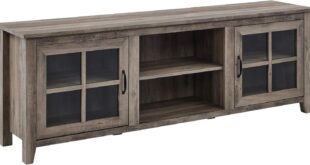
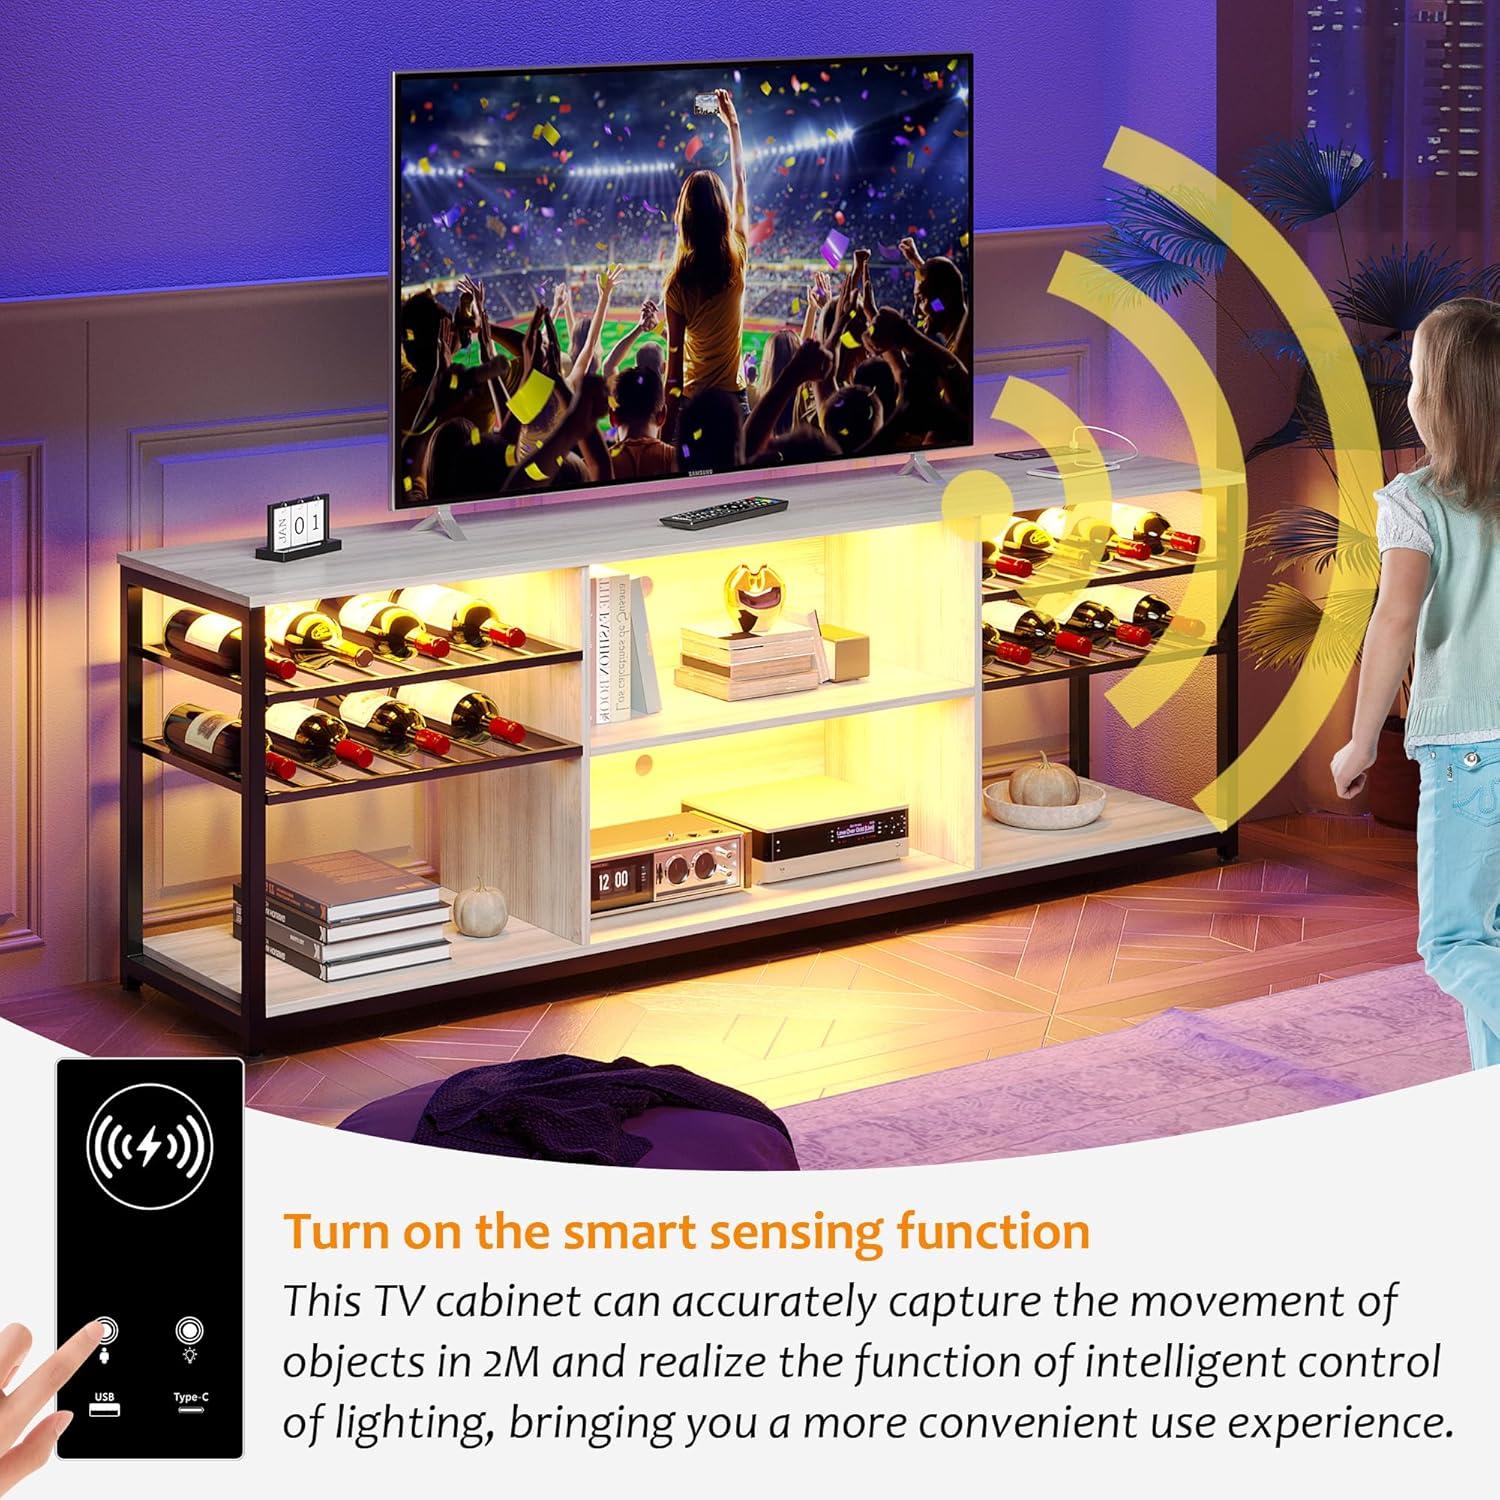
Even before the TV wakes, the SKKTKT LED TV Stand for 75 Inch TV — a gray, industrial-style console — quietly sets the tone. You notice its low, horizontal presence first: broad enough to carry a large screen yet visually grounded by a dark metal frame. Run your hand along the top and the MDF feels smooth and slightly matte; the metal rails are cool where they meet the wood, giving the piece a solid, workmanlike texture. Small details catch you without asking for permission — the wine cubbyholes breaking the shelf line, a wireless pad recessed into the surface, and an LED that flicks on as you step within range. It settles into the room like something meant to be used, not only admired.
Unpacking your 75 inch LED TV stand and a quick first look
When the box arrives it feels dense and layered rather than a single loose parcel. As you slice the tape and fold back the top flaps, a layer of foam and a plastic-wrapped instruction booklet sits on top; beneath that, the largest panels are nested flat with smaller metal pieces and hardware tucked into the corners. Most visible faces are protected by a thin film and corners have foam blocks or cardboard braces, so the first impression is of parts kept from rubbing against each other. A faint cardboard scent and the slight drag of protective wrap are the first sensory cues; after spreading the contents out on the floor you’ll notice stickers or part numbers on edges that make identification easier without diving into assembly steps.
On a quick visual pass you can spot pre-drilled holes, labeled brackets, and cutouts for cables and electronics—these features make orientation obvious before any tools are used. Hardware is bagged and often labeled, though a small packet sometimes hides behind a panel; a brief inventory prevents a pause later. The LED strip, sensor module and power lead typically arrive in a separate sealed pouch so they don’t tangle with screws, and leveling feet or glides are inside a small bag. Below is a simple checklist of what usually appears in the box so you can confirm contents at a glance:
- Instruction packet & tools: manual, Allen key, labeled screw bags
- Panels & frames: top panel and the main shelf/side pieces wrapped
- Electrical components: LED/sensor assembly and power cable
| Item | Typical count / note |
|---|---|
| Instruction manual & hardware bags | 1 packet / screws sorted by type |
| Large panels (top, shelves, sides) | 3–5 pieces depending on configuration |
| Metal brackets & feet | Several pieces in a small bag |
| LED strip & sensor module | 1 sealed pouch |
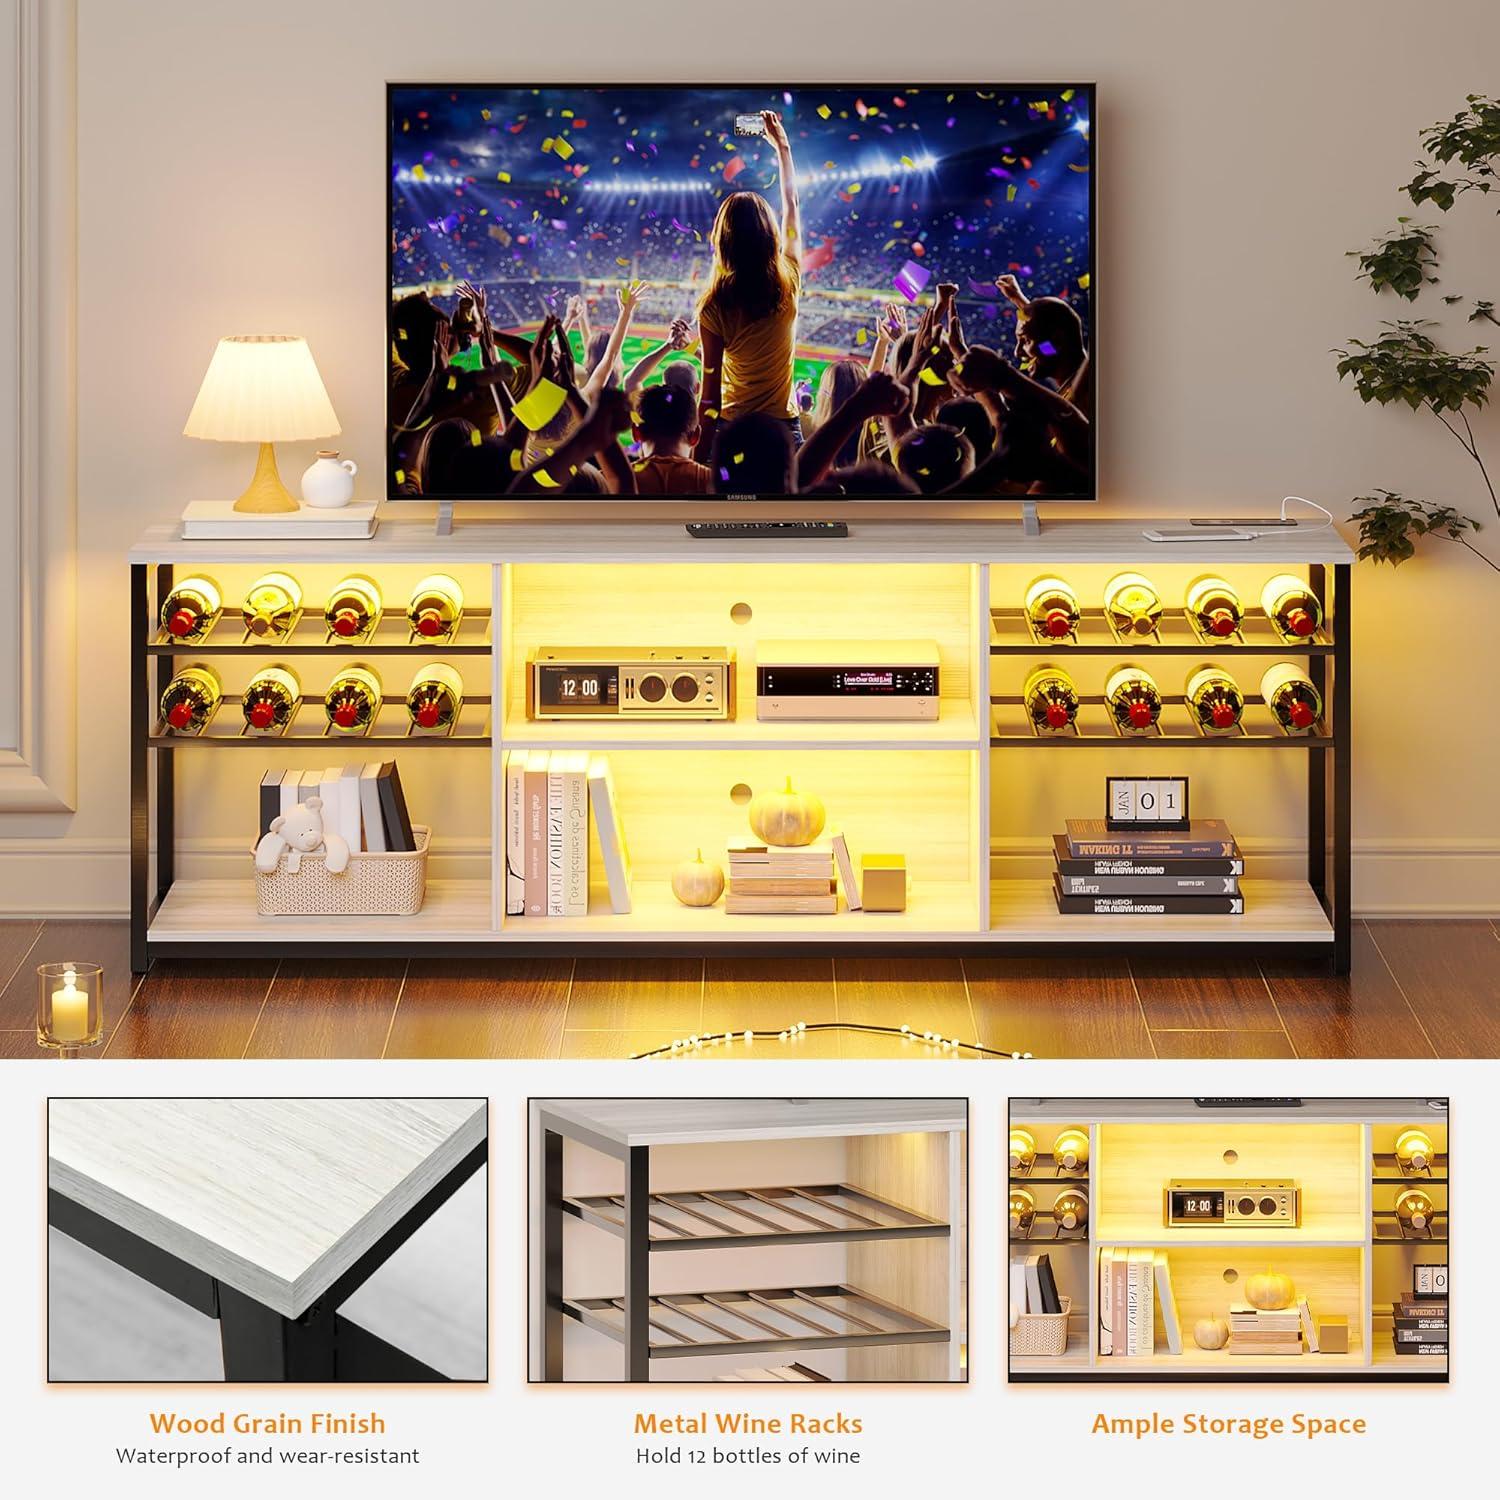
The grey industrial aesthetic and the materials that give it shape
The grey finish reads as intentional and utilitarian rather than decorative: a muted, mid‑tone surface that behaves somewhere between faux concrete and weathered wood depending on the light. Up close the top and shelves show a printed grain and a faintly textured laminate; you can feel the slight difference between that smoother shelf surface and the cool, powder‑coated metal of the frame.Exposed fasteners, right‑angle braces and visible welds supply the industrial cues you notice first from a short distance, and the squared edges and uninterrupted horizontal lines keep the profile restrained. Occasionally you’ll catch yourself aligning objects to those lines—small, everyday moves that underscore how the finish and joinery set a functional mood in the room.
- Grey laminate — subtle grain, matte hand, low reflectivity
- Powder‑coated metal frame — cool touch, visible seams and bolts
- MDF core beneath veneer — smooth top face with a denser, engineered backing
| Material | Where it appears | Visual/physical note |
|---|---|---|
| Grey laminate | top and shelves | Faint wood/concrete print, matte finish |
| Powder‑coated steel | Frame and supports | Uniform grey/black tones, cool to the touch |
| MDF | Panel cores | Stable backing under veneer, concealed in edges |
In practice the palette and materials create a controlled contrast: the matte grey softens the metal’s severity, while the hardware and weld marks keep the overall effect factory‑made. That same pairing brings small trade‑offs — the grey surface can mute brighter decor and tends to mask light dust but reveal scratches more readily, and the metal elements register ambient temperature when you touch them — observations that shape how the piece sits in everyday use.
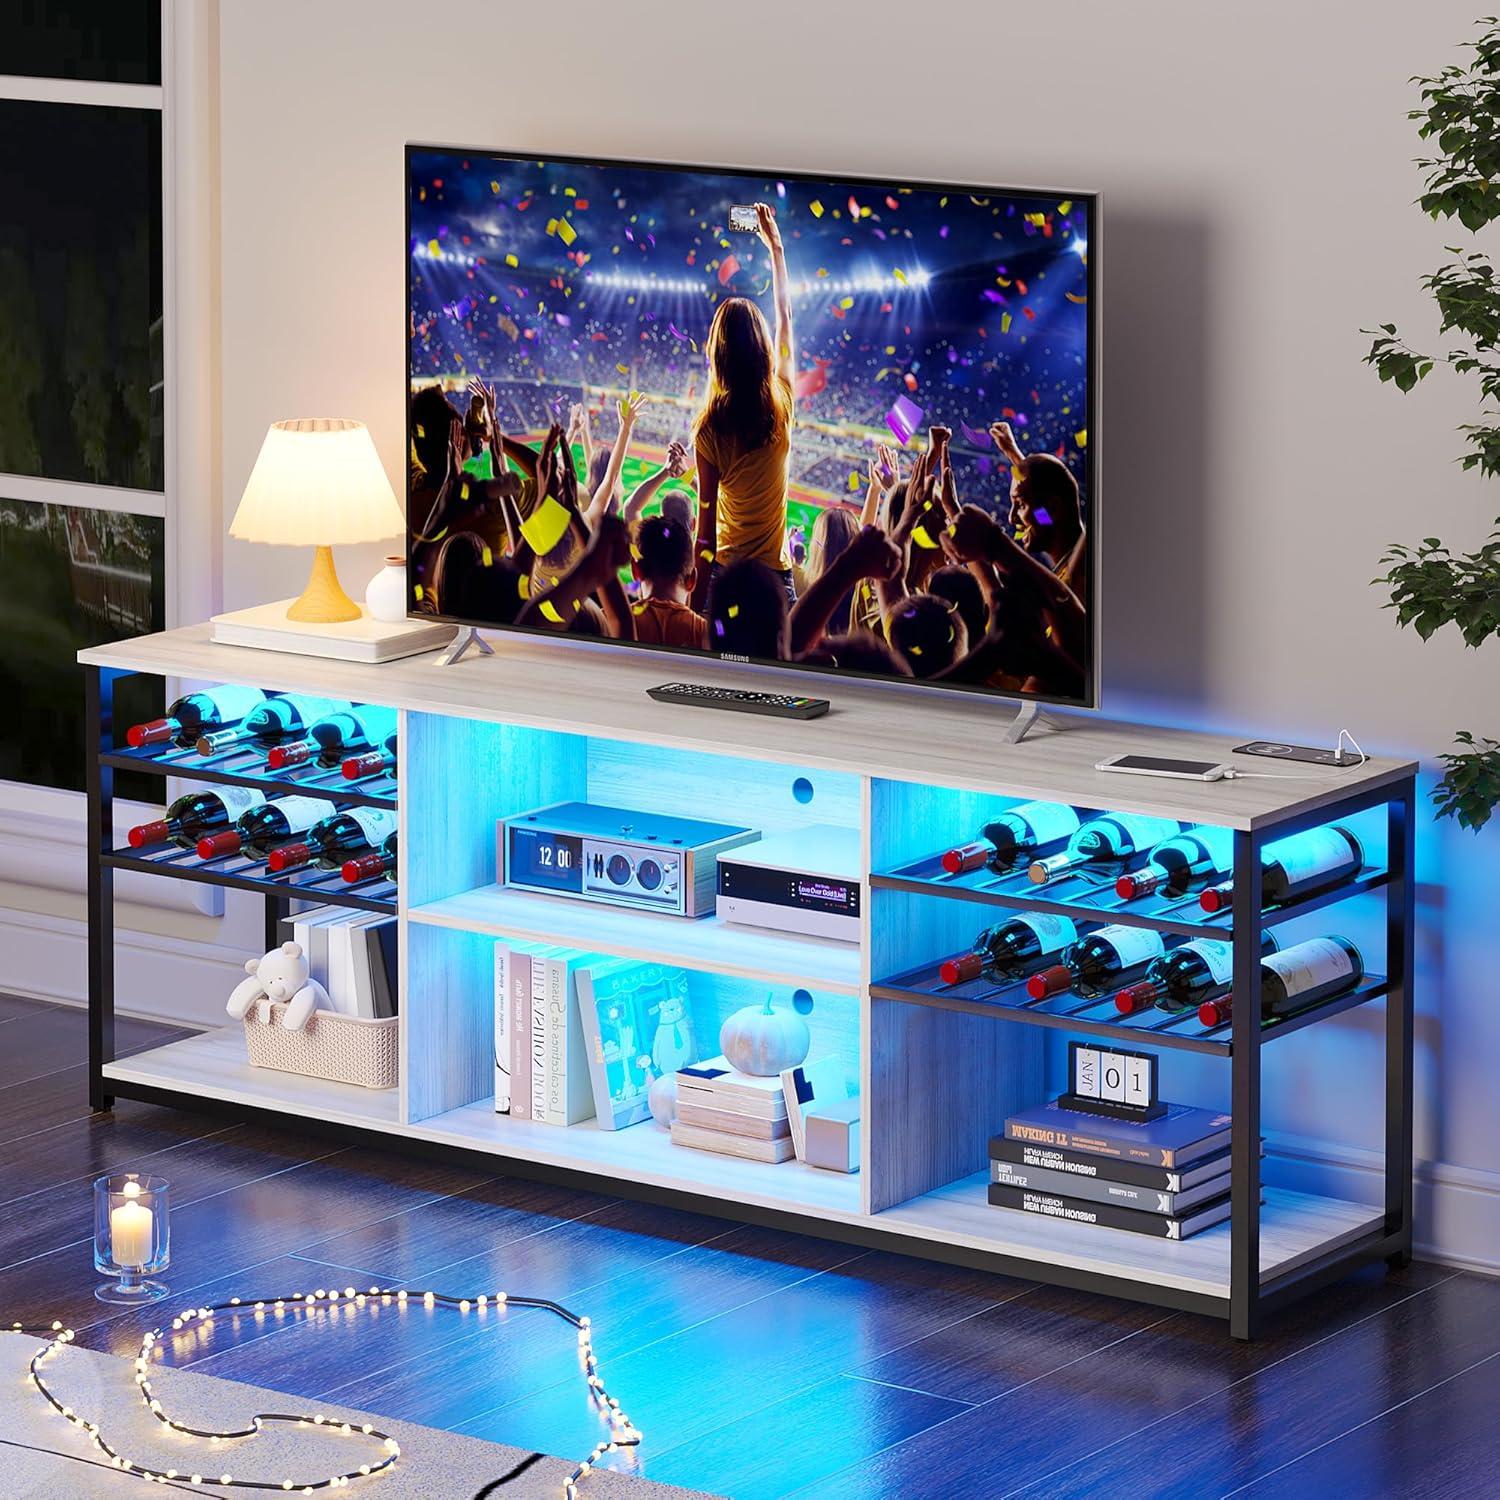
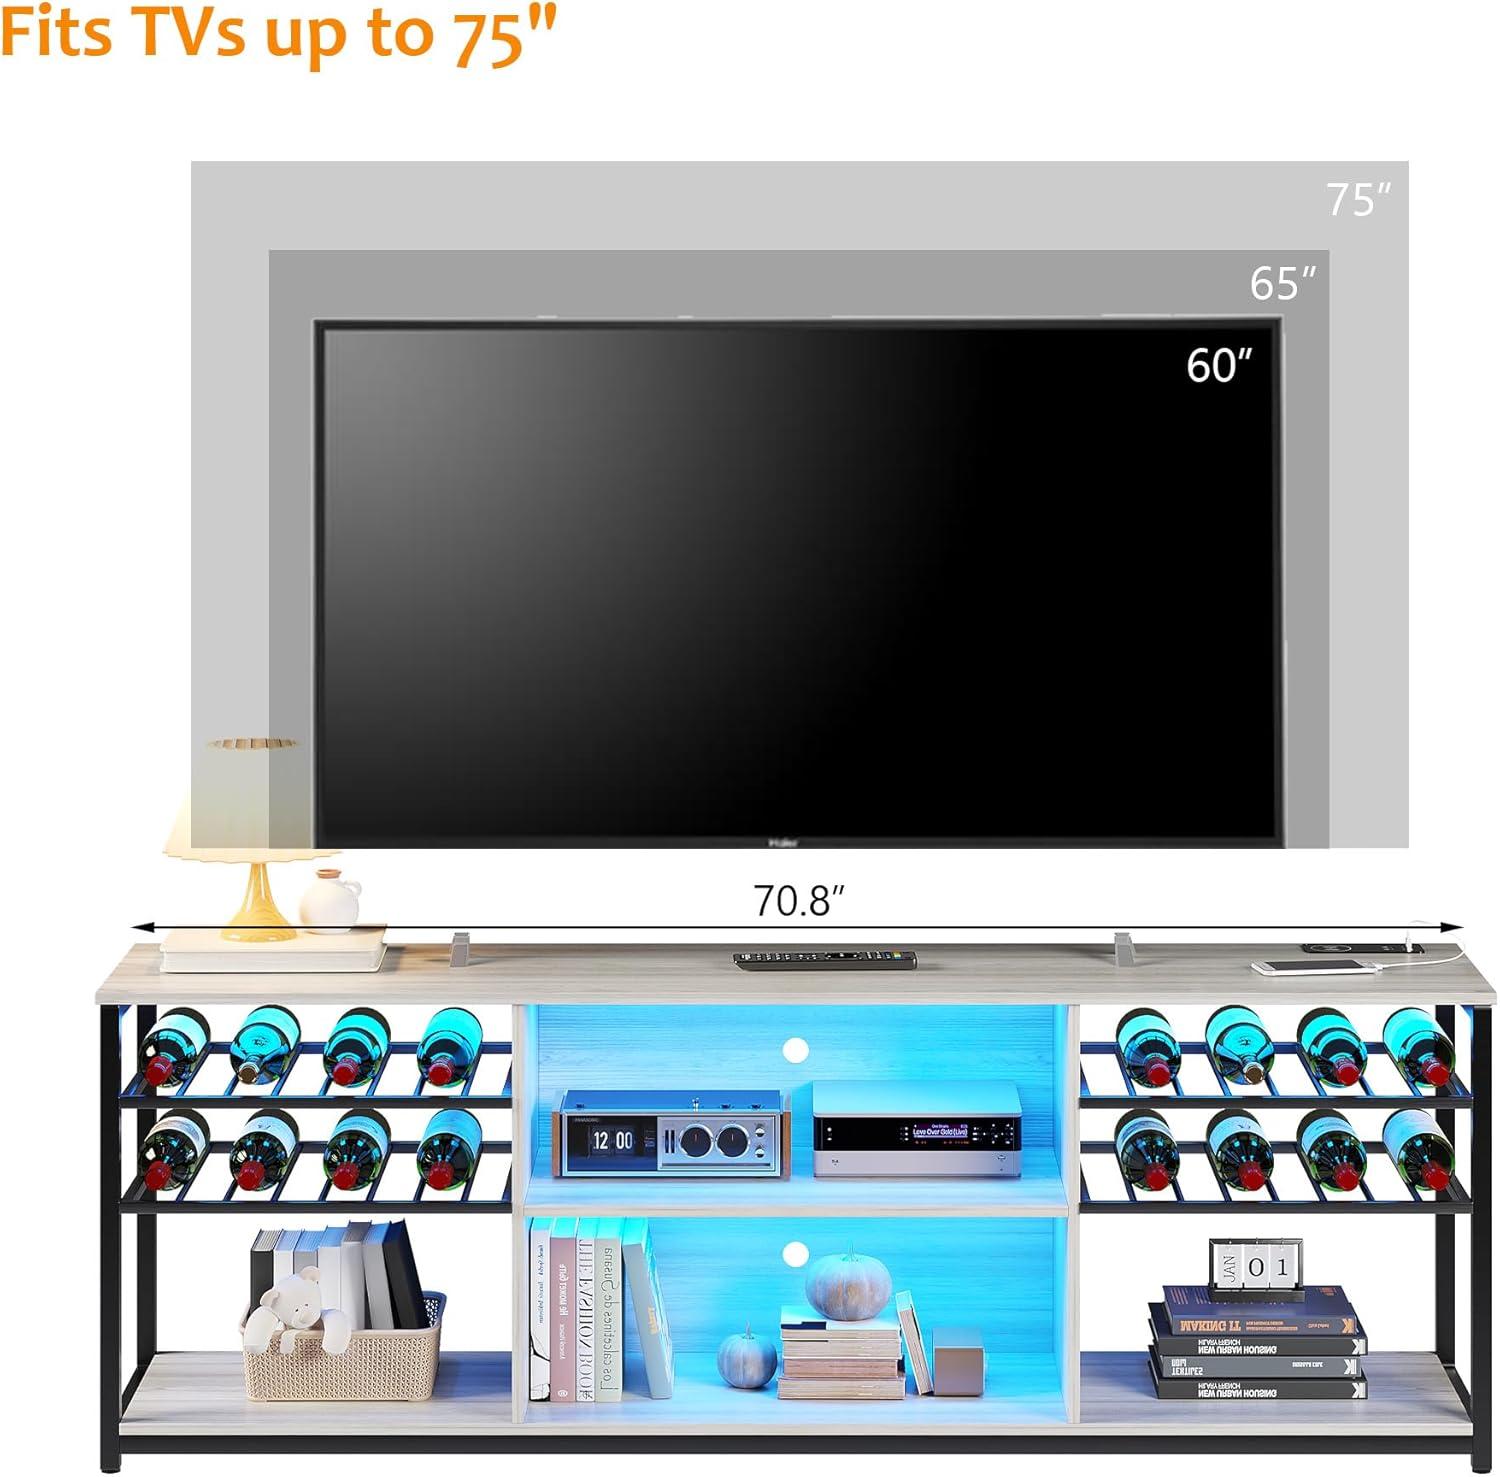
Where it fits in your room: dimensions,TV compatibility,and clearance
The stand’s physical footprint is compact enough for most living rooms while still being built to hold a larger television set; its overall profile is roughly 60–66 inches wide, about 16–18 inches deep and around 24–28 inches high (these are approximate measurements based on similar units and user observations).It is intended to accommodate a 75‑inch screen on the top surface, though reports from some users describe a slight bowing in the center under heavier loads, so allowance for internal support or a modest gap toward the back can be useful. Behind the console, leave a small service corridor: a few inches for cable runs and power plugs, and a bit more if a wall outlet or surge protector sits directly behind the cabinet. The adjustable feet help with minor leveling on uneven floors, and the light and charging features sit flush enough that they don’t require additional clearance above the unit.
| Measurement | Typical value (approx.) |
|---|---|
| Overall width | ~60–66 in |
| Depth (top shelf) | ~16–18 in |
| Height | ~24–28 in |
| TV compatibility | Up to 75 in (top-surface placement) |
| Recommended rear clearance | 3–6 in for cables and ventilation |
- Front-to-screen distance: standard viewing distances for a 75‑inch screen tend to be 8–12 feet,so consider room depth when locating the stand.
- Top-surface loading: allow for a small margin of weight toward the stand’s center; some users have added internal bracing when placing vrey large or heavy TVs.
- Accessory space: a soundbar or tall speakers may need extra vertical room in front of the screen; measure speaker height against the stand’s top-to-eye clearance before final placement.
View full specifications and current configuration details on the product listing
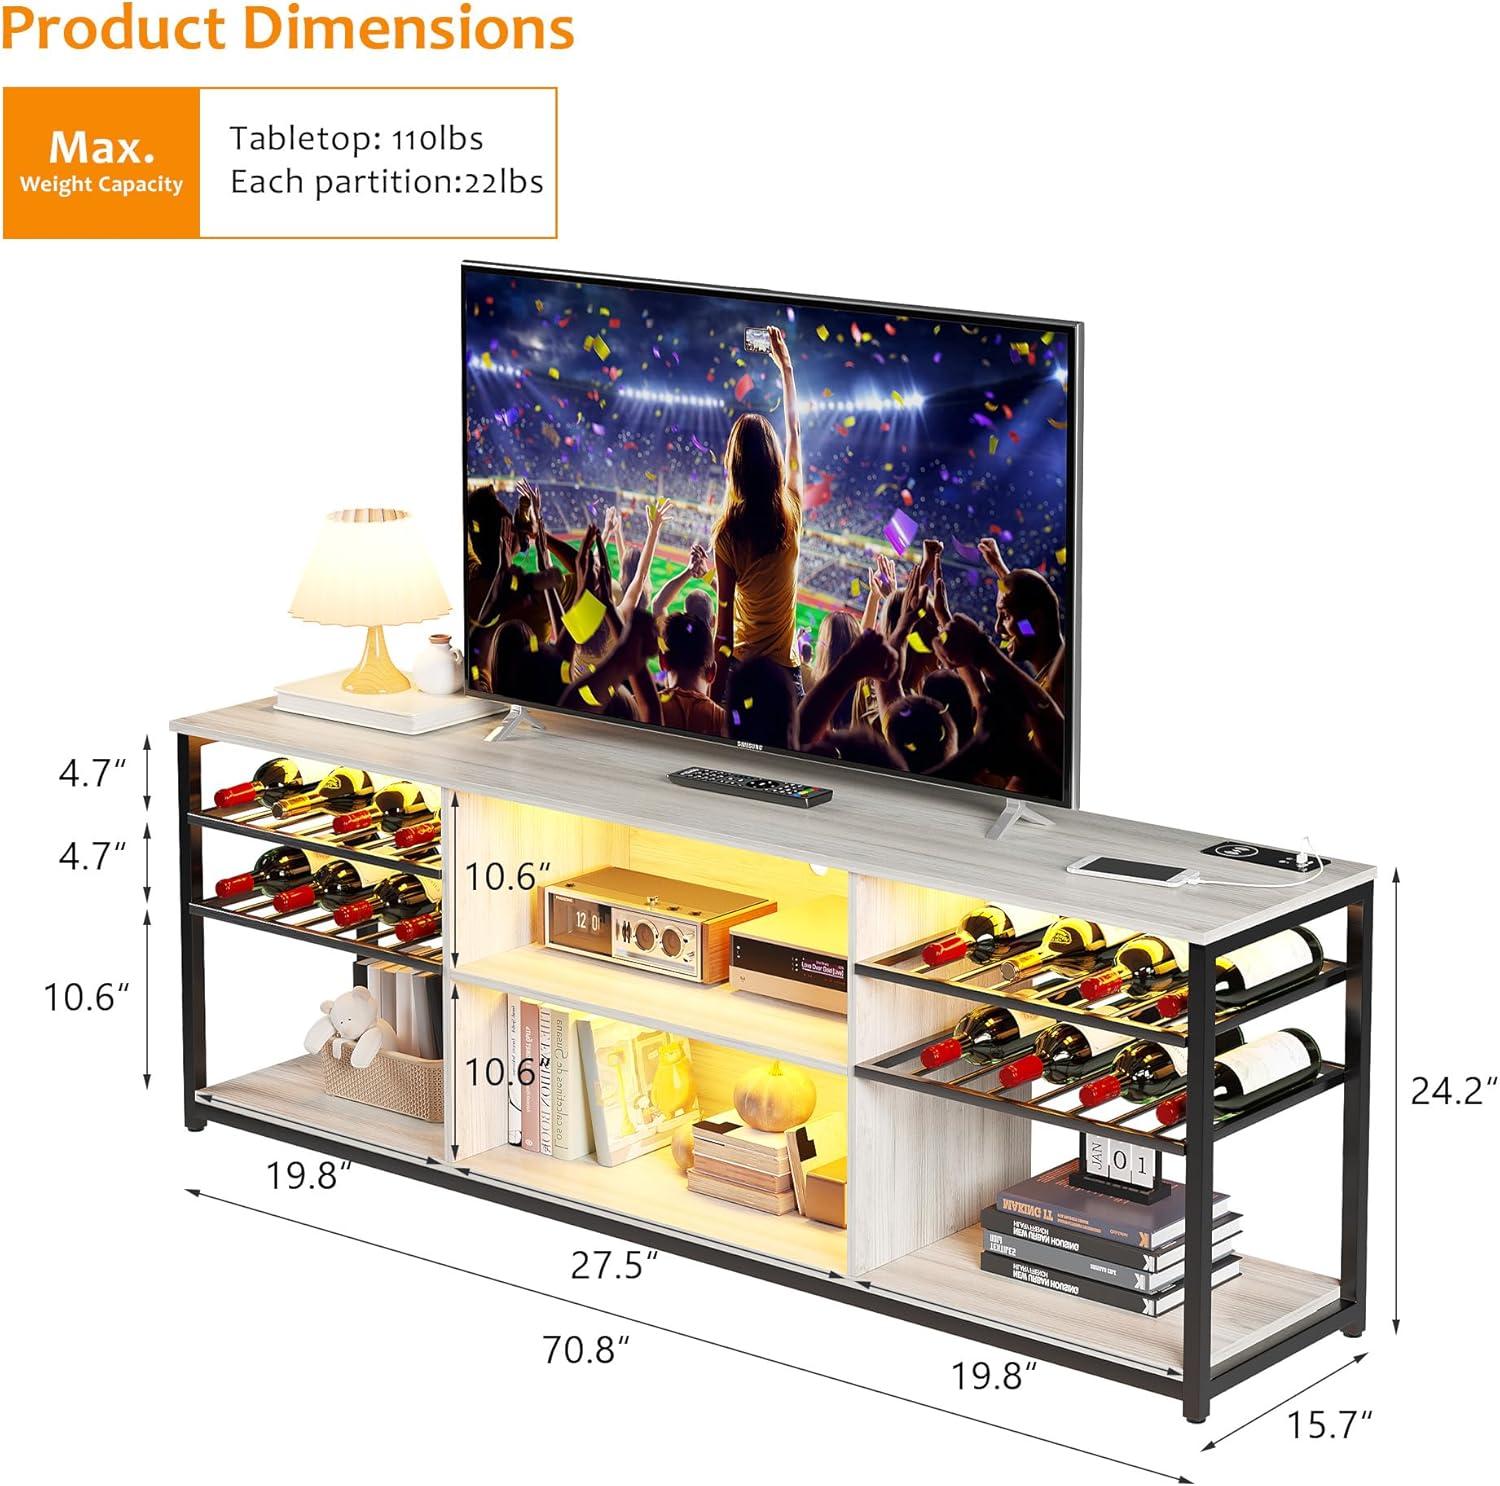
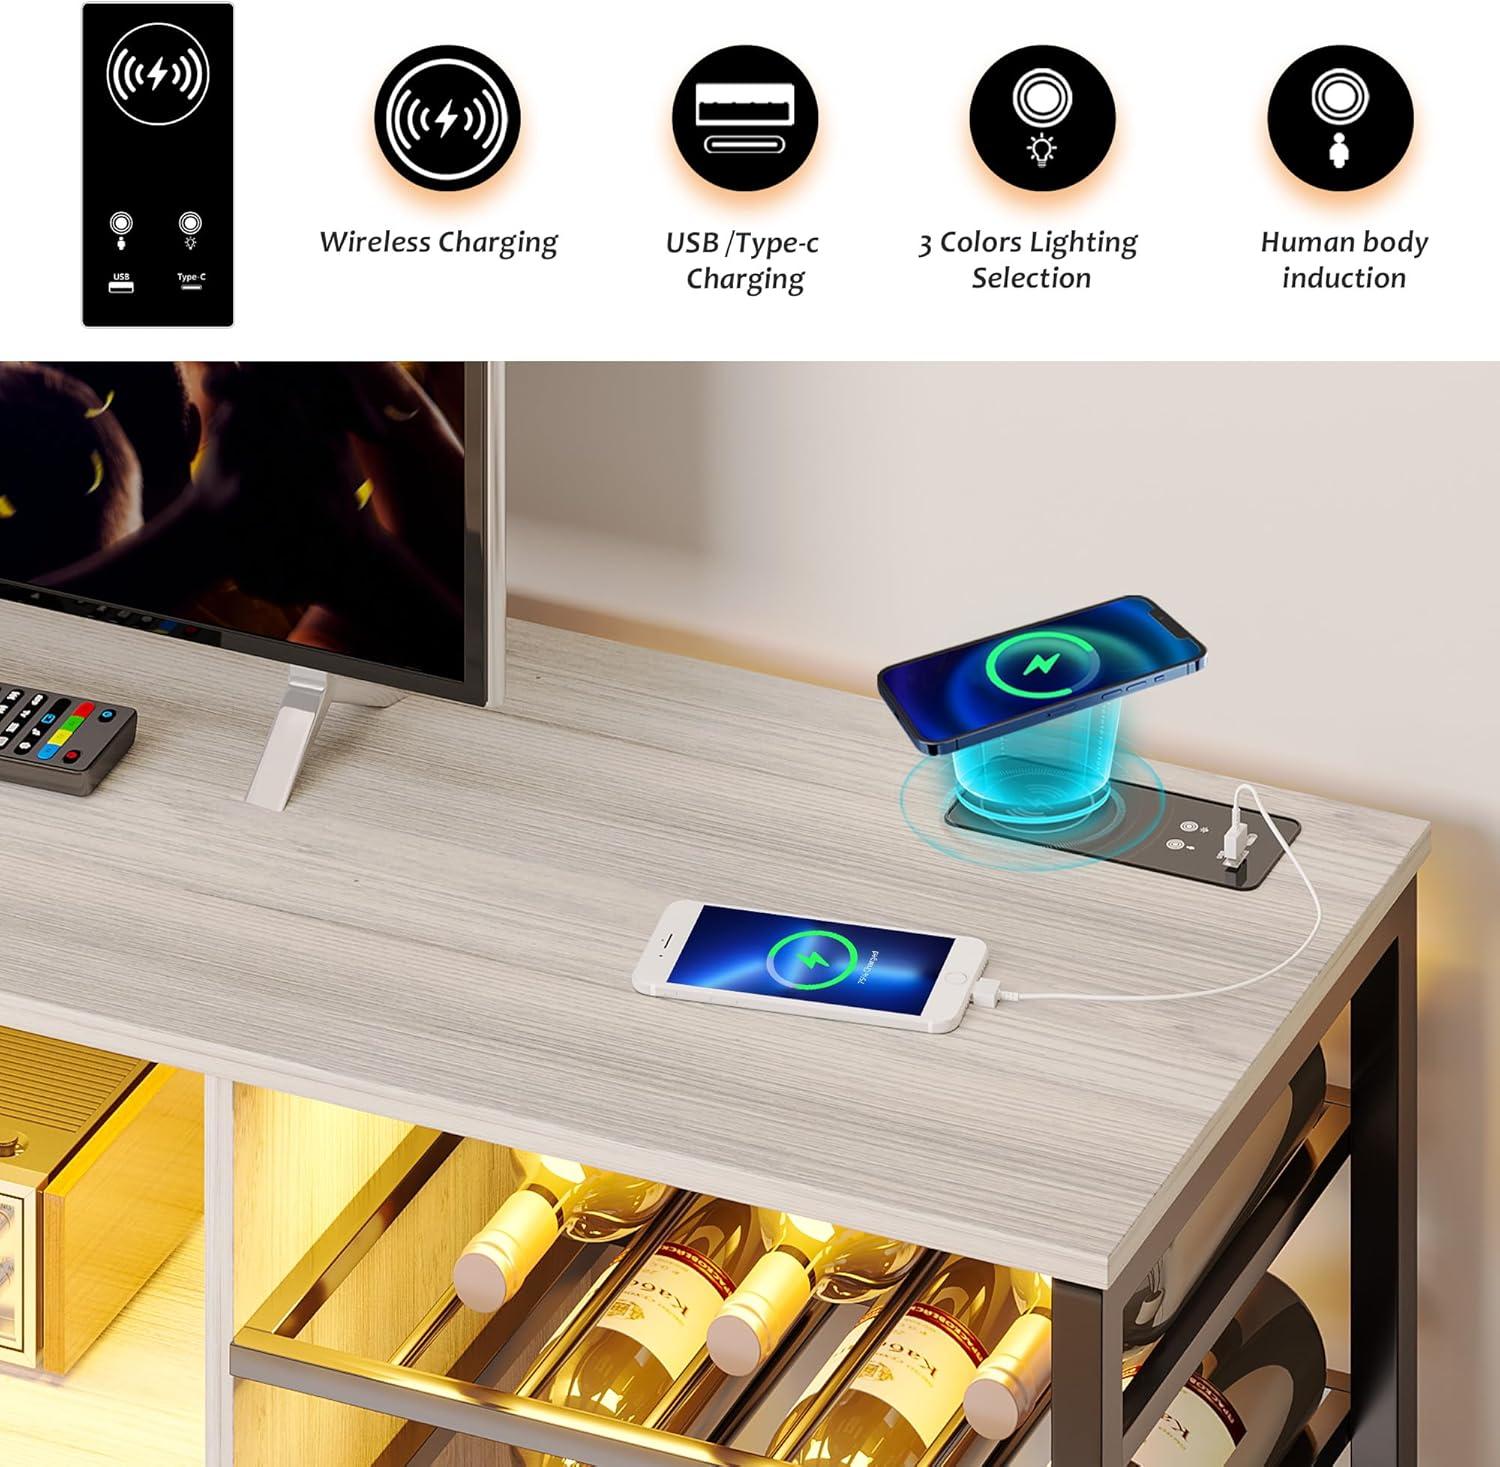
Everyday features you’ll use: charging station, wine shelves, and cable routing
The built-in charging area quickly becomes part of evening routines: you drop your phone on the wireless pad while you make a snack, plug a pair of earbuds into the USB port before bed, or top up a tablet via the Type‑C lead while scrolling on the couch. Placement matters in practice — devices sit within easy reach but can crowd the top surface when several items charge at once, and some thicker phone cases can interrupt contact so you’ll find yourself nudging or briefly removing a case. Cables that must remain plugged in tend to follow the path of least resistance; common behavior is to tuck a power strip behind the console and route cords through the back openings so they stay mostly out of sight, though short charger leads sometimes drape visibly over the edge.
You’ll notice the wine shelves are used more than just for bottles: they create vertical pockets where glassware, a corkscrew, or a small decanter slide into place and where stray cables can be threaded along the back. That arrangement is useful but has small compromises — thicker decorative items can crowd a shelf and make it harder to run a cable cleanly,and storing liquids adjacent to electronics influences how carefully cords are tucked away. The table below outlines what you’ll encounter day-to-day.
- Wireless pad — useful for quick top‑ups; placement and case thickness affect reliability.
- USB / Type‑C ports — handy for headphones and controllers; multiple devices can create a shortwire tangle.
- Back routing — keeps most cords hidden but depends on plug size and cable length.
| Feature | Everyday effect |
|---|---|
| Charging station | Makes frequent charging easy and visible; can become a catch‑all for small devices and remotes. |
| wine shelves | Provide organized nooks for bottles and accessories but can limit neat cable runs when filled. |
| Cable routing | Hides most wiring and centralizes a power strip, though plug size and short cables occasionally force visible runs. |
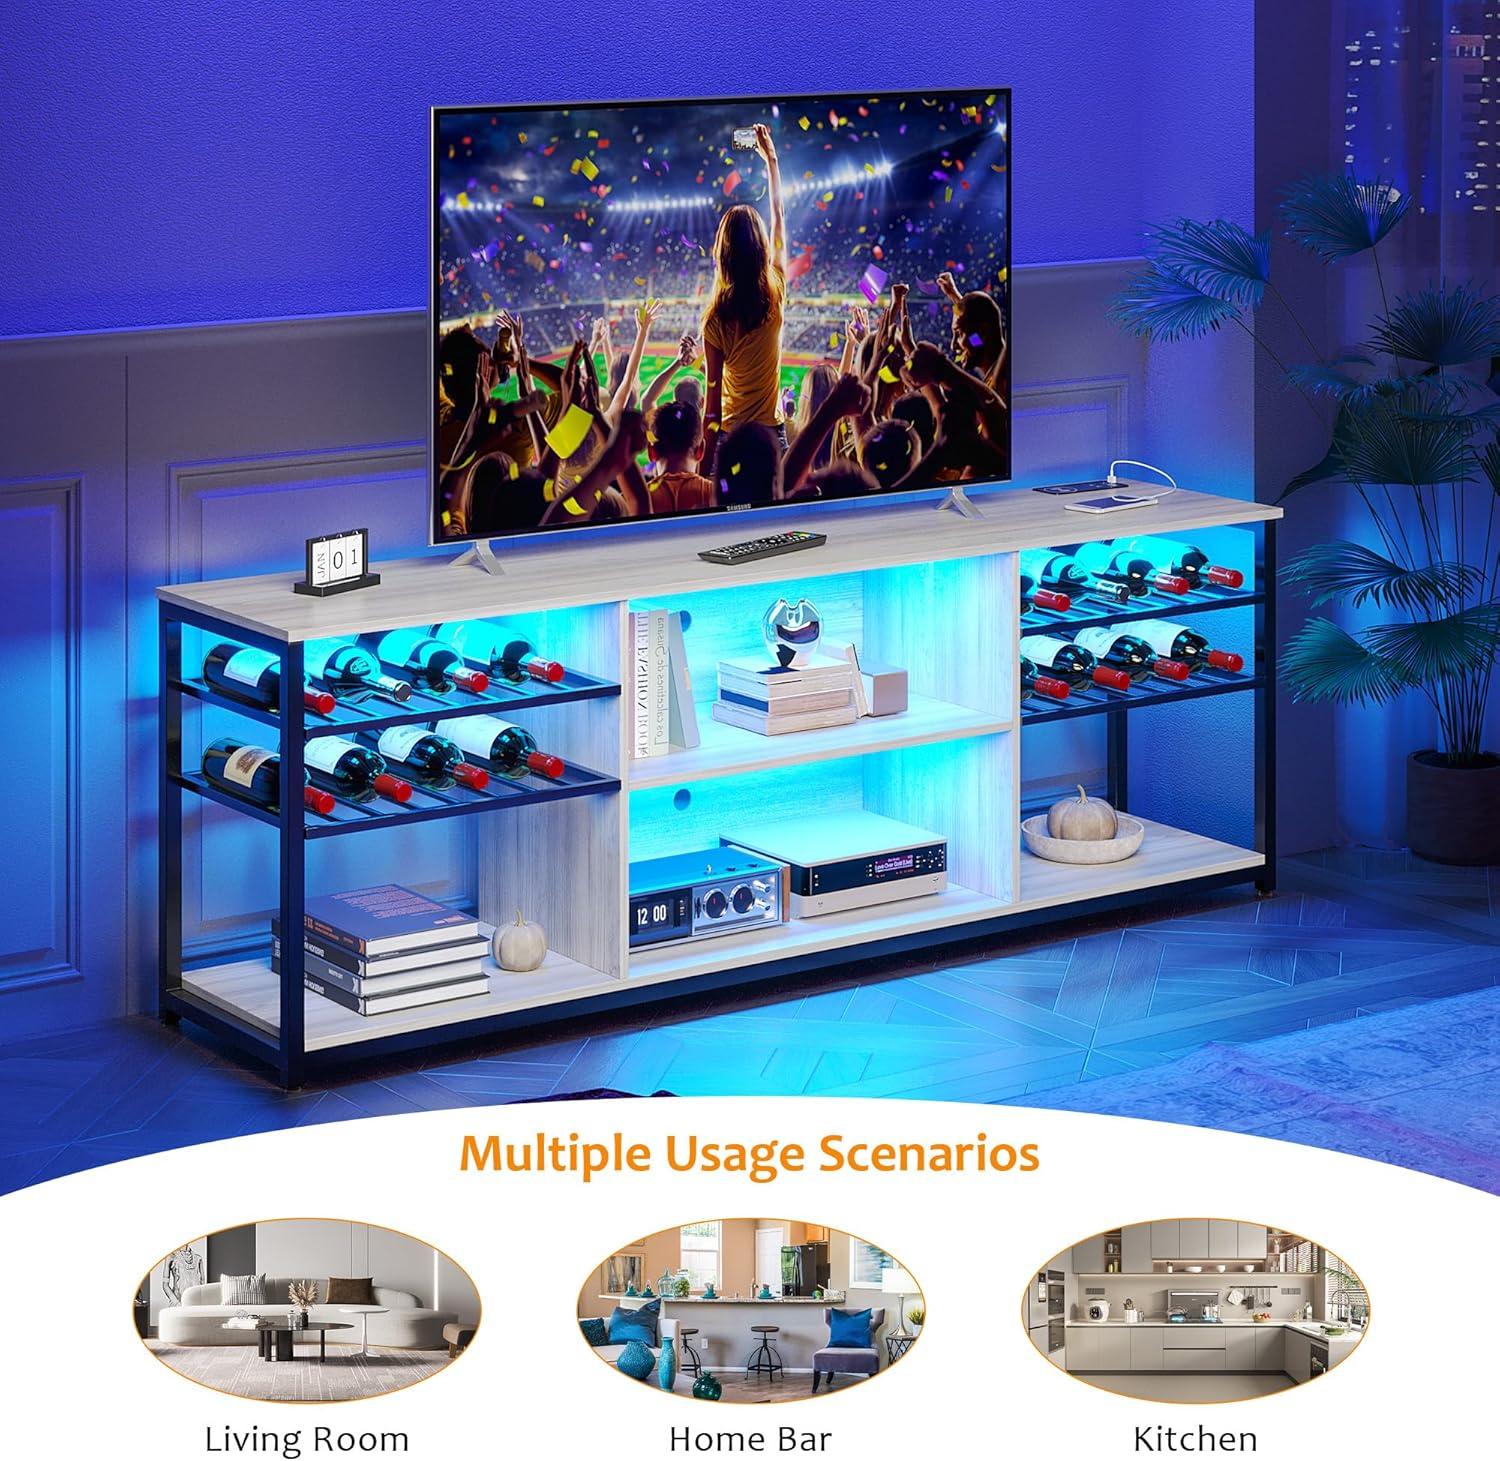
Living and sleeping spaces: arranging seating,devices,and decor around the console
When you place seating around the console,the room’s natural traffic paths and sightlines tend to dictate the arrangement more than strict symmetry.In a living room the sofa often ends up centered with an armchair angled slightly inward so the TV and the console’s surface remain visible without feeling like the furniture is glued in place; in a bedroom the bed and a bench at its foot create a more relaxed viewing axis, and you’ll find yourself shifting a throw pillow or nudging a chair every few evenings as light or company changes. Pay attention to the console’s visual height and the line of sight from common seats—keeping a clear sightline and an unobstructed walkway usually matters more to daily comfort than perfection in alignment, and small, habitual tweaks (moving a side table two inches, tipping a lamp’s shade) are part of how the setup settles into everyday use.
Devices and decor cluster into predictable zones around the console, with practical habits shaping how you use each one. The top surface typically carries the display and a low-profile speaker or lamp; the central openings are where media boxes or a soundbar spend most of their time, and side shelves or racks get pressed into service for decorative items and bottles. You’ll notice a few recurring routines: dropping your phone on the charging area at night, tucking remotes into a small tray, or rotating a plant to catch afternoon sun.
- Top surface — visible gear and ambient lighting that you interact with often.
- Middle shelf — access-amiable space for devices that need remote control or airflow.
- Side storage — decorative display or items swapped in and out depending on hosting needs.
| Placement | What to watch for |
|---|---|
| Top surface | keep clear of glare and bulky decor so the screen and controls stay accessible |
| middle shelf | Allow space for ventilation and cable exits behind the unit |
| Side shelves | Use for infrequently moved decor or items that benefit from being on hand |
Cables and chargers usually end up routed through the back and gathered with a small strip or clip, and everyday adjustments — shifting a cushion to avoid reflected light or moving a wine bottle to reach a remote — become part of the living rhythm around the console.
How its suitability for your space measures up to expectations and practical limitations
Fitting the unit into an everyday room tends to show a mix of practical trade-offs rather than outright surprises. Observations from real use point to routine constraints: the integrated electronics require a nearby power source so placement often clusters close to an outlet or a visible cable run; the horizontal footprint can read as a visual anchor in narrower living areas; and load distribution across the top and middle shelving has prompted some households to add a discrete support when heavier items are placed. The following table summarizes these placement-related patterns without repeating technical measurements.
| Consideration | Typical observation |
|---|---|
| Power & cabling | Integrated lighting and charging mean the piece is frequently enough sited where cords are accessible, with cables sometimes left visible unless extra management is added. |
| Traffic & sightlines | Low, wide profile keeps sightlines open in many rooms but can feel dominant in tight walkways or small foyers. |
| Load & support | Surface use fluctuates: light décor and electronics are fine, while heavier loads have occasionally led to mid-span flex that users have mitigated with small bracing. |
| Setup & delivery | Assembly hiccups or shipping damage reported in some cases can delay final placement and require short-term adjustments to room layout. |
- Power routing: Placement almost always reflects where power is easiest to access; extension or concealment strategies tend to be adopted after the stand is in place.
- leveling and floor protection: Adjustable feet help on uneven floors but may need micro-adjustments over time as items are rearranged.
- Incremental fixes: It’s common for households to tweak positioning, add a thin support bar, or shuffle decorative items to balance aesthetics with practicality; occasional habits—like removing a phone case before charging—also shape where the unit ends up in a room.
Full specifications and configuration details
Putting it together and keeping it looking right: assembly, maintenance, and small adjustments
When you unpack the pieces, take a moment to spread everything out and identify hardware before you start — the numbered panels and short bolts tend to look very similar at a glance. The build sequence matters: fasten frame connections and feet loosely at first so you can shift panels into square, then go through and tighten in a steady pattern; it feels easier to fit shelves after the outer frame is stabilized. Watch panel orientation carefully — getting a side or shelf flipped is a common, time-consuming slip that usually shows up when holes don’t line up. Small adjustments during assembly are often practical rather than technical: nudging the top trim, swapping a bolt for a longer spare, or adding a thin center brace if the middle shelf shows any bow under weight.If the unit sits unevenly, the adjustable feet let you micro-level it, and routing cords through the back gap while you build saves rummaging later.
keeping the finish and function looking right is mostly routine. Dust the lighting strip and sensor area with a soft cloth so the electronics stay responsive, and wipe the frame and MDF surfaces with a damp, non-abrasive cloth to avoid moisture damage along edges. Periodically check fasteners and the feet after you move the piece — screws can loosen and the middle shelf can settle over time, so a quick re-tighten or a simple reinforcing bar will restore stiffness. A few small, handy items you might keep nearby clarify these observations:
- Basic toolkit: hex key and screwdriver used during assembly.
- Quick fixes: felt pads for floor protection, a thin brace for mid-shelf support.
- Regular checks: wiring routes, charger surface cleanliness, tightening hardware.
| Task | Typical interval |
|---|---|
| Dust lighting/sensor and wipe surfaces | Every 1–2 weeks |
| Check and tighten bolts/leveling feet | After moving or every 3 months |
| Inspect shelf for sag or wear | Every 6 months |
How It Lives in the Space
over time the LED TV Stand for 75 Inch TV, Industrial Entertainment Center with Charging Station, TV Console Table with Wine Storage Shelves, Television Stands for Living Room, Bedroom (Grey) moves out of the spotlight and into the steady background of the room. In daily routines the top gathers the small things that get set down, the lower shelves find their quiet uses, and the surfaces show the faint, honest marks of regular use. It becomes a familiar perch during evenings and a part of the slow, pleasant choreography of the space. Quietly,it stays.