decordip Garden and patio decoration inspiration
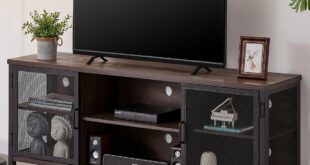
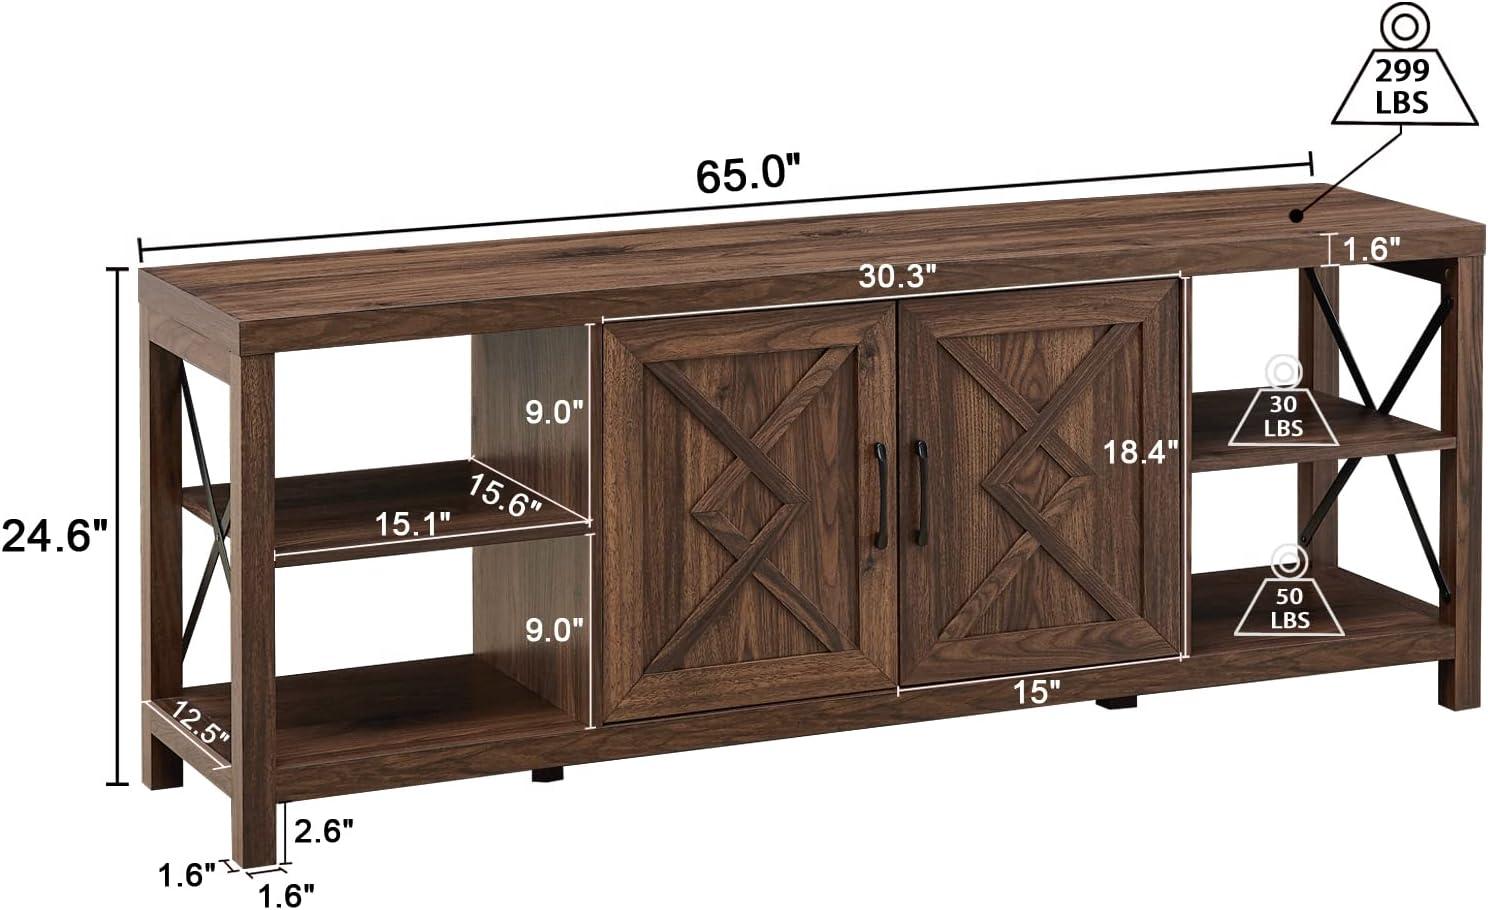
You sink back on the sofa and the Okvnbjk 65-inch TV stand in dark walnut slides into view — a low, horizontal presence that quietly anchors the room. Up close the engineered wood has a smooth, slightly satiny grain under your hand, and the iron X braces introduce a bit of industrial heft without looking outsized. The center door closes with a soft, muted click, a detail that makes the piece feel settled rather than flimsy. At this scale it reads as honest, everyday furniture: it absorbs the visual weight of the screen and the odds-and-ends of a living room so the space looks lived-in, not staged.
Unboxing and first impressions in your living room
The delivery arrives as a few large, flat boxes that take up a chunk of floor space in your living room.When you break the outer tape, the first thing you notice is the amount of protective material — foam blocks at corners, cardboard panels sandwiched between major pieces, and plastic sheeting over veneered surfaces. The instruction booklet and several sealed hardware bags sit on top, so you don’t have to hunt for the paper before you start sorting. What’s in the box:
- large panel pieces wrapped in foam
- sealed hardware packs and fasteners
- instruction manual and small accessory parts
There’s a faint wood-ish odor when the foam comes off, and most surfaces look intact right away; a quick sweep of the packaging shows no obvious transit damage.
You’ll want a clear patch of floor to lay everything out — you and whoever’s helping will shuffle panels, move bags of screws, and stand pieces up against a wall while you identify parts. Moving components from the entryway into the living room is easier with two people; some panels are awkward to angle through doorways and around furniture. Unpacking and arranging everything so it’s ready for assembly took roughly a half hour in this setting, though that can stretch if you stop to compare labels or rearrange the staging area. The little sorting routine — grouping similar bags, lining up numbered panels, and setting aside tools — becomes a small, practical rhythm as you prepare to build.
| Unboxing task | Observed time |
|---|---|
| Open boxes and retrieve parts | 10–15 minutes |
| Sort hardware and stage panels | 10–20 minutes |
How the dark walnut grain and low profile sit beside your sofa and shelves
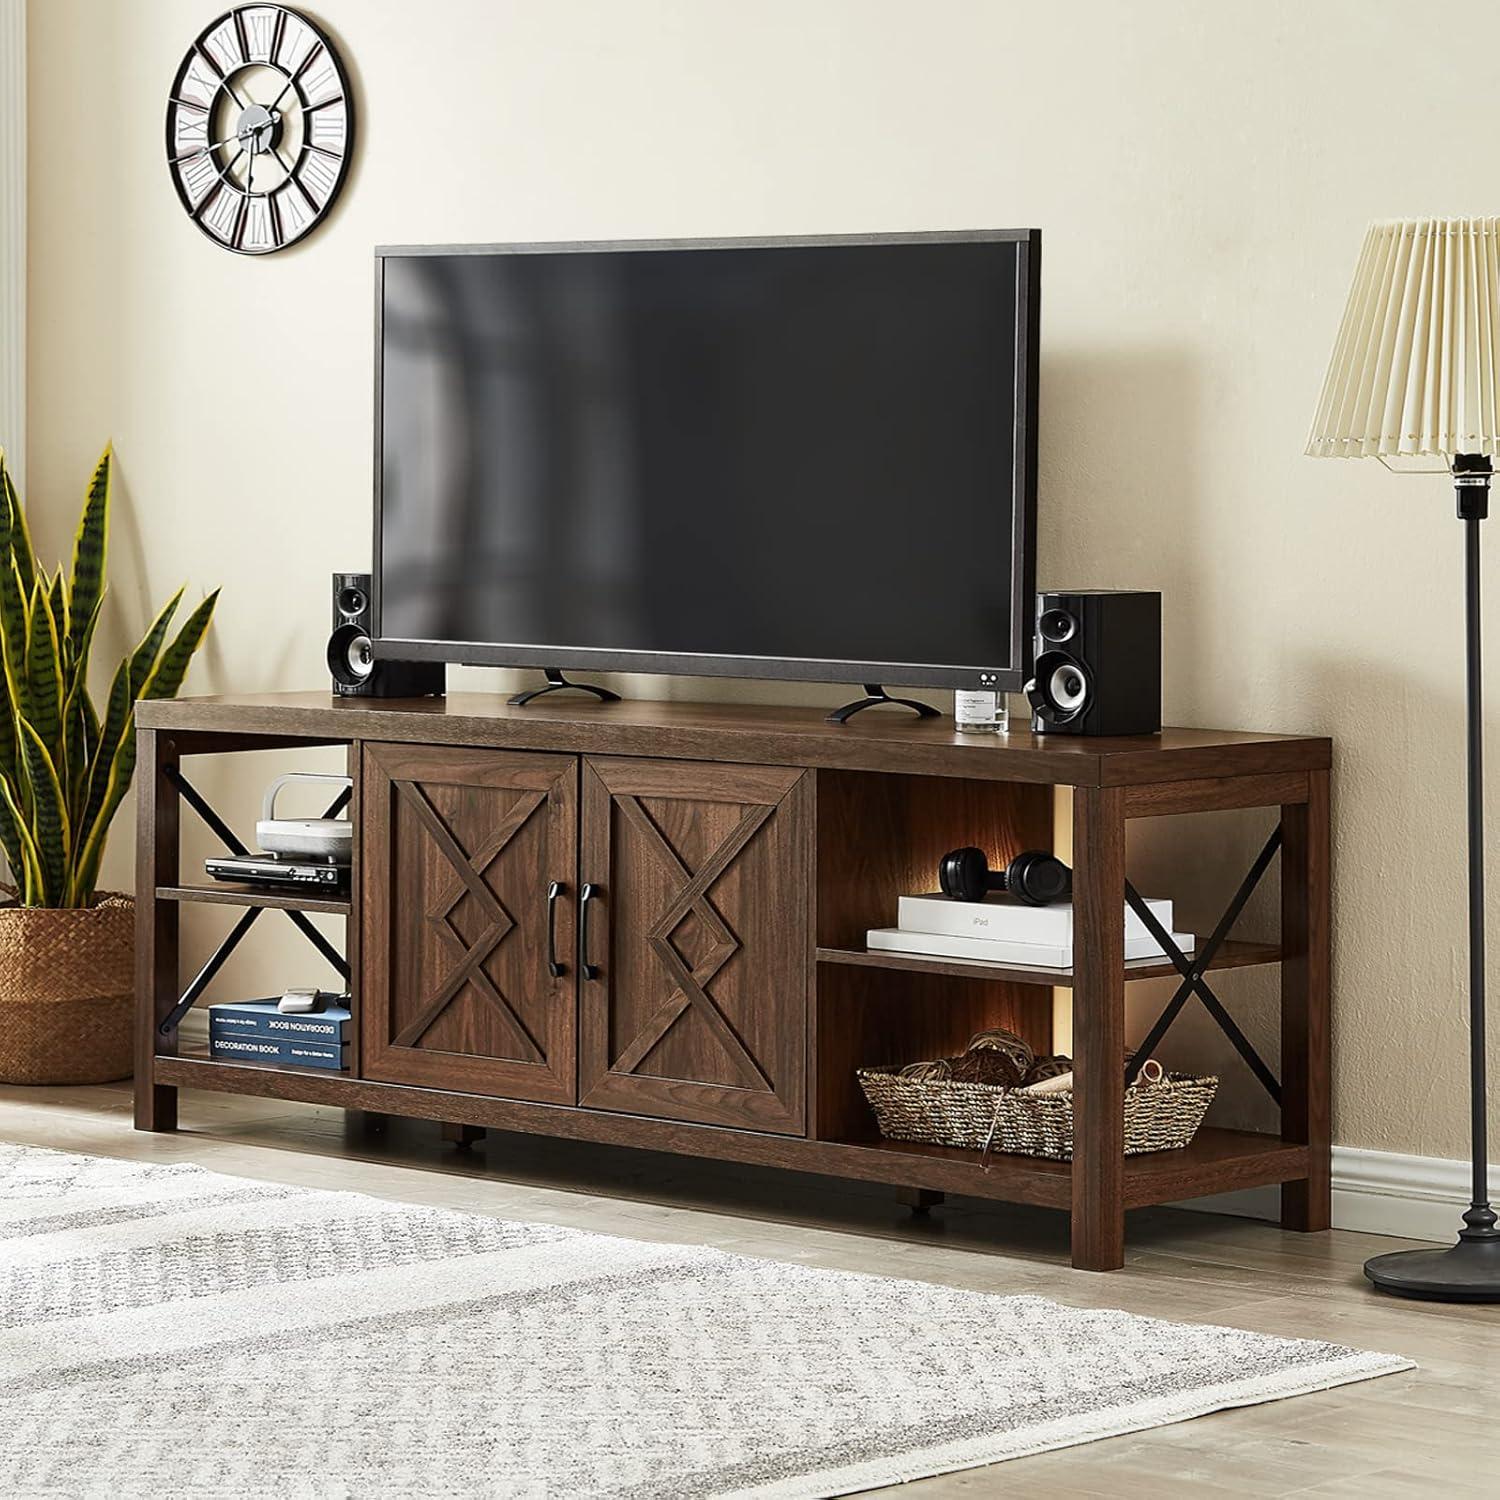
Placed beside your sofa, the dark walnut grain reads as a low, horizontal plane rather than a dominant vertical piece — it often sits beneath eye level so the wood pattern becomes part of the room’s base rather than a focal point. From the couch you’ll notice the grain catching light differently through the day: morning glare brings out the warmer streaks, while evening light tones down the contrast. The low profile keeps sightlines open, so the top surface and any décor on it feel visually connected to the seat cushions rather than competing with them. Small, habitual adjustments happen here too: you might nudge the stand an inch or two to align with a sofa arm, or shift a throw pillow to avoid a tight fit when guests come over.
The relationship with nearby shelves tends to be about continuity and negative space — the stand’s low silhouette creates a horizontal break below taller shelving so displays on the shelves maintain prominence. Observations that often matter in everyday use include:
- From the sofa: the grain and low height frame the lower half of your field of view; smaller decorative objects on top read against the wood instead of disappearing into it.
- Beside shelves: there’s a visual step between the two pieces that helps items on the shelves retain vertical emphasis, though cables and devices on the stand will be more exposed than items tucked into taller cabinetry.
in practical terms this dynamic can feel balanced most of the time, with the dark finish anchoring the lower part of the room while the open vertical surfaces of shelves draw the eye upward; in some setups that same low profile can leave a bit more visible wall behind the unit or require slight repositioning of accessories to keep the lines looking intentional.
| Viewing position | Typical observation |
|---|---|
| Seated on sofa | Grain reads as textured background; top surface aligns with low sofa elements |
| Standing across room | Low profile emphasizes shelving above; wood tone anchors the lower composition |
| Beside bookshelf | Creates horizontal break that preserves vertical display hierarchy |
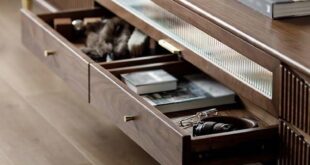
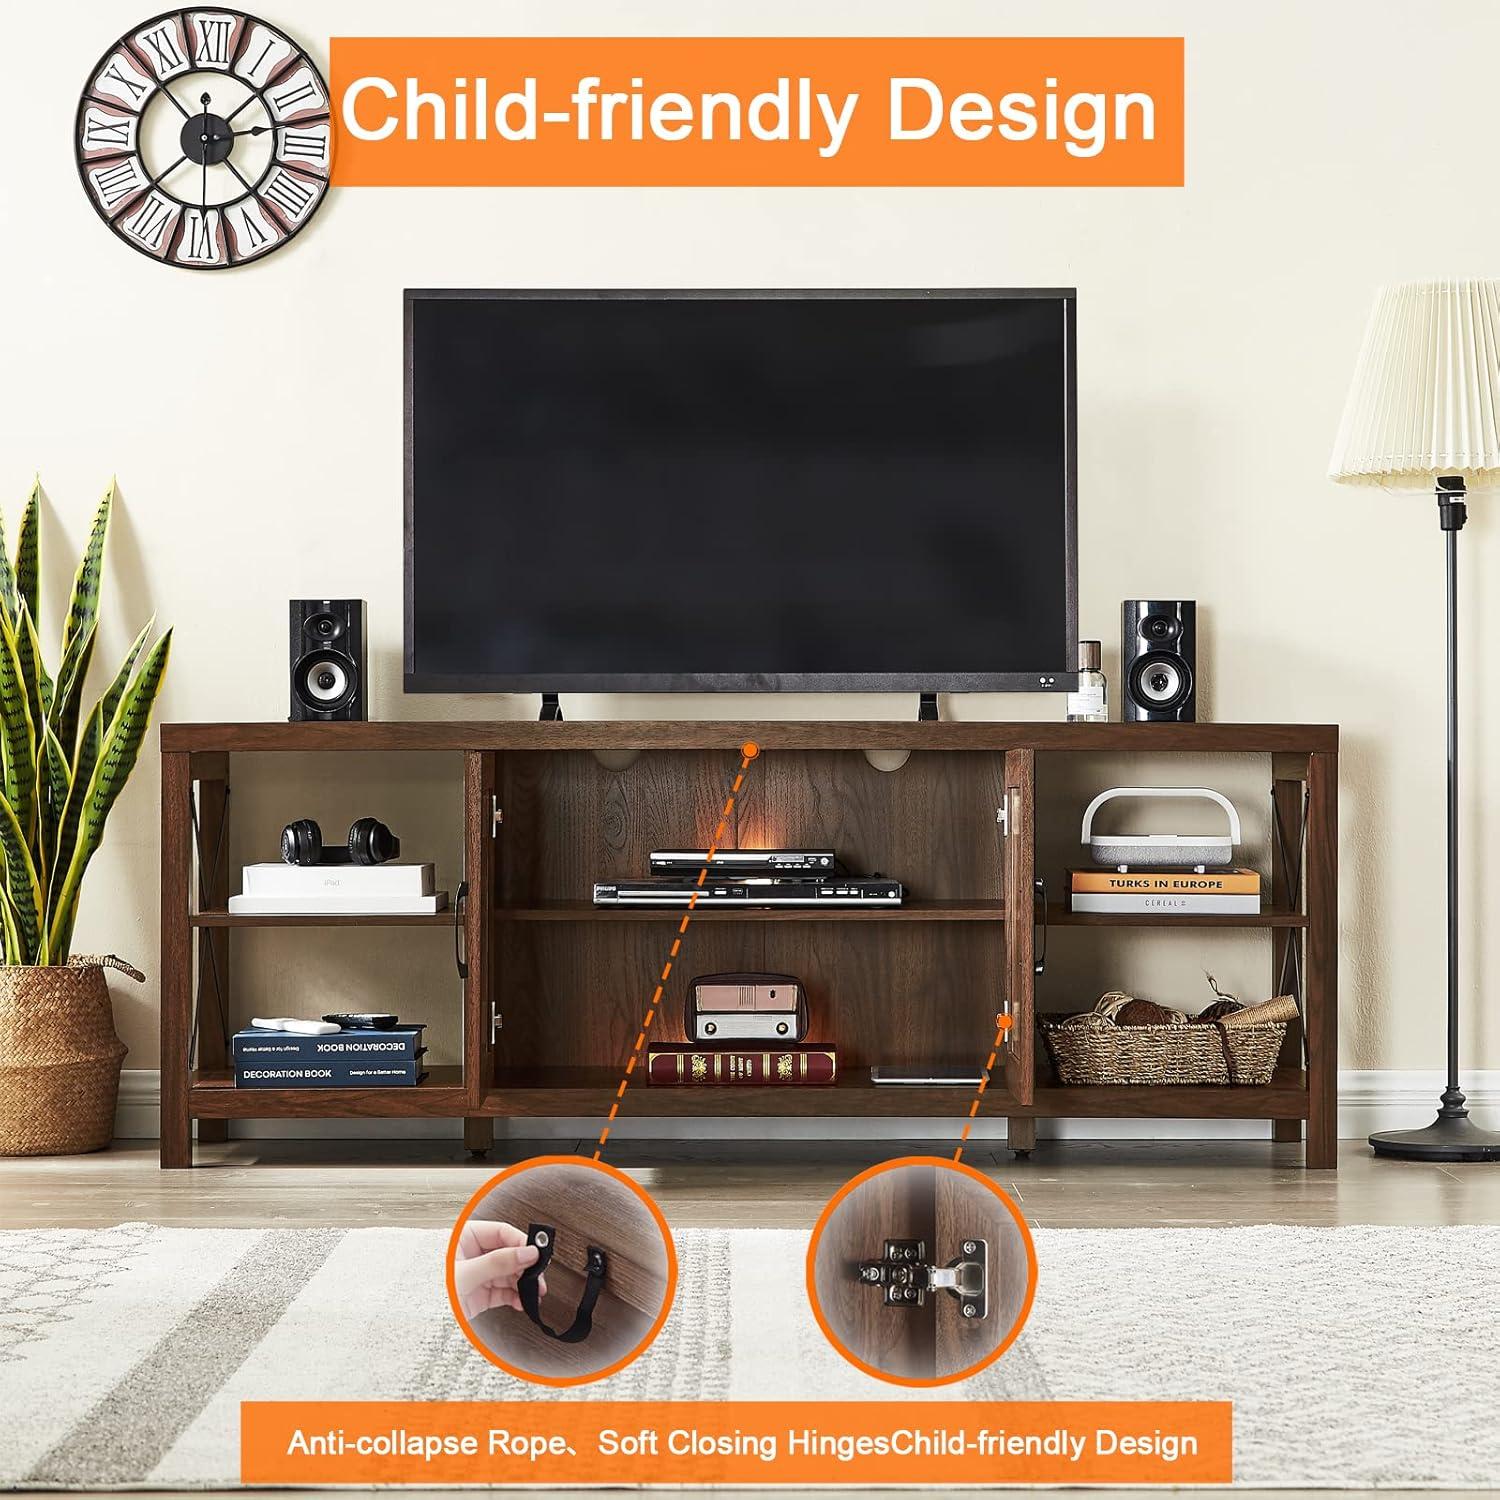
what you find behind the doors shelving cable routes and the soft close action
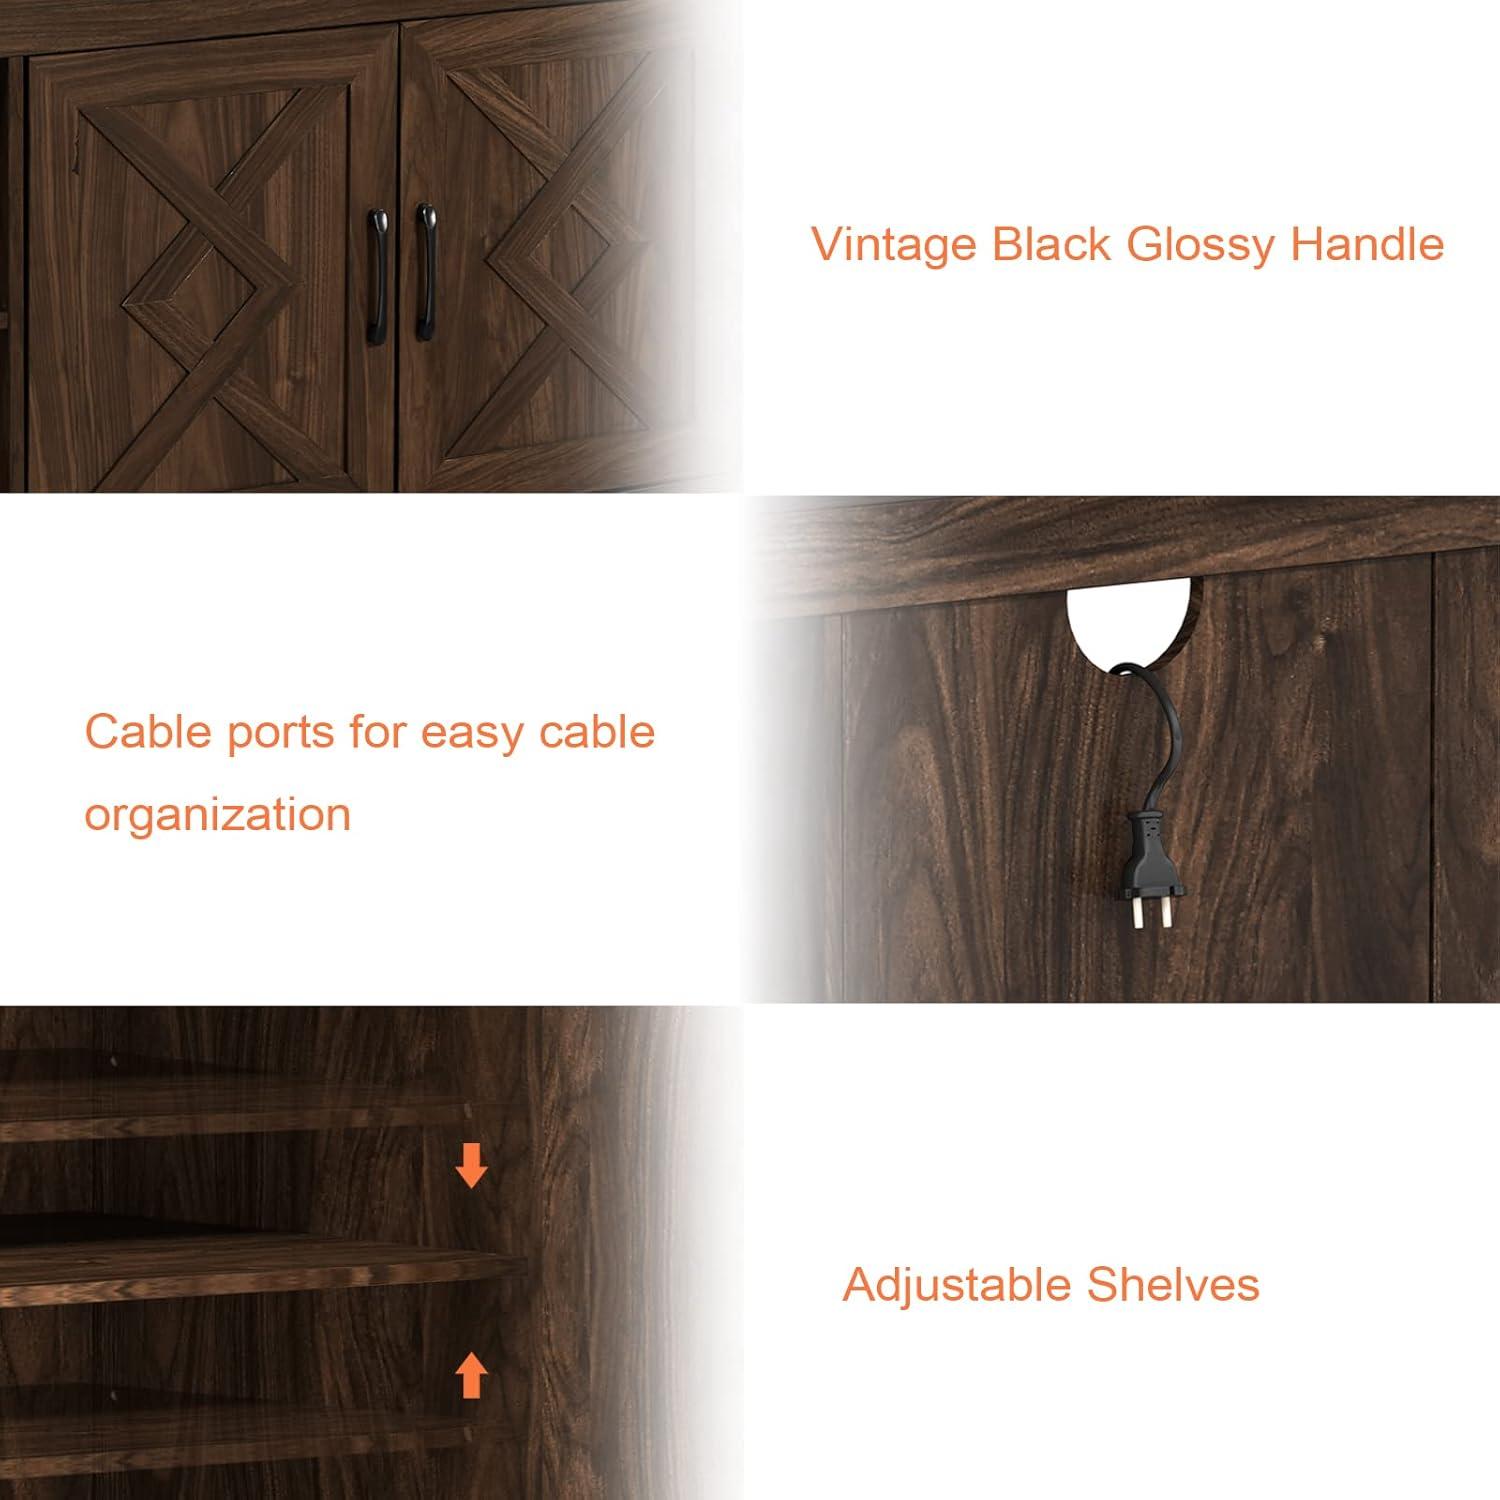
When you open the cabinet doors the interior reads as a practical media hub rather than empty shelving. An adjustable shelf sits on a set of notched positions, so you can nudge its height a few inches depending on what you slide in; in everyday use that means balancing a game console and a router on different levels without having to stack one on top of the other. Cable routing is handled by a few cutouts in the back panel and shallow slots at the base; thay’re large enough to pass several cords at once but there are no rubber grommets,so the edges are plain wood. You’ll also notice a small gap along the rear corner where cords can be tucked horizontally to reach a power strip placed inside, though fitting larger brick-style adapters may require angling them rather than lying them flat.
- Shelving: one adjustable shelf with multiple peg positions
- cable routes: circular rear cutout(s) and base slots, no grommets
- Internal access: room for a power strip but limited clearance for bulky adapters
| Opening / Route | Observed position |
|---|---|
| Rear circular cutout | center of rear panel |
| Base slot(s) | along bottom rear edge, left/right |
The soft-close hinges are evident as soon as you start to close a loaded door: the last few centimeters of travel slow noticeably and the door settles quietly into place. Closing gently produces a near-silent pull-in, while a brisk push will still be arrested by the damper near the end — it won’t stop a very forceful slam entirely, but it does take the edge off.If the door and hinge alignment are slightly off, the mechanism can feel a touch stiff until you guide the panel into position; otherwise the action is consistent day to day and gives a muted click when fully shut. Small adjustments to the hinge screws are visible from inside the cabinet if you need to fine-tune the fit, and in normal use you’ll find the damping engages late in the stroke rather than across the whole motion.
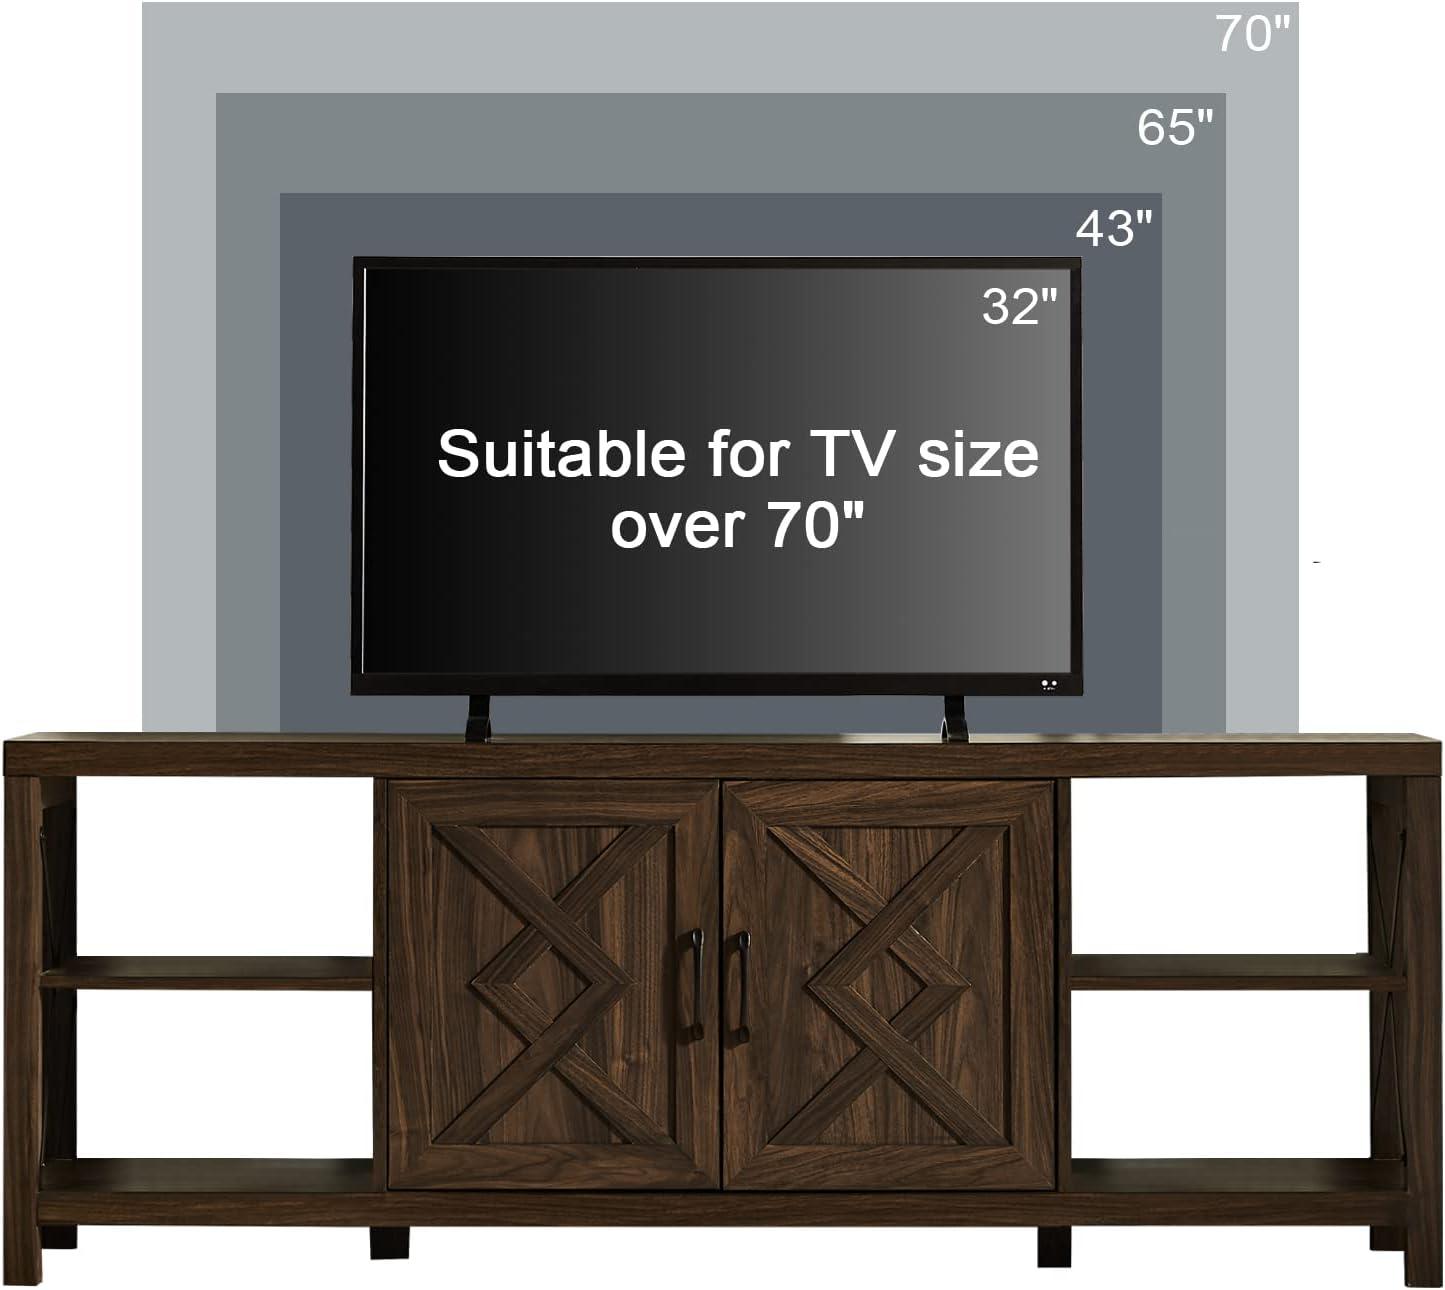
Measurements and clearance for your sixty five seventy and seventy five inch TVs
Before you place your television on the stand, take a quick, practical measurement of the set as it sits with its stand attached — not just the advertised diagonal. Measure the full width at the widest points (left bezel to right bezel) and the depth from front bezel to the back of the TV or its pedestal. Then check the top surface and the back edge of your console for usable space: many people slide the TV a few inches back to make room for cables and keep the screen away from the very front edge. A short checklist you can run through in the room:
- Measure the TV width and depth where it will contact the stand.
- Check the base footprint or pedestal location to see if the stand’s top needs to be centered or if the feet sit near the edges.
- Allow a couple of inches at the back for power and HDMI cables and a few inches at the sides for airflow and occasional nudging when you adjust connections.
You’ll often find yourself making tiny shifts after setup — angling the TV a degree or two or sliding it millimeters to get the visual balance right — so leaving a little wiggle room matters more than exact, flush measurements.
below is a simple reference for typical screen widths and a rough clearance idea to keep in mind when comparing your TV to a stand’s usable surface. These are approximate averages for modern 16:9 TVs and general clearance that many households find practical; individual models can vary, especially if the bezel is thick or the base has an unusual footprint. The depth column hints at how far back the stand needs to accommodate the TV or pedestal, and the side clearance notes a modest buffer for access and airflow.
| Screen Size (diagonal) | Approx. screen Width | Typical Panel/Stand Depth | Suggested lateral Clearance |
|---|---|---|---|
| 65 inch | ~56.5 in | 2–10 in | 1–3 in each side |
| 70 inch | ~61.0 in | 2–11 in | 1–3 in each side |
| 75 inch | ~65.4 in | 2–12 in | 1–4 in each side |
Also note how the TV’s ventilation slots and cable exits sit: if the TV needs a little gap from the wall for heat dissipation or the plugs are angled, that increases the required rear clearance. If your TV uses a central pedestal rather than two feet, the meaningful check is seating it over the stand’s strongest area so small bumps or dusting don’t shift it forward.
Everyday use in your home device access remote sightlines and cleaning
When you arrange devices on the stand, everyday access tends to be straightforward: the top surface gives you quick reach for remotes and streaming boxes, while any open shelving keeps sensor sightlines uninterrupted. If you store components behind doors you’ll notice that closed doors can interrupt infrared signals, so you may find yourself leaving one door ajar or positioning an IR extender or external blaster to maintain control without opening cabinets every time. small habits develop — angling the console slightly toward your usual seating, sliding a remote into the same corner when not in use, or shifting a game console forward a few inches so cables are easier to reach — and these make daily interaction feel less fussy.
Cleaning is mostly a matter of routine access and a few occasional moves. A soft cloth or duster handles the top and visible shelves; behind the unit you’ll want to pull it out every few weeks to clear dust from cable runs and ventilation gaps, and you’ll probably shift devices forward when wiping the back edge. Hinges, door faces and the inner shelf surfaces collect dust in different ways, so you might clean those areas on a slightly different cadence than the top surface — quick wipe for the visible parts, slower, more thorough attention for recessed spaces where dust settles.
- top surface: quick daily/weekly dusting keeps fingerprints and crumbs at bay
- Open shelves: easy access for remotes and sensors, dust lightly when you handle devices
- Rear/cable area: occasional deeper clean when you move the unit to reach plugs
| Area | Cleaning approach | Typical frequency |
|---|---|---|
| Top surface | Dry or slightly damp cloth; lift objects briefly | Weekly |
| Open shelves & device fronts | Dusting and spot wipes; move remotes and controllers | Biweekly |
| back/cable space | Pull unit out and vacuum or wipe; reorganize cables if needed | Monthly |
How this stand measures against your space expectations and everyday constraints
Placed in a living area,the unit frequently enough reads as a deliberate anchor rather than something that disappears into the background; it tends to sit flush with baseboards and creates a clear horizontal line for media and decor. In regular use the soft‑close door action quietly changes how often doors are left open,and the open shelving makes quick-reach items—remote controls,a game controller,a streaming stick—easy to grab without much rummaging. Cable runs and ventilation take a small bit of space behind the cabinet, so routing power and HDMI leads usually ends up as a brief planning step rather than an ongoing hassle. small, day‑to‑day movements (vacuuming, rearranging a soundbar, sliding a console in and out to swap discs) reveal that the central supports and the X‑frame do more than look decorative: they alter how weight and access feel over time, with less perceptible sagging and a steadier surface during typical handling.
Everyday constraints surface in incidental ways: bringing the pieces through tighter doorways or down stairwells usually involves pausing to reposition panels and at least two people, and the protected packaging included during delivery tends to make that first unboxing a bit more time‑consuming. Routine cleaning is uncomplicated where the legs create open clearance, yet the middle supports sometimes interrupt a single sweep of a floor tool. Adjustable interior partitions invite occasional shuffling of components, so electronics are often rearranged to find the best airflow and cable routing; meanwhile, surfaces collect dust in predictable spots on open shelves and behind doors. These patterns show the trade‑offs that come with a media piece designed for mixed storage and display: small conveniences in daily access balanced against a few handling and maintenance habits that emerge over weeks of use.
View full specifications and configuration details on the product listing
Assembly and setup notes as you move it from the box to daily use
When you unbox it, you’ll notice components wrapped in foam and protective panels; spread them out on the floor and match parts to the illustrated manual before you begin.It’s easiest to work on a soft surface (a blanket or cardboard) to avoid scuffs, and you’ll want a second person once the larger panels and top board come into play. Follow the instructions step by step but hold off on fully tightening fasteners until the basic frame is assembled — that little slack helps align doors and shelves. Pay attention to labeled bags and small hardware; some pieces are easy to lose if you shuffle everything across the room while you’re still sorting. For everyday setup, think about where cables will enter and exit so you’re not routing cords after the back panel is in place, and keep the doors slightly ajar while you first test hinges and shelf placement so adjustments are simpler.
- Tools to have: Phillips screwdriver, soft cloth, hammer (for dowels), adjustable wrench, zip ties, tape measure; a low-torque drill can speed things up but isn’t required.
- Moving & placement tips: lift with two people for the top board and when sliding the assembled unit into place; watch for catches on soft-close doors while shifting the cabinet.
| Stage | Typical time | Quick note |
|---|---|---|
| Unbox & sort | 10–20 minutes | Confirm all parts against the parts list |
| Assembly | 45–60 minutes | Build with a partner; leave fasteners a bit loose for alignment |
| Final checks | 5–15 minutes | Level the unit, route cables, test doors and supports |
Minor adjustments are normal after a short period of use: hinges can settle and screws may need a quick re-tighten once everything has weighted in. If you plan to relocate the unit later, keep the original hardware bag or take a quick photo of the screw types so reassembly is smoother.
how the Set Settles Into the Room
Over time the Okvnbjk TV Stand for 75 Inch TV with Storage,65 Inch Width Wood TV Stand for 65 70 75+ Inch TV with Soft Closing Door Hinges, Dark walnut simply finds its way into the daily patterns of the room, less a new arrival and more a familiar surface. You notice how people position themselves around it, the way cushions shift and the light pools differently on its top as the room is used, and small marks gather where hands rest. In daily routines the doors become background motion and the storage quietly holds chargers and remotes that disappear into habit. It sits quietly as a familiar presence, worn into the rhythms of your household, and simply stays.