decordip Garden and patio decoration inspiration
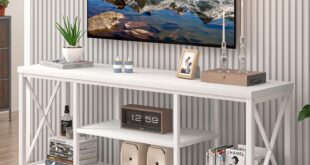
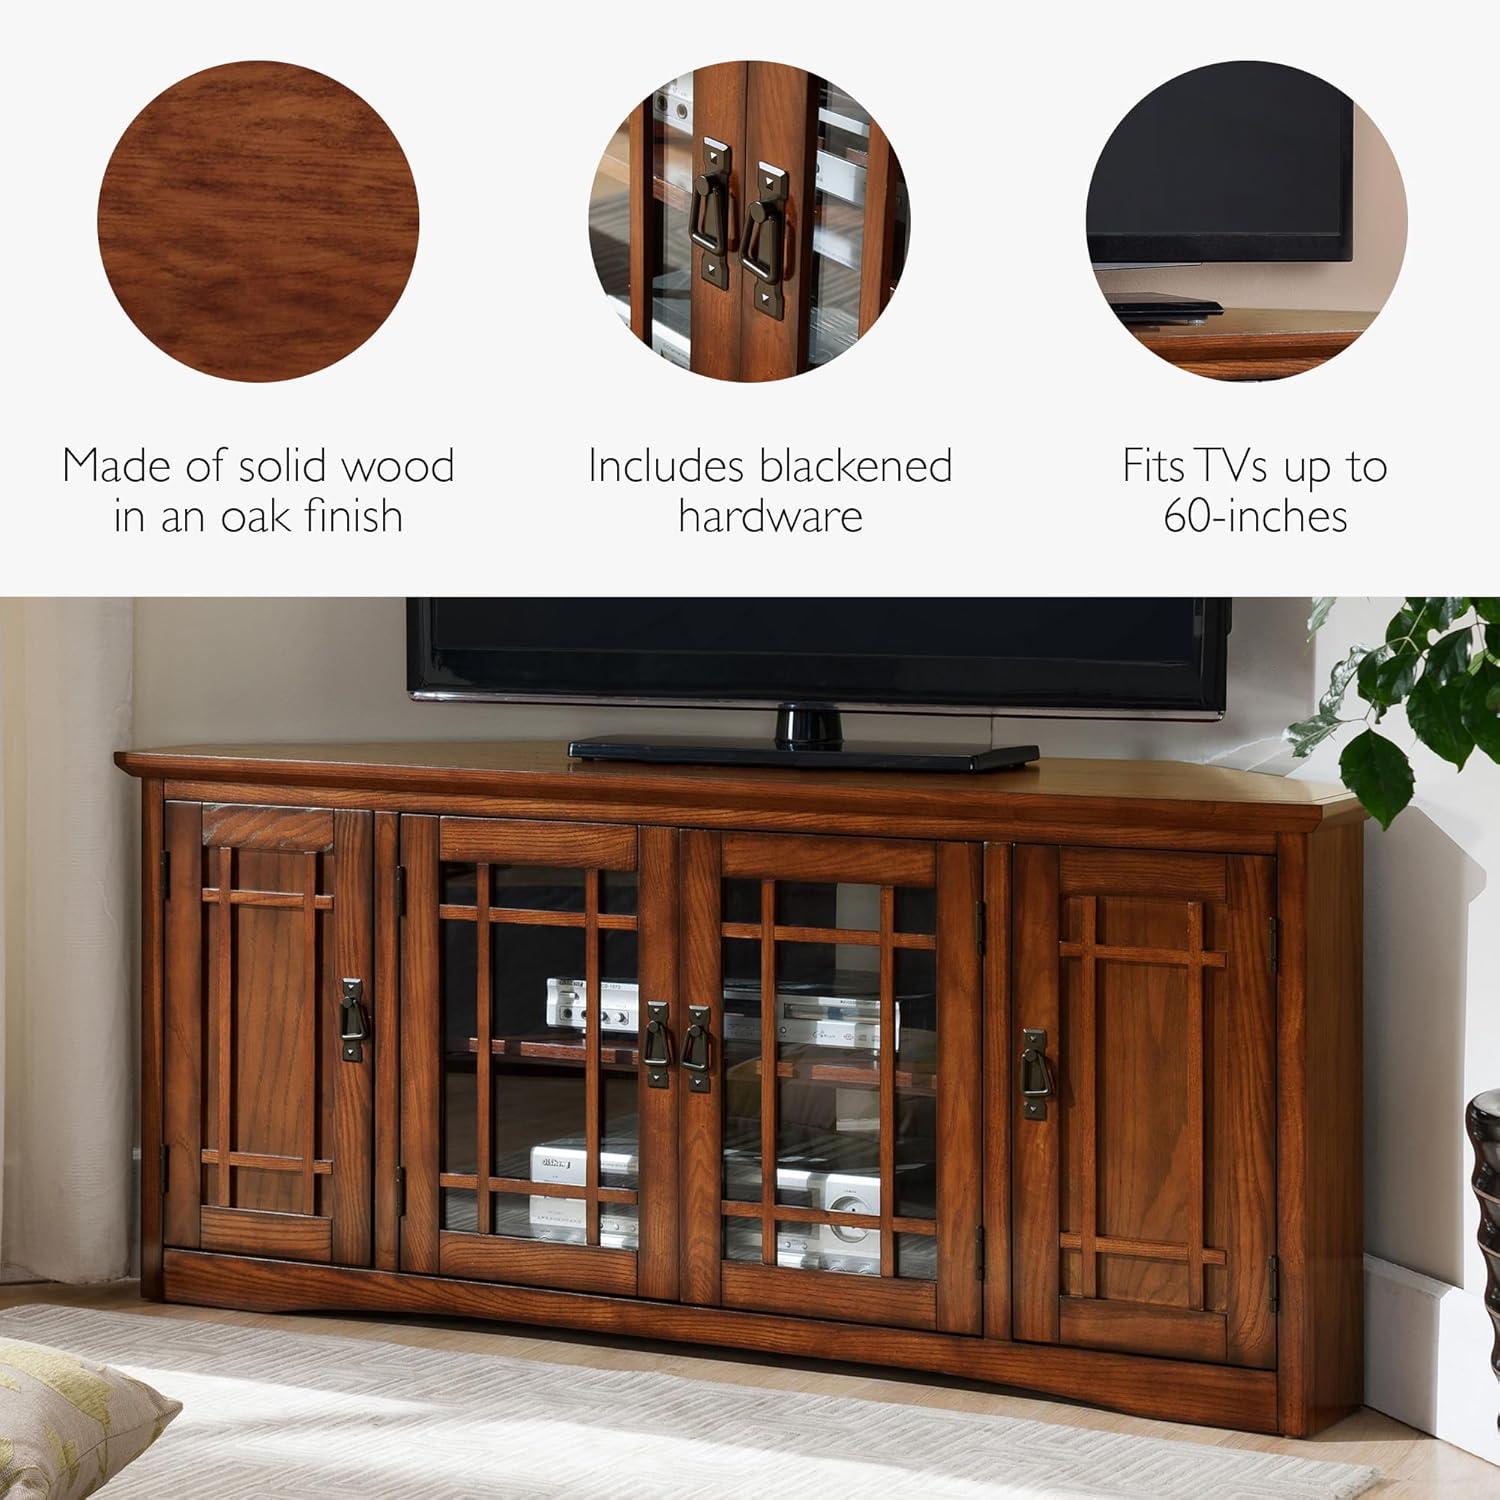
Late afternoon light pulls the warm oak grain into relief as you glance across the room at the piece — Leick Home’s 60‑inch corner TV stand (model 82386) — quietly anchoring the seating area. Up close the wood feels reassuringly solid under your hand, the top carrying a modest visual weight that keeps the unit from appearing to float. Blackened hardware and clear glass doors give a subdued, slightly vintage edge, while the shelves read as practical hollows rather than staged compartments. From a few paces away it simply sits there: familiar, scaled to the room, and easy to imagine living around.
A quick look at how this medium oak corner TV stand presents itself in your room
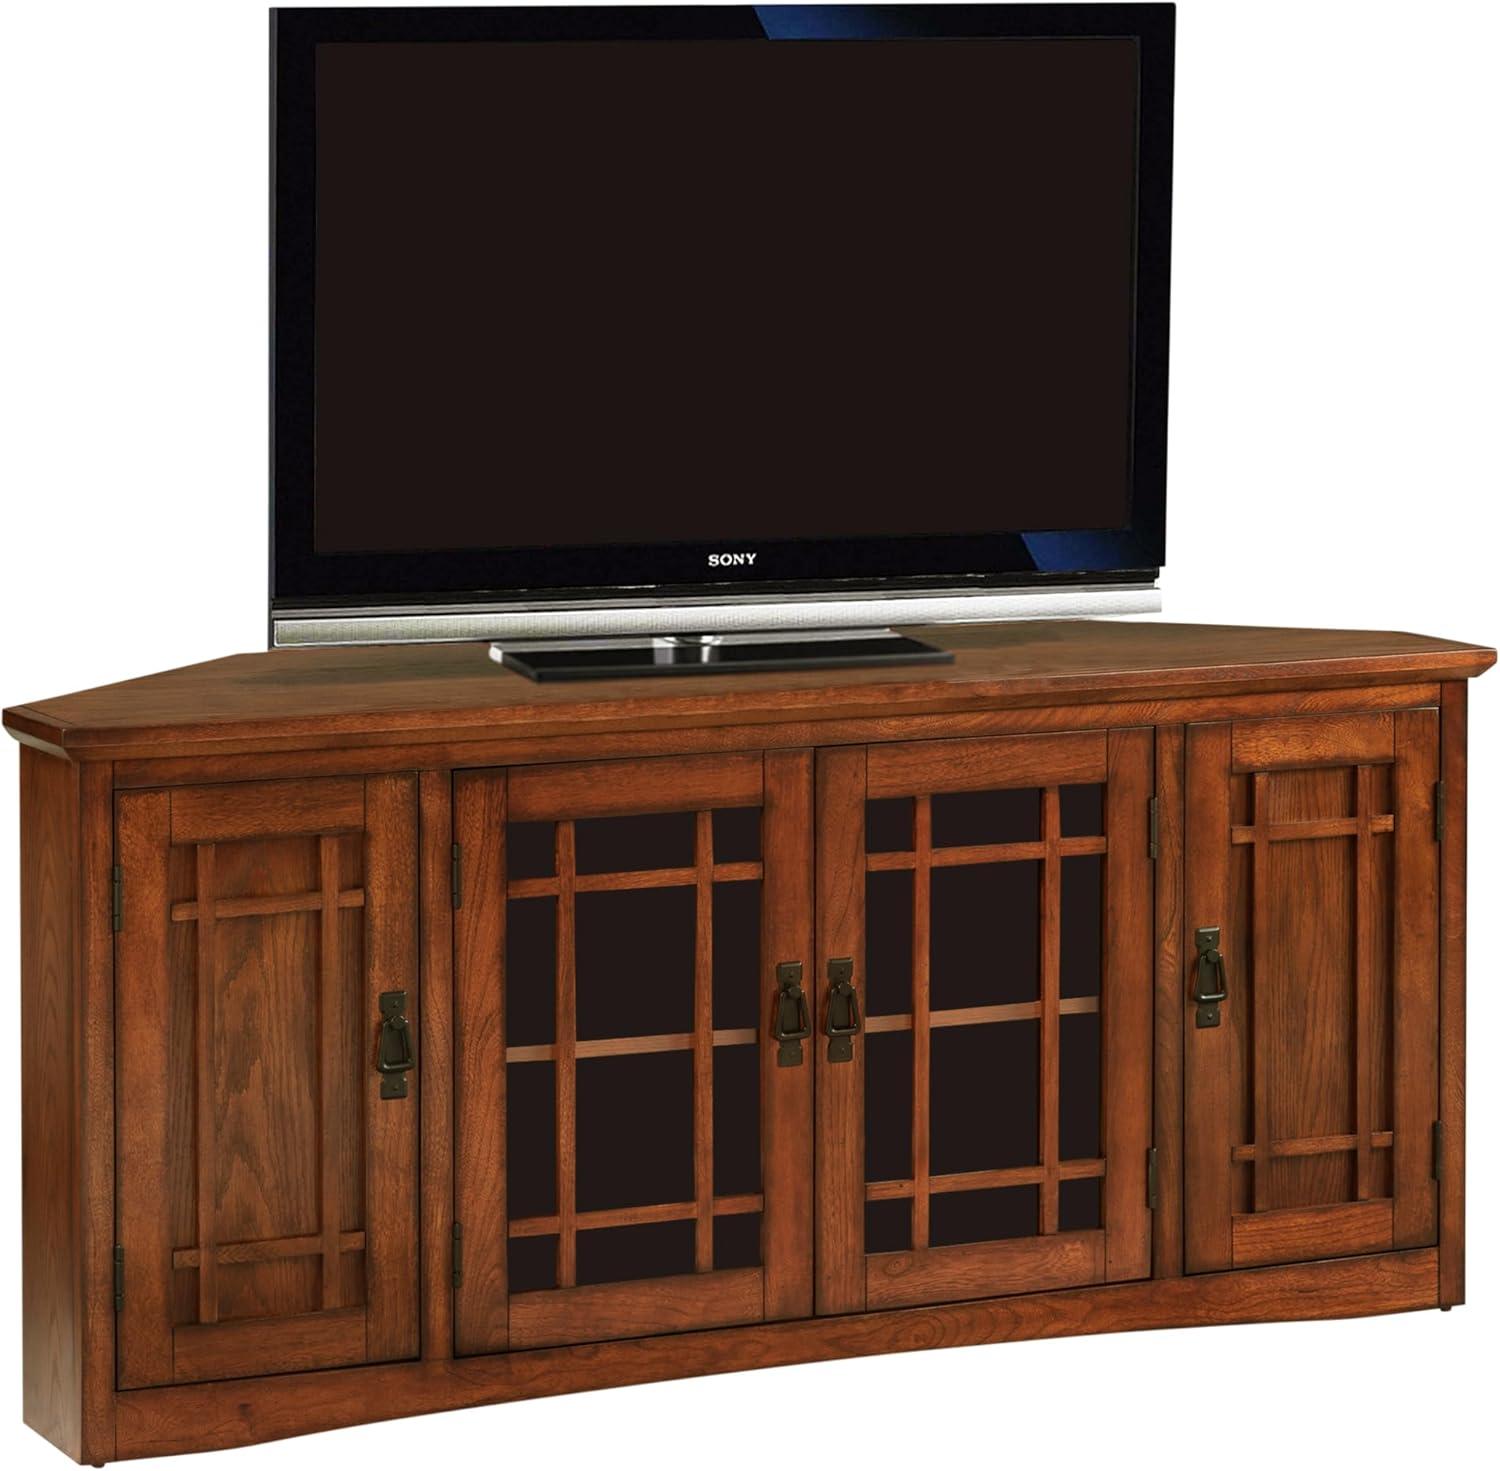
Placed into a corner, the stand tends to read as a contained media anchor rather than an intrusive piece — it fills that triangular negative space and quietly frames whatever sits on the top. From a short distance you’ll notice how the glass-front sections catch light differently throughout the day, sometimes reflecting nearby windows, sometimes showing silhouettes of electronics behind the doors. It often becomes one of those surfaces you adjust throughout the week: nudging it a fraction to sit flush against baseboard trim, swapping a display object on the corner of the top, or tucking a game controller into an open shelf after use.Sightlines from a sofa or entryway make the blackened hardware and door shapes small punctuation marks rather than focal points, and when the screen is off the stand reads more like low cabinetry than a TV pedestal.
- From the doorway: appears as a compact built-in rather than a standalone entertainment unit
- Near natural light: glass fronts and medium finish create small highlights and soft reflections
- In everyday use: serves as a catch-all for remotes and chargers, with cables mostly out of sight
| Situation | How it presents |
|---|---|
| Daylight | Finish and glass show soft sheen; the piece blends with wood tones in the room |
| Evening (lamps on) | Glass surfaces reflect warm light, emphasizing the vertical lines of the doors |
| TV off | Reads as low storage and display surface rather than a media centerpiece |
Mission style lines and blackened hardware as they appear from different angles

Up close and at arm’s length the Mission lines read as a steady rhythm of rails and slats that organize the face of the piece; from straight on they give a clear, geometric silhouette, while from a three‑quarter view the same pattern breaks into alternating bands of light and shadow.At a low angle the top rail becomes more pronounced and the profile feels heavier,and when you step to the side the pattern compresses into layered planes that can look almost carved rather than applied. In everyday use you’ll catch different aspects without meaning to — a quick glance while walking past emphasizes the verticals, whereas leaning in to open a door highlights the horizontal joinery; these shifting impressions can leave small grooves and edges more noticeable in certain lights, so the linear motif tends to show dust in the crevices more than a flat surface would.
Blackened hardware behaves like punctuation on that linear canvas: head‑on it reads as a dark, matte accent that interrupts the wood’s continuity, and at a shallow angle it picks up faint highlights that betray a subtle metallic sheen. When you crouch to reach a cable or pull a door open the pulls feel and look more three‑dimensional, casting thin shadows that emphasize the Mission lines behind them. In dimmer rooms the hardware can nearly disappear into the joints, while under direct lighting it stands out crisply; it also tends to display fingerprints and dust differently depending on how you handle doors, so the contrast that makes the hardware visually useful can also make small marks more apparent.
| Viewing Angle | Observed Effect |
|---|---|
| Front‑on | Clear rhythmic verticals; hardware as dark accents |
| Three‑quarter | Light and shadow interplay; depth of rails becomes visible |
| Low/side | Silhouette thickens; hardware casts defining shadows |
Solid wood panels shelving rails and visible joinery on closer inspection
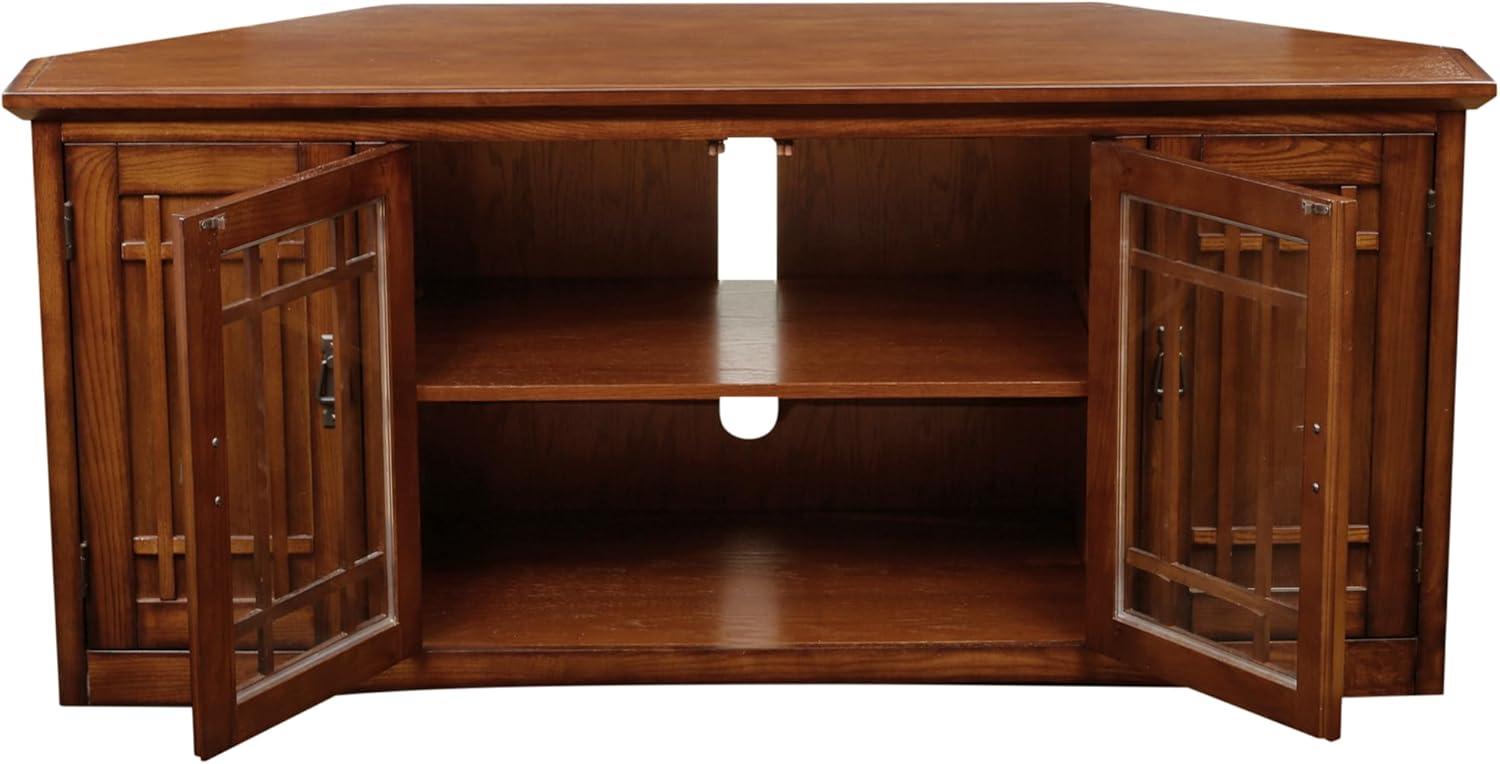
When you crouch down and peer into the cabinet openings, the solid wood panels show their grain continuity and the joinery becomes more obvious than it is from across the room. The seams where top and side panels meet reveal glue lines and, in some spots, small fastener heads sunk below the finish; the finish itself helps mask these details, but the way pieces align and the tiny variations in fit tell you how the case was put together. You’ll notice the shelving rails are part of the internal framework rather than loose metal brackets — they’re routed into the side walls and follow the same medium-oak surface, so the support feels visually integrated with the cabinet when a shelf is in place.
Up close, the shelving system is a mix of routed rails and rows of predrilled holes for adjustment; moving a shelf requires a short, intentional nudge to lift it off its stops, and the shelf slides back into place with a small scrape that’s audible in a quiet room. A few specific observations stand out:
- Shelf rails — routed into the sides, matching the wood tone and sitting flush with the interior face.
- Shelving panels — sit on the rails or into pegged holes, with the front edges largely concealed by the door frames.
- Visible joinery — glue lines and fastener locations appear at corner seams and panel junctions, with recessed back panel fastenings where the unit is assembled.
Using the shelves day to day, you’ll find the construction details are more of a background fact of life than a focal point, but they do influence how easily you reposition shelving and how the interior ages over routine use.
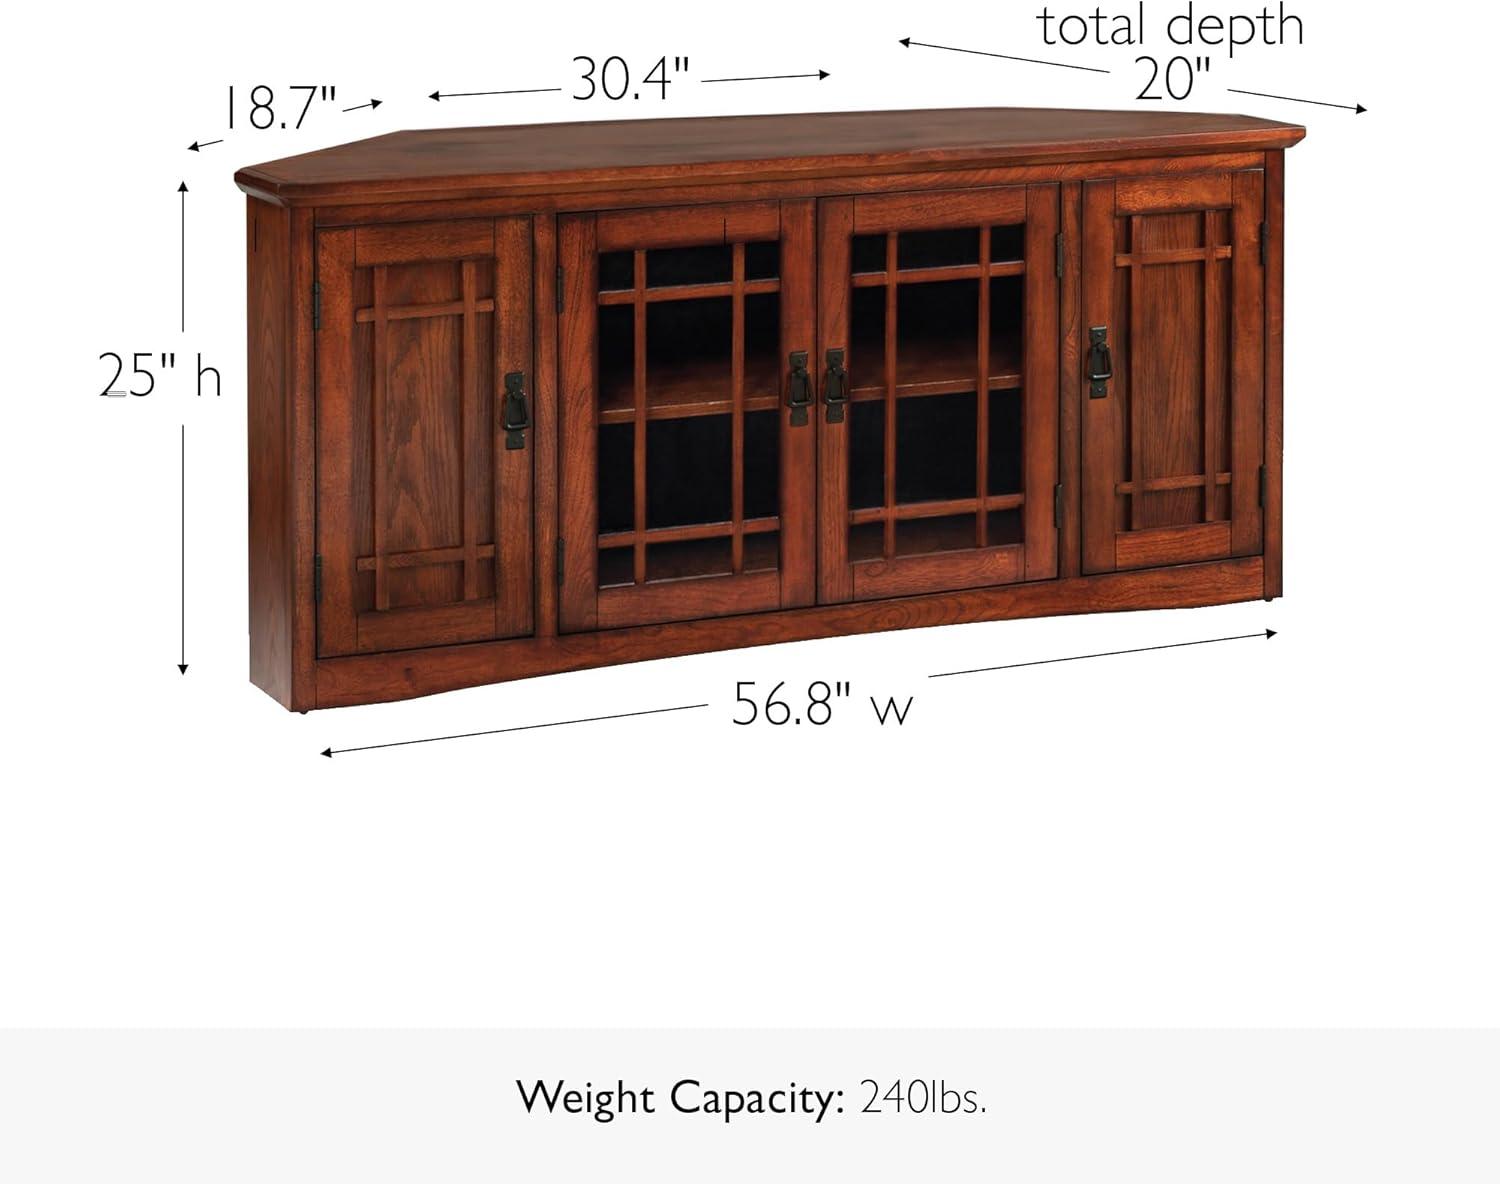
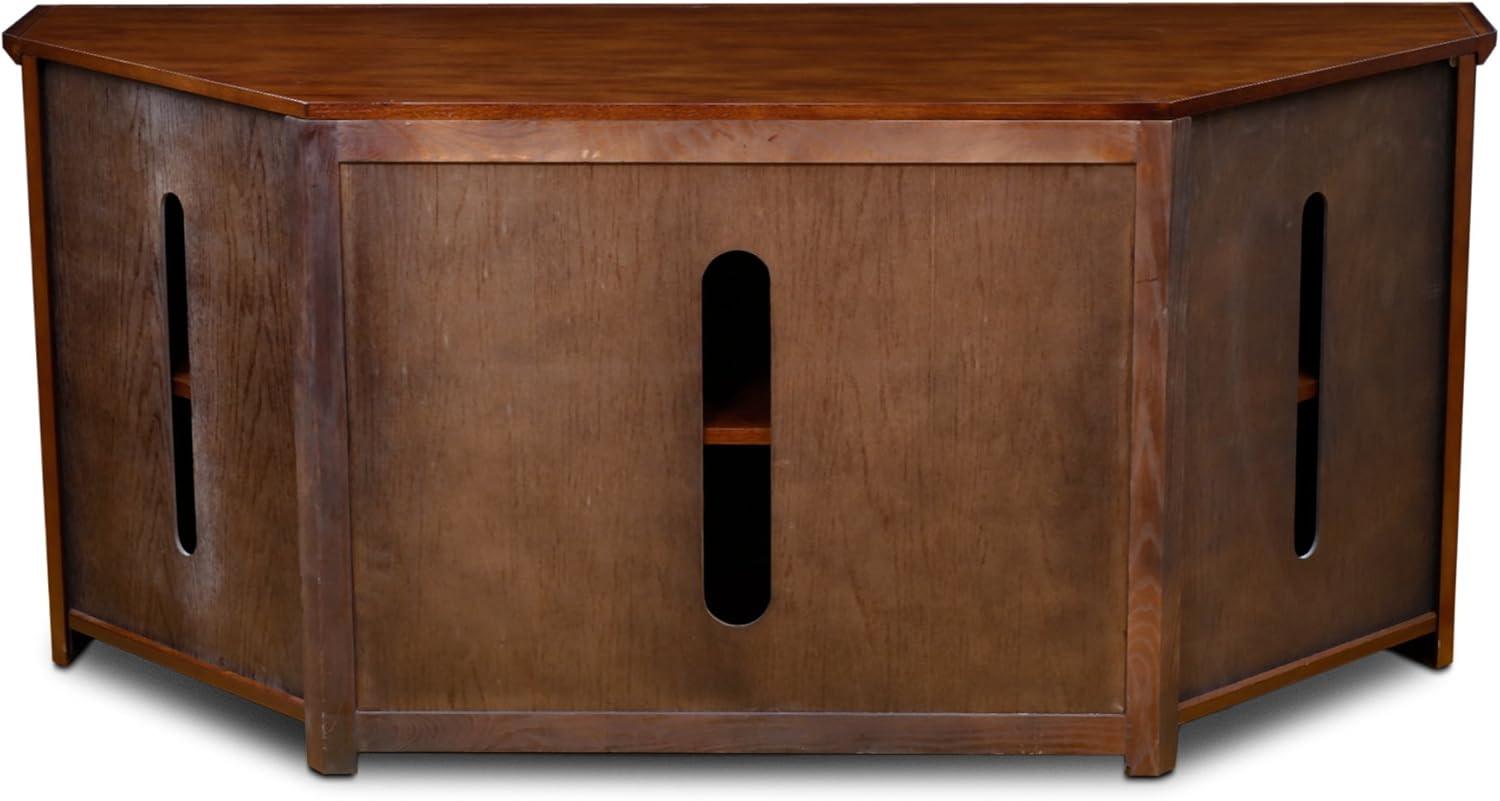
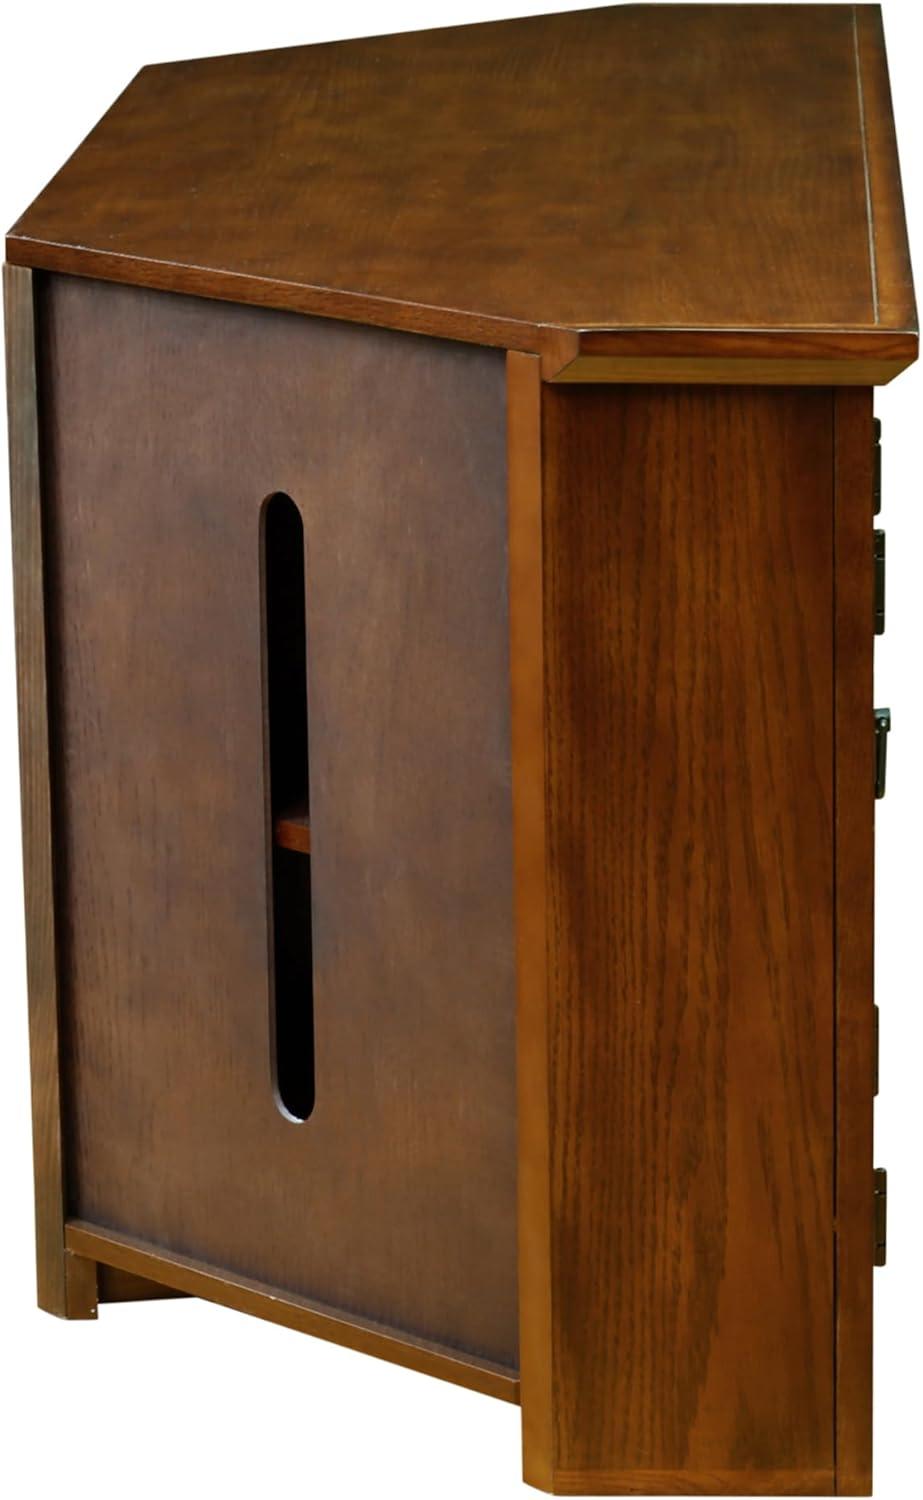
The piece settles into a corner with a shallow, triangular presence that visually tucks the media area out of the main traffic path; from typical seating positions the screen reads as centered along the room’s diagonal rather than pushed flat against a single wall. Because common TV measurements are diagonal, the relationship between a set’s stated size and how much of the top surface it occupies isn’t one-to-one — larger diagonals often translate into noticeably wider screens that approach the front edges of a corner top. In practice this means some TV bases or pairs of feet will sit close to the stand’s outer corners, while slimmer pedestal mounts or wall-mounted screens leave more of the top clear; small forward or side-to-side adjustments are commonly made to line the screen up with sightlines. The shelf arrangement behind the doors creates staggered storage zones, so components tend to be pinned to one side or stacked vertically depending on their footprint and the chosen shelf positions, and the perforated back keeps cords directed toward the corner junction rather than draping into the room.
- Edge clearance: TVs with wider bezels or spread-out feet will visually fill the top; narrower bases often leave usable surface at the centre front.
- Shelf stacking: Adjustable shelves mean a taller receiver or game console usually occupies a single shelf opening, while multiple slim devices get spread across shelves or placed behind one of the end doors.
- Viewing geometry: the corner placement shifts the viewing axis slightly outward, which can affect perceived screen size from side-seated positions.
| TV diagonal | Approx. screen width | How it usually sits on a corner top |
|---|---|---|
| 48″ | ~42″ | leaves a modest border of top surface visible; feet often sit well inside the outer edges. |
| 55″ | ~48″ | Approaches the outer thirds of the top; base placement and bezel width become more noticeable. |
| 60″ | ~52″ | Fills much of the corner façade; some feet or wide bezels will reach close to the front corners. |
Full specifications and configuration details are available at this product listing.
Unboxing and the assembly steps you will follow with the included parts and fasteners
when you unbox the stand you’ll pull out several wrapped panels and a clear hardware packet alongside the instruction sheet. Parts are individually wrapped or banded to prevent scuffs; the glass doors and any exposed trim are cushioned, and hinges often arrive already attached to the door panels so you don’t start from scratch. You’ll likely open the hardware bag and find a mix of small items (screws, shelf pins, and short bolts), a set of door pulls, and probably an anti-tip strap or bracket tucked in with the instructions. Before you begin, you tend to spread the pieces on the floor near the corner where it will live, check the inventory against the parts list, and set a Phillips screwdriver nearby — small adjustments to alignment or tightness are common as you fit everything together.
Quick assembly sequence you will follow is straightforward and mostly driven by the panel shapes and the included fasteners. First you expand the hinged end cabinets into place,then slide or drop the bottom panels into their slots and insert the back panels so the perforations align for cable access; next you position the top and use the supplied screws or bolts to secure it. After the main shell is fastened you press the shelf pins into the pre-drilled holes and set the adjustable shelves, then attach the door pulls and make minor hinge adjustments so the doors close evenly. In most cases the hardware packet contains the common pieces you’ll need; the table below summarizes typical fasteners and what you’ll use them for during these steps.
| Fastener | Function in assembly |
|---|---|
| Screws/bolts | Securing the cabinet top and joining panels |
| Shelf pins | Supporting adjustable interior shelves |
| door pulls | Attached to glass/wood doors for opening |
| Hinges (pre-attached or loose) | Mounting and aligning the doors |
| Anti-tip strap/bracket | Anchoring the unit to wall for stability |
How this stand matches your expectations and where it might limit your setup

The stand largely tracks expected behavior for a corner media piece in everyday use.The broad, corner-oriented top typically accommodates a large flat-panel and a low-profile soundbar while leaving a little room for decorative items; components stored behind the glass doors are straightforward to arrange as the shelves can be shifted to different heights. Cable routing through the perforated back keeps most wiring tidy, though grouping of cords remains visible when doors are open or when many devices share the same bay. Assembly and daily operation tend to feel uncomplicated—the unfolding setup and self-closing hinges make the unit ready-to-use quickly and keep routine interactions smooth.
Access and ventilation can present practical limits in real rooms. Doors that swing outward may be awkward to open when the cabinet sits deep in a tight corner,and clear glass fronts leave component faces and dust on display rather than concealed. Taller or deeper AV boxes with bulky power bricks sometimes require removing a shelf or shifting layout to fit, and densely packed electronics can reduce airflow around heat-producing devices. These tendencies are situational and depend on how many and what type of components are planned for placement. Full specifications and configuration details are available on the product listing: See full product information
When you tuck the stand into a corner, it often becomes a quiet backdrop rather than the room’s loudest piece; leave a little breathing room on either side so art or a plant can peek out and soften the hard angles. Pay attention to sightlines from the couch — angling the screen a few degrees toward the main seating area and keeping the top surface uncluttered helps the whole setup read as intentional instead of jammed together. In everyday use you’ll find small habits shape the look: a tray for remotes,a low table lamp to balance evening glare,or a quick swap of seasonal décor on the top keeps the vignette feeling fresh without a full redo.
Styling moves that tend to work across different spaces include layering textures and heights around the stand and letting one side carry visual weight while the other stays minimal. For clarity: anchor with a taller element (lamp, vertical art) and balance with lower, tactile pieces (rug, basket) so the corner doesn’t disappear or dominate. A few quick, situational ideas you might try are below, followed by a short reference table that summarizes placement cues for common rooms.
- Living room: pair the stand with a narrow console or plant to create a circulation path; rotate display objects so the top reads arranged, not crowded.
- Media nook: use slim vertical storage or floating shelves nearby to stack components without blocking sightlines; keep frequently used items within easy reach.
- Small apartment: angle a chair or pouf to form a diagonal sightline that makes the corner feel integrated with the rest of the room.
| Setting | Quick styling cue |
|---|---|
| Open living room | Use a low rug and a single tall lamp to define the media corner without closing off space |
| Tight media nook | Keep surfaces minimal and rely on vertical accents to avoid a cramped feel |
How It Lives in the space
After a few weeks the Leick Home 60 in Corner TV Stand settles into the room as if it had always been there, and you notice it folding into familiar sightlines as time passes. In daily routines it becomes a place for remotes and a low perch for the cat, the surface quietly picking up scuffs and fingerprints that map ordinary use. You watch small habits form around it—the lean of cushions, the route to the couch, the casual drop of things—more about living in the space than about the piece. Over time it simply stays.