decordip Garden and patio decoration inspiration
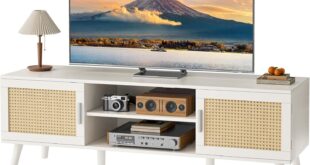
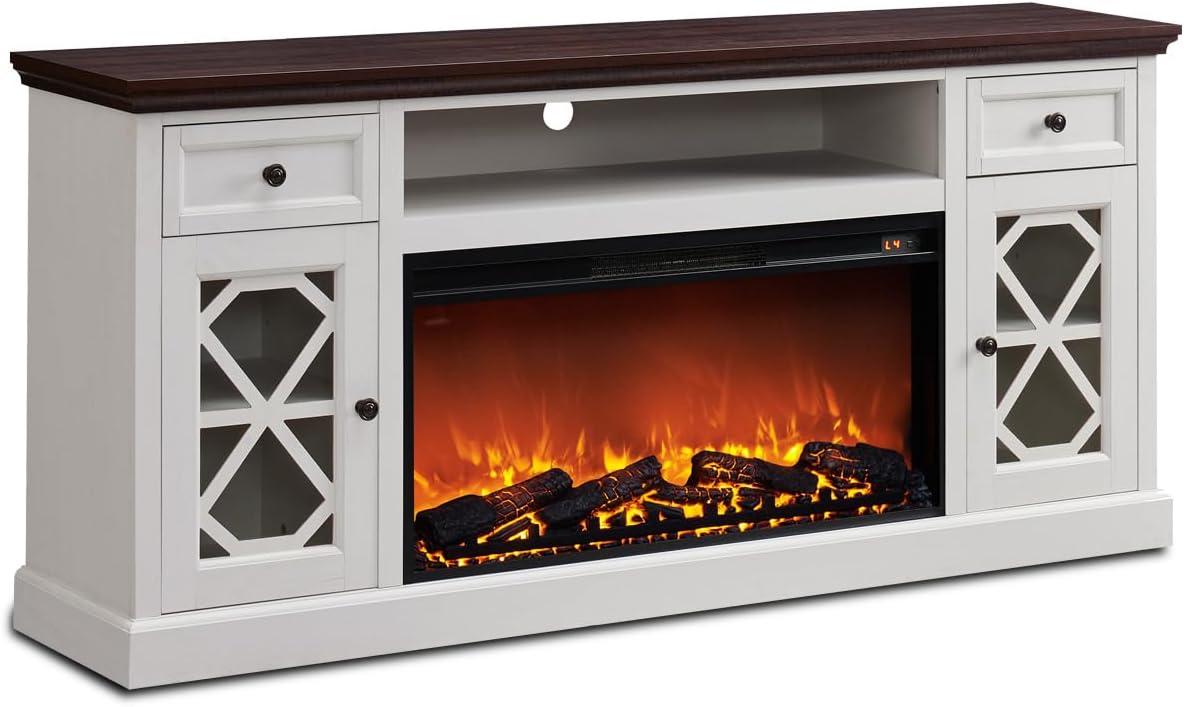
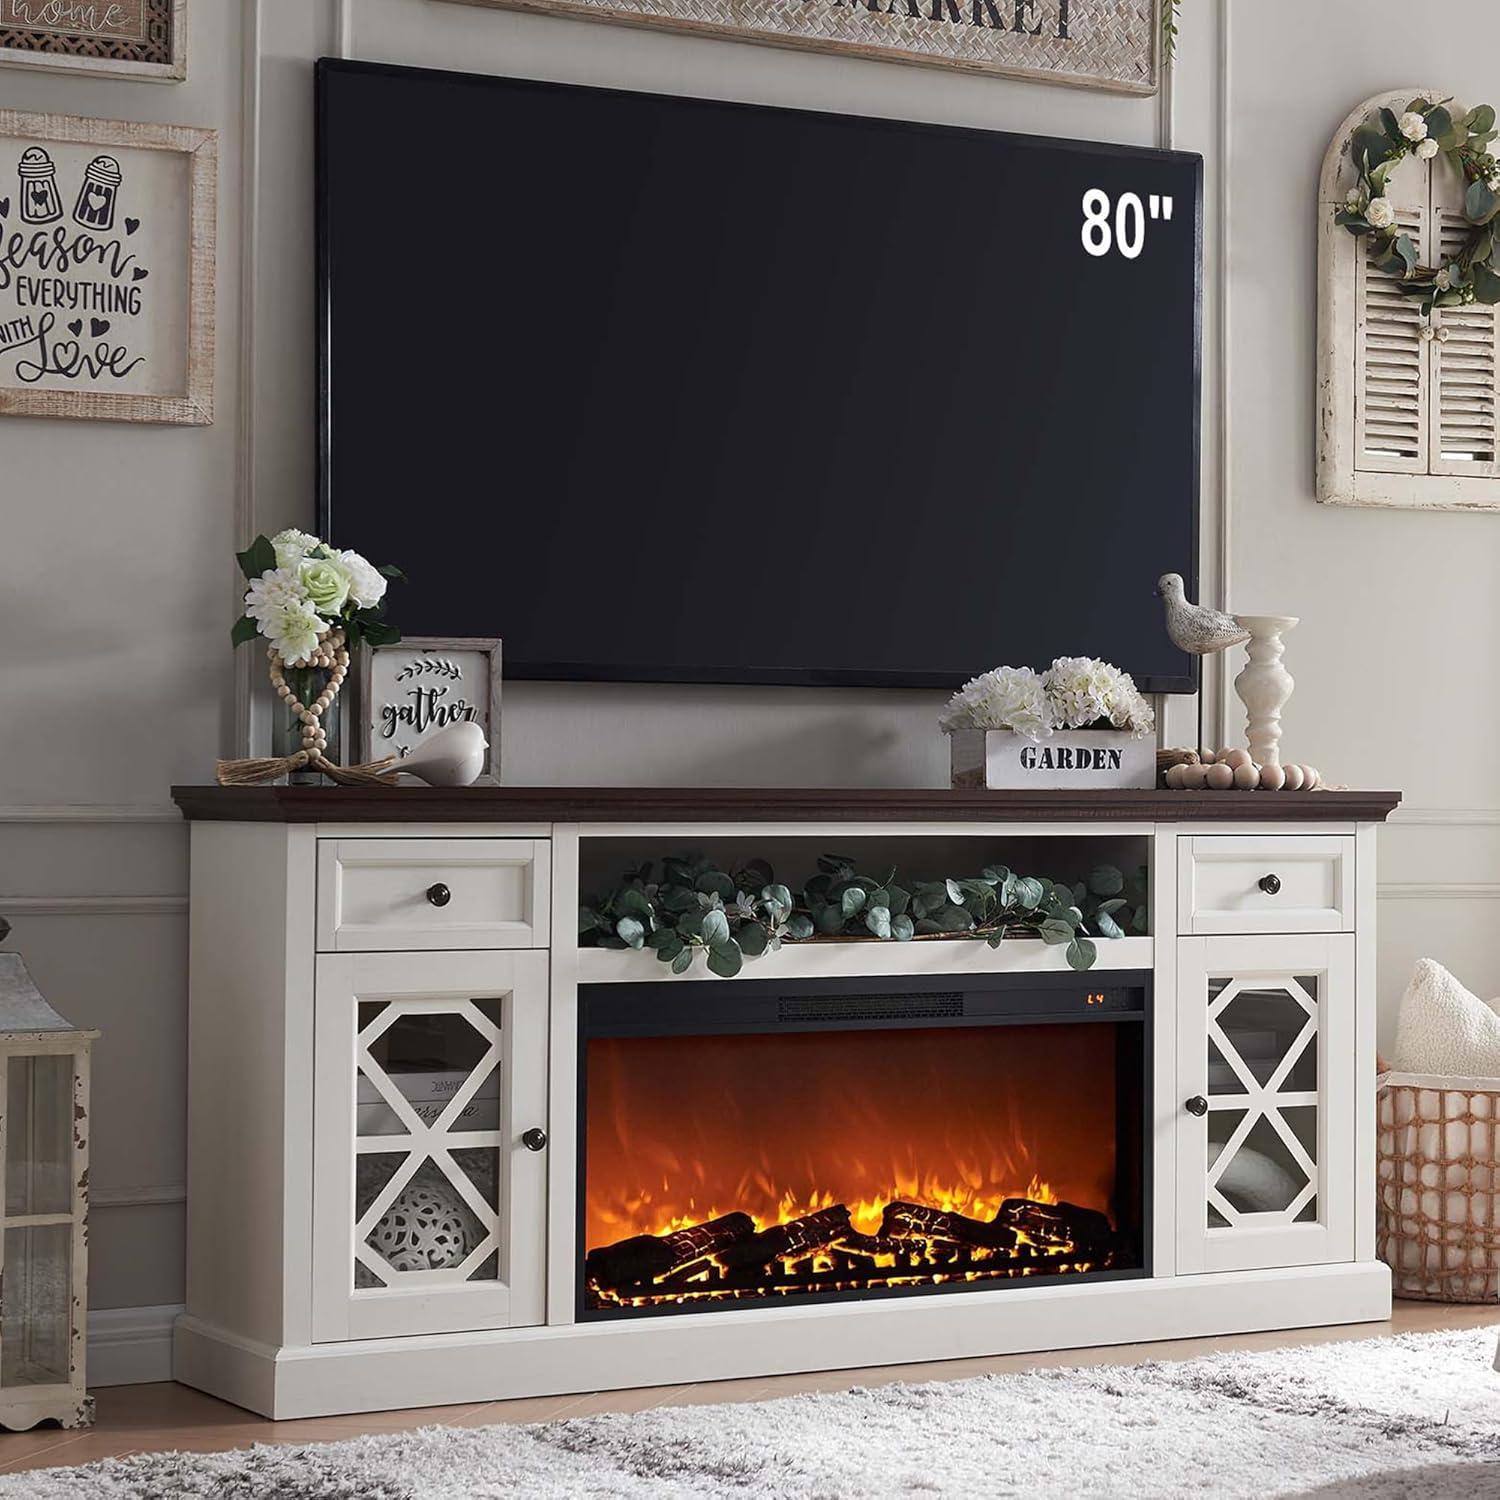
A low, wide silhouette stretches beneath your screen; you run a hand along the painted top and feel its reassuring weight. That’s the IFGET3D Farmhouse Fireplace TV Stand — the 70‑inch white console — its diamond‑pane doors catching the afternoon light as you move through the room. From across the living area it reads as substantial rather than fussy, the proportions settling the wall without calling attention to themselves. Flip the insert on and a warm amber flicker spills across the front panels; the flame effect feels layered, the heater emitting a soft, steady hum more felt than heard. Up close the finish shows a subtle wood grain and the doors close with a muted thud, leaving an impression of texture and real presence.
When you first unpack the farmhouse fireplace TV stand and its thirty six inch electric insert
When the boxes arrive, you’ll notice they’re packed with a lot of padding — thick foam sheets, corner protectors and wooden boards that make unwrapping a deliberate, two-handed task.You set a box down, cut the tape, and peel back layers of plastic to reveal flat panels and wrapped hardware; there’s a faint factory smell and a few protective films over painted surfaces and the glass on the fireplace insert. The insert itself is heavier than it looks in photos and tends to feel awkward to lift alone, so you’ll probably shift panels around and pause to reorient them before the real assembly begins.
Before you start, you usually lay everything out so nothing gets lost. On the inside of the boxes you’ll find labeled bags and a few loose pieces that benefit from a quick sorting session — people frequently enough plop small screws into a bowl or line the bags up next to the instructions. Typical items you’ll uncover include:
- Main panels and doors — wrapped individually and often numbered or lettered to match the diagram.
- Drawer components and slides — smaller boxes inside the larger crate, sometimes with extra packing material stuck to them.
- Hardware packs — each type in its own bag and labeled; you’ll find cam locks, dowels and several screw varieties.
- Electric insert — cushioned by foam, with a bundled power cord, a remote tucked in a small bag, and a thin protective film over the viewing surface.
- Instruction manual and templates — usually on top, so you don’t have to hunt for them once you start sorting.
With parts spread out you’ll probably spend a few minutes checking for obvious damage and separating fasteners by type, then peel protective films off glossy faces as needed. It’s a small, routine choreography — the kind of unpacking where you put on some music, clear a patch of floor, and make a habit of keeping like pieces together so the actual build goes more smoothly.
How the white highboy proportions and diamond paneled doors settle into your living room
The tall, narrow silhouette tends to read as a vertical counterpoint in most living rooms: it lifts the eye from the low plane of a sofa to the ceiling and quietly breaks a long horizontal run of furniture. You’ll notice how it anchors a wall without filling it entirely — the space above and around the piece becomes part of the composition, not leftover void. In tighter rooms this vertical emphasis can make the seating area feel cozier; in larger, open plans it creates a focused zone that other elements orbit around. Small, habitual nudges happen as you live with it — shifting a floor lamp an inch, angling a rug slightly, or clustering a taller plant nearby so the overall grouping feels balanced rather than top-heavy.
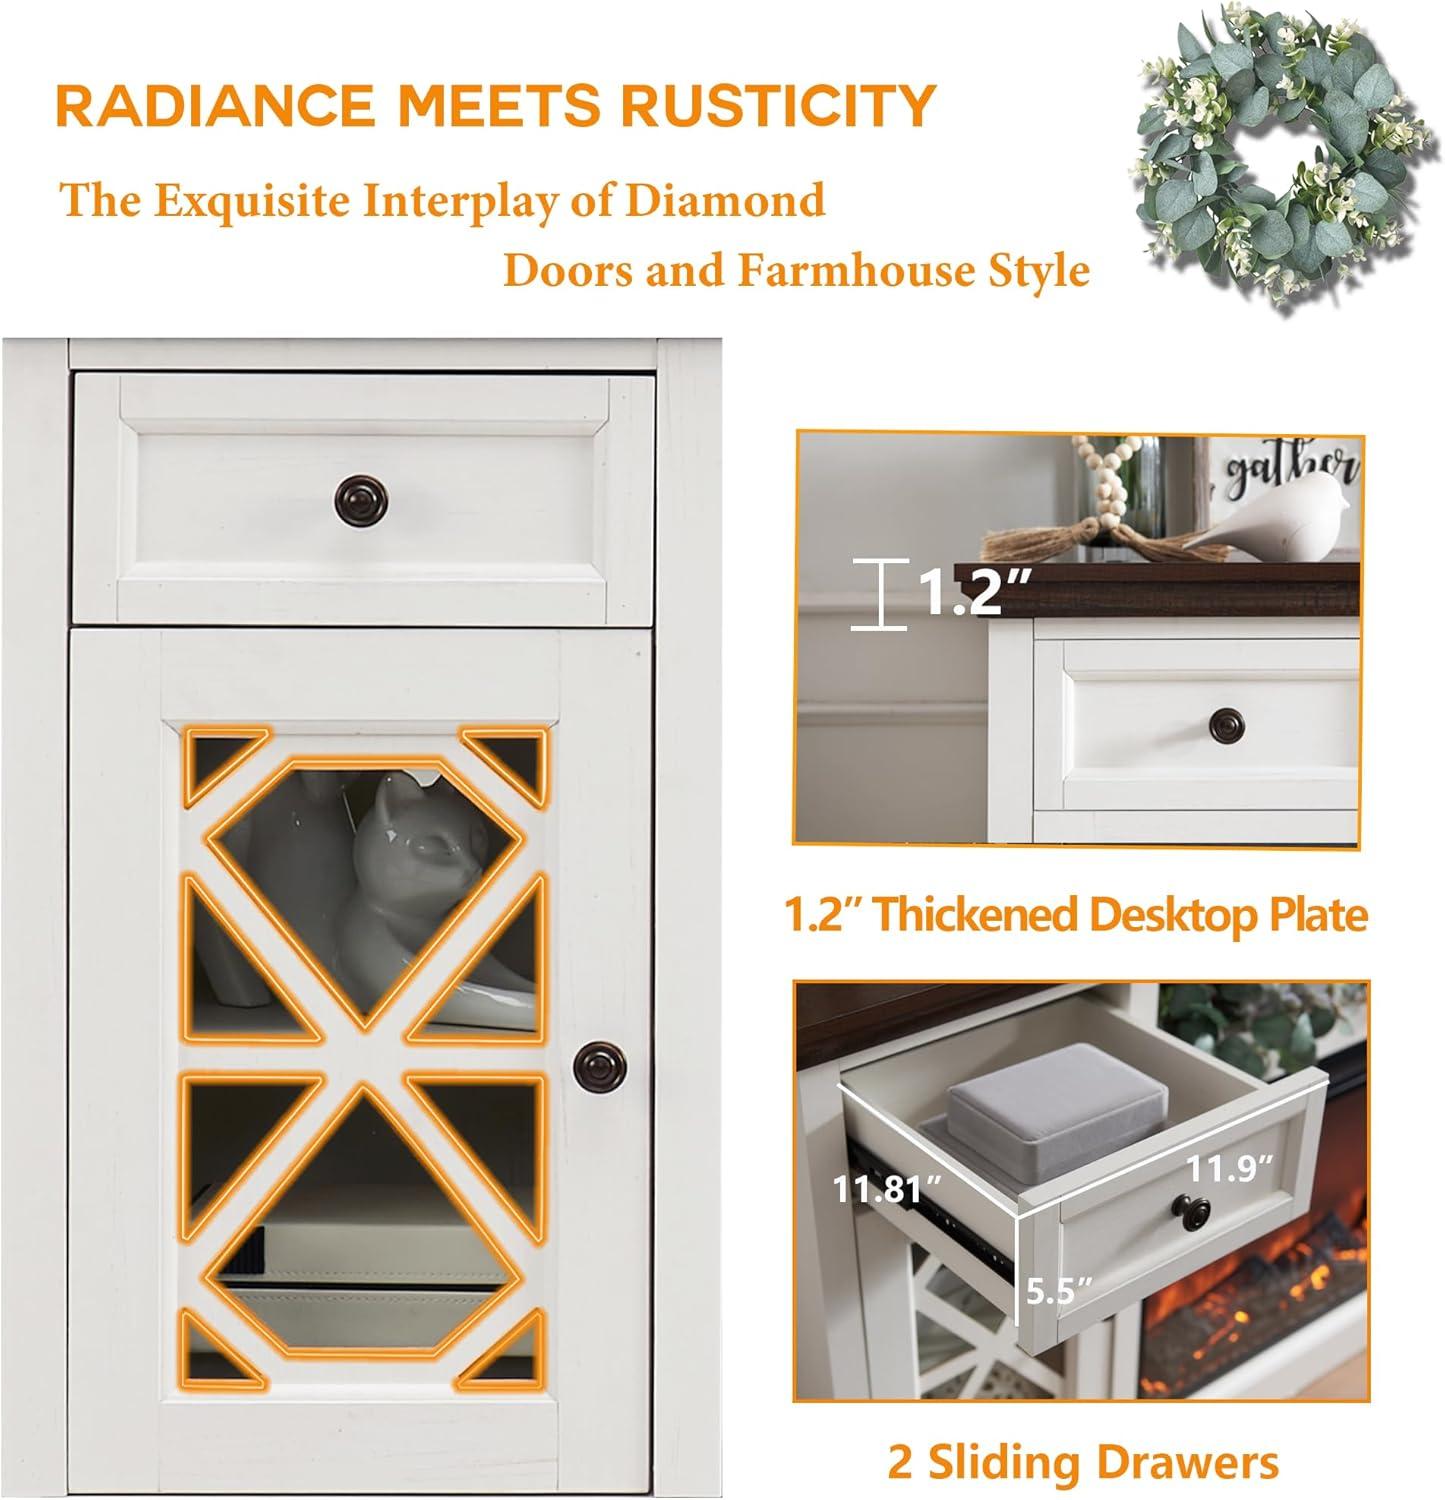
The diamond paneled doors introduce a repeated geometry that softens the mass and gives the front a rhythm that changes through the day. The diamond motif catches and fragments daylight and lamp light, producing faint shadow lines that subtly animate the facade; at night the pattern reads differently under ambient lighting, frequently enough blending into other linear elements in the room. People commonly echo that geometry elsewhere — a patterned pillow, a framed grid, or a narrow mirror — to create a quiet visual conversation.
| Lighting condition | Observed effect of the doors |
|---|---|
| Morning/bright daylight | Diamond pattern appears crisp; shadows add texture |
| Evening/lamplight | Pattern softens and becomes a subtle backdrop for decorative objects |
- Echoing scales: you may find yourself repeating small diamond or grid motifs nearby.
- Placement tweaks: a slight lateral shift of art or a lamp often makes the doors sit more comfortably within the room’s visual flow.
What the painted finishes,drawer hardware,and fireplace components are made of and how they come together in your setup

The cabinet’s white surface you see and touch is a painted coating over engineered panels, with real-wood edging used where pieces meet so the visible seams don’t look raw. In everyday use that finish reads as smooth and matte; it wipes clean with a damp cloth and can show faint fingerprints or scuffs if you handle the doors and top a lot. The drawers use straightforward hardware — small knob-style pulls (usually metal or metal‑finished) and basic metal runners — so when you open and close them the motion feels direct rather than cushioned. During assembly you’ll notice the pulls and plates are separate pieces to attach, and occasional alignment nudges are part of getting the fronts to sit flush and the doors to line up neatly.
- Painted surfaces: white paint over engineered panels with real-edge banding
- Drawer hardware: metal knobs/plates with metal runners
- Fireplace trim: glass front and plastic/resin decorative logs behind the flames
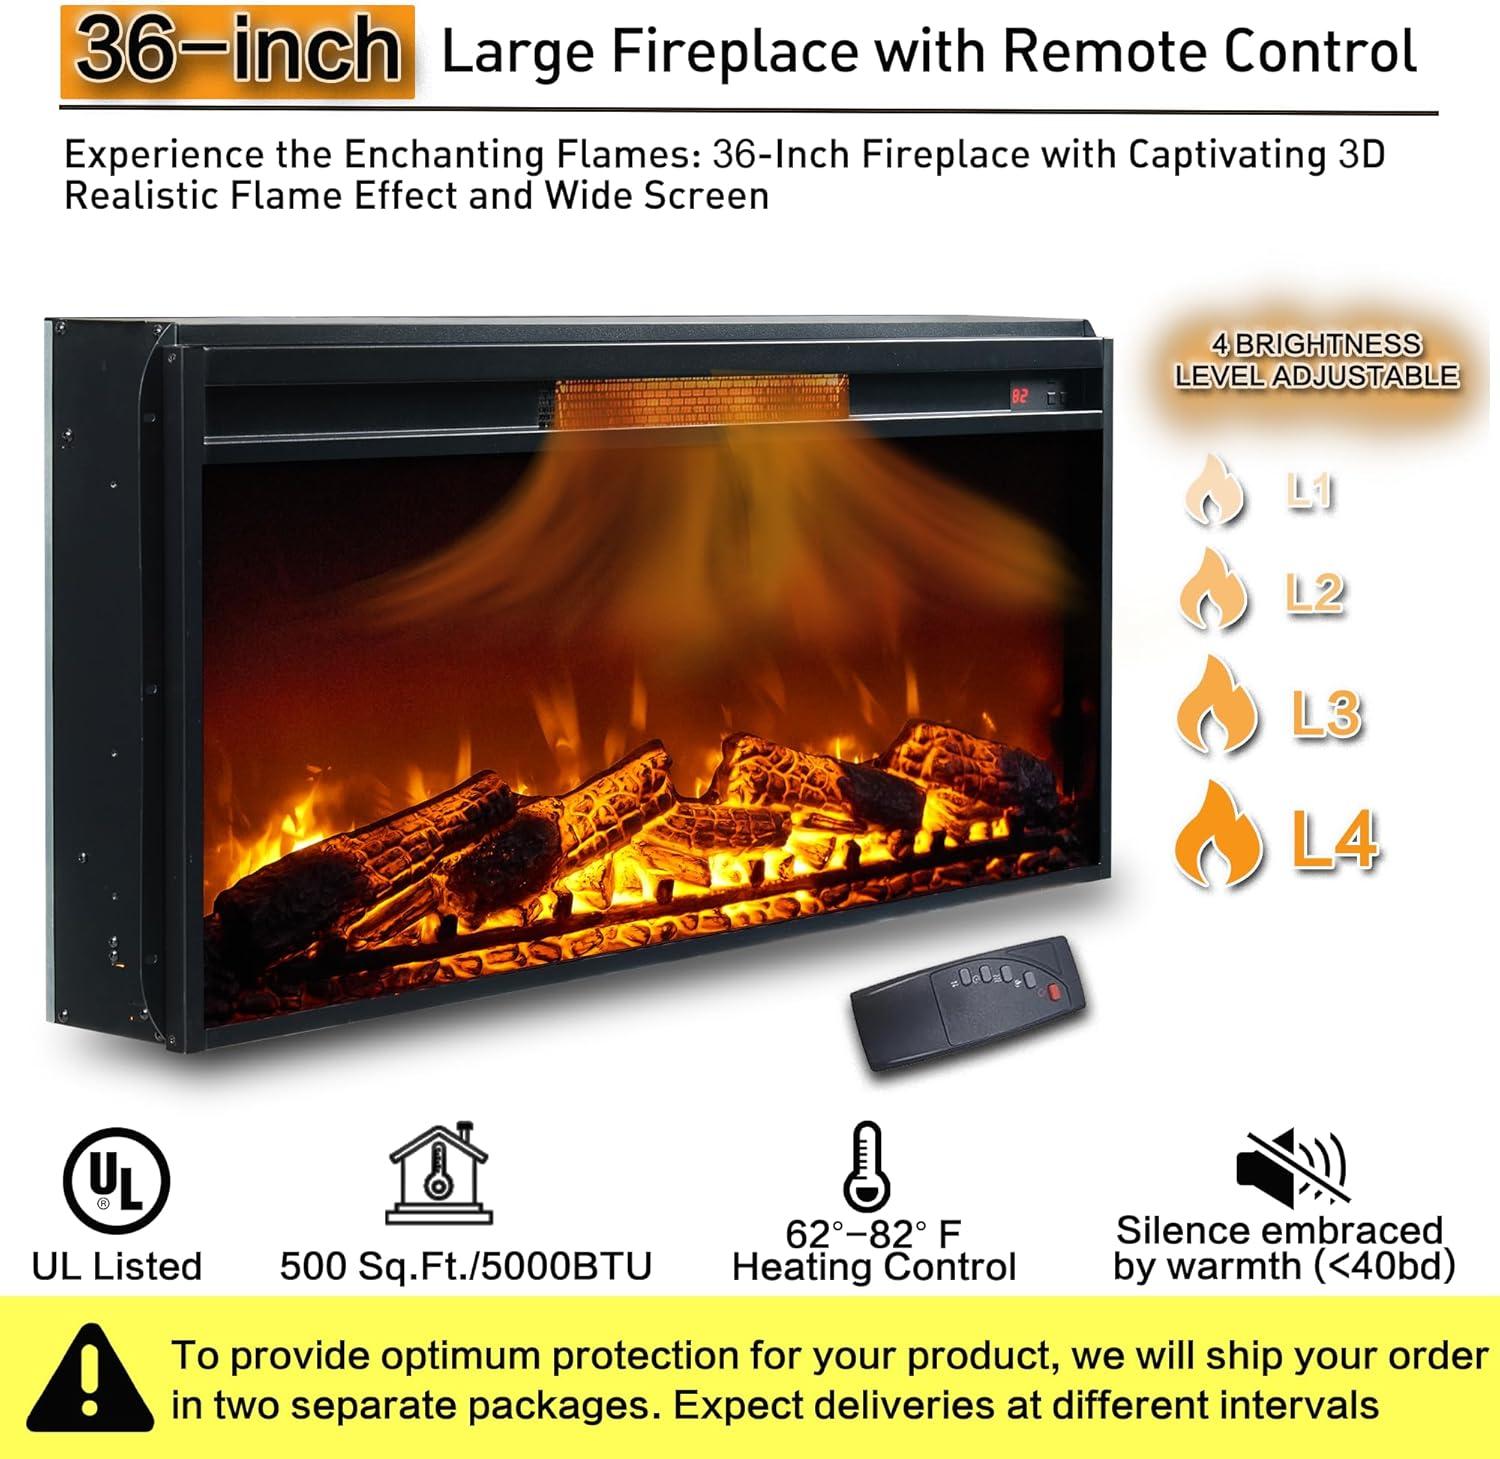
The electric insert itself is a self-contained module with an LED-based 3D flame effect behind a glass face, faux logs or embers made from molded resin or plastic, and a metal housing that contains the heater fan and heating element. In your setup that insert sits into the central cavity and plugs through the rear access, so the painted surround frames the glass while the vent grille below or on the unit directs warm air into the room; you’ll feel that warmth at the grille more than on the painted panels. Controls are on the unit and frequently enough mirrored by a remote; the decorative doors and drawer fronts don’t interfere with the insert once everything is aligned, though the painted edges closest to the opening can be warmer to the touch after extended run times.
| Component | Typical material | How it integrates in use |
|---|---|---|
| Painted panels | Engineered wood (MDF/particleboard) with paint/topcoat | Forms the visible frame and shelves; shows normal handling wear and cleans with a cloth |
| Edge banding | Real wood or veneer | Conceals panel cores and softens joins at visible edges |
| Drawer hardware | Metal knobs/plates and metal runners | Attached during assembly; provides direct pull and sliding action |
| Fireplace insert | LED elements, glass front, plastic/resin logs, metal housing | Sits into central cavity, plugs through the back, vents heat through grille |
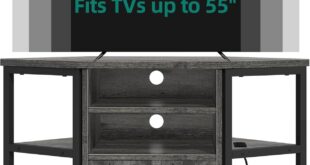
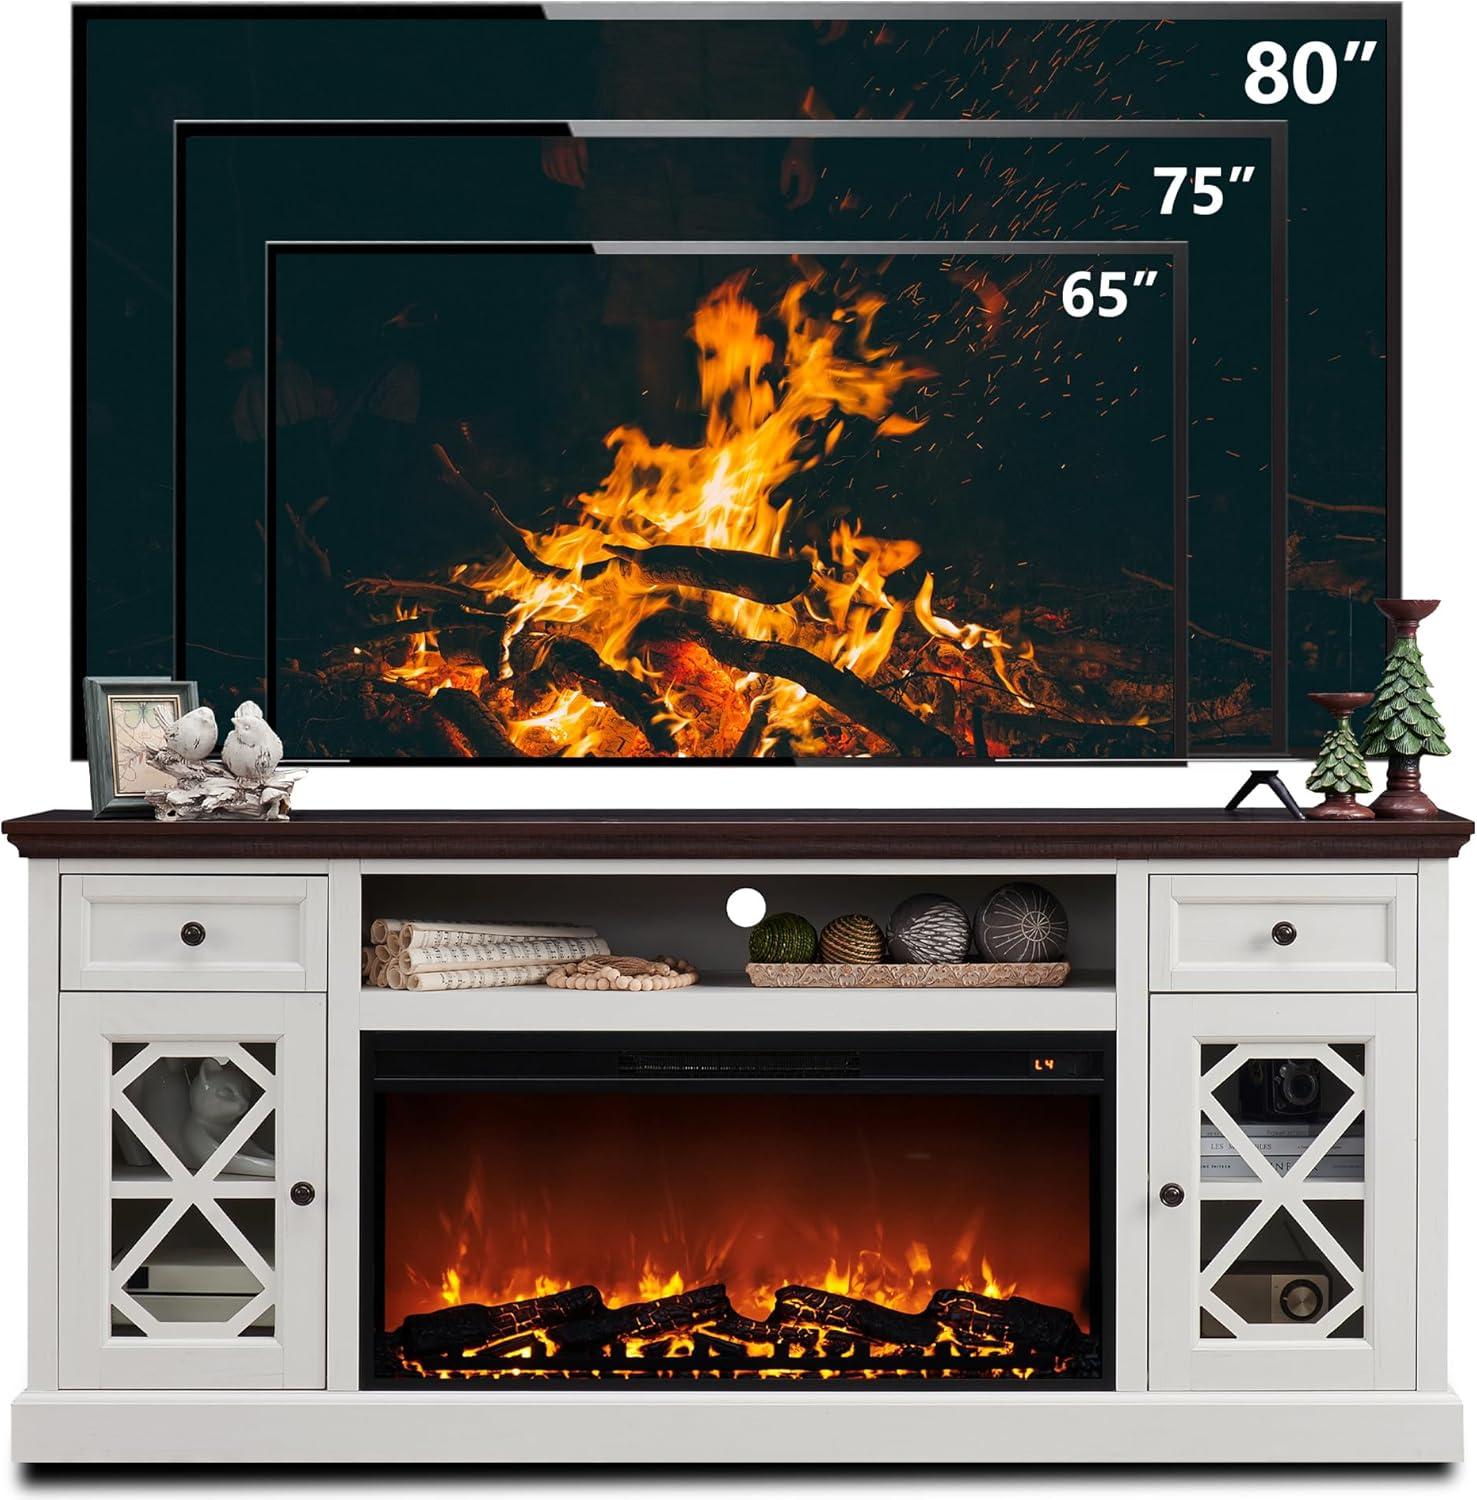
Measurements and clearances for placing the console in your room and accommodating large televisions
Placing the console in a living space usually means thinking about more than just floor footprint; airflow for the electric insert, cable routing, and the visual width of a large screen all interact.Leave a few inches between the back of the unit and the wall so the power cord and AV cables can pass without pinching, and to allow warm air from the heater to circulate — in many setups that ends up being roughly 2–4 inches of rear clearance. When a wide television sits above the mantle area, the outer edges of the screen will often extend beyond the cabinet sides; this creates a need to check sightlines from typical seating spots and to allow a little extra side clearance so the TV doesn’t feel cramped against nearby furniture or doorways. People commonly slide the console a few inches to one side or the other during setup to balance a screen off-center in a room, and occasional micro-adjustments during the first week of use are normal as cable lengths and remote ranges reveal practical limits.
The short list below captures typical clearances observed during in-home installations, followed by a simple reference table showing those figures in one view.
- Rear clearance: ~2–4 in. for cords and airflow
- Top/vertical clearance: enough room so the TV bezel doesn’t press against shelving or crown moulding (varies with wall mount or stand height)
- Side clearance: allow 1–3 in. each side beyond the TV’s bezel for ventilation and ease of access
| placement consideration | Observed guideline |
|---|---|
| Rear gap for cables/venting | 2–4 inches |
| Side clearance beside large screens | 1–3 inches per side |
| Viewing height (eye level when seated) | TV centre generally 36–42 inches from floor, depending on seating |
The measurements above reflect common in-room adjustments and the slight trade-offs owners often accept between a flush look and practical cable/ventilation space. See full specifications and configuration details
Daily handling and storage routines from the drawer to cable routing and the fireplace controls you encounter

When you live with this piece day-to-day, the most repetitive motions are opening the drawer, sliding the cabinet doors, and checking the back for cable access. You tend to keep small, frequently used items within arm’s reach: remotes, HDMI adapters, a TV manual or two, maybe a few spare batteries. The drawer accommodates those sorts of things without much hunting, and you often stash the fireplace remote there between uses so it’s not lost on the coffee table. Cable routing becomes a short, regular task — feeding the TV and console cords through the rear cutouts, looping excess cable into a soft coil, and velcro-tying bundles so the shelf inside doesn’t look like a nest. Every so often you reposition a power strip to make room for another plug or to free the fireplace’s cord; those small adjustments are part of the rhythm of living with media furniture and usually take only a minute.
- Typical items you stash: remotes, batteries, small streaming dongles, an HDMI cable or two
- Daily cable moves: feed through the back cutout, bundle excess, keep the fireplace plug accessible
- Small habits: return the remote to the drawer after using the heater, wipe dust from the cable openings weekly
The fireplace controls are ones you use more situationally than constantly: a quick press for power, a few taps to alter flame intensity or heat output, and sometimes the timer if you want the unit to shut off after a set period. You’ll find both the physical control panel on the insert and a handheld remote in circulation, so switching between them becomes second nature — remote for the couch, panel if the remote’s battery is dead. The table below gives a snapshot of what those basic inputs do so you don’t have to guess when you reach for the control.
| Control | Typical action you’ll perform |
|---|---|
| Power | Turn unit on/off; quick touch when you start a movie |
| flame/Effect | Cycle brightness or flame style for ambiance without heat |
| Heat/Level | adjust fan/heat output for warming the room |
| Timer | Set to auto-shutoff after a chosen interval |
you’ll notice small, everyday trade-offs: keeping the remote in the drawer reduces clutter but means an extra reach when you want to tweak settings; routing cables neatly can require you to unplug a device for a minute when rearranging consoles. Generally speaking these are handled as quick habits — a dusting here, a reroute there — rather than planned projects, and the control layout makes those tiny interactions straightforward in normal use.
How the console measures up to your expectations and where practical limits appear in everyday use
In everyday use the console generally performs in ways that match common expectations for an integrated electric-fireplace media piece. The flame effect provides a noticeable glow in dimmer rooms and the heater cycles quietly enough that background TV or conversation isn’t regularly interrupted; controls and the remote tend to be straightforward to operate and the cabinet sits solidly without wobble once placed. Routine tasks — turning the heater on and off, adjusting flame intensity or timer settings, wiping the surface — are simple to carry out, and the insert’s fan reaches its set temperature quickly in a small seating area. At the same time, some habitual behaviors emerge: the unit is heavy when assembled so it stays put rather than being shifted frequently, the flames read best in lower ambient light, and the front doors or panels can obscure remote signals unless positioned with line-of-sight or the remote is pointed directly at the insert.
Practical limits crop up during regular living-room rhythms and are worth noting as contextual observations rather than definitive flaws.
- heat distribution: Effective for nearby seating but not designed to replace whole-house heating in larger, open-plan spaces.
- Daylight visibility: Flame realism drops in bright, sunlit rooms and the visual impact is strongest at dusk or with softer lighting.
- Access and adjustments: Cable routing and component access behind the console can require moving the unit or lifting a TV to reach ports.
- Maintenance points: Vents and the inner display collect dust over time and benefit from occasional cleaning to keep the effect crisp.
| Everyday factor | Typical behavior observed |
|---|---|
| Heat output | Warms a small to medium seating area; limited reach in large rooms |
| Flame effect visibility | Most noticeable in low light; less pronounced in bright daylight |
| Noise | Fan is generally quiet at typical settings, audible when set higher |
| Mobility | heavy once assembled — not convenient to relocate frequently |
View full specifications and configuration details on the product listing
Assembly steps and routine care as you encounter them for the cabinet and its electric fireplace

When the boxes arrive you’ll instinctively spread out the labeled panels and separate the small hardware bags; the instructions walk you through matching codes on parts, and that moment of matching numbers tends to speed the work. Assembly begins with the larger panels and cam-locks — you’ll use a Phillips screwdriver and occasionally a rubber mallet to seat dowels — and at a few points you’ll want a second pair of hands to square the cabinet as you fasten the top and back. Hanging the diamond-style doors usually requires the most fiddling: align the hinges, check that the magnetic catches meet, and adjust the hinge screws in small turns until the gaps look even. The fireplace insert slides into the central opening last; you thread its power cord through the rear access, clip any trim pieces into place, install the remote’s batteries, and test the flame and heater before you finish. Tools you’ll reach for most often:
- Phillips screwdriver — for cam locks and hinge screws
- Rubber mallet — to nudge panels and dowels
- Level or second person — to square the unit and align doors
After setup, routine care follows a predictable rhythm: you’ll dust flat surfaces weekly, clean the glass panels with a soft cloth and a non-abrasive cleaner, and keep the fireplace’s air intake and outlet free from blankets or other obstructions. Every month or two you’ll glance behind the console to confirm cords are still routed neatly and that the plug and cord show no wear; unplug the unit before any deeper cleaning.Small maintenance tasks—tightening a loose screw at the hinge, wiping veneer edges, or lubricating drawer slides if they begin to bind—come up intermittently and are easy to handle in short sessions. the short table below summarizes common tasks and timing as they typically arise in everyday use:
| Task | Typical Frequency | notes |
|---|---|---|
| surface dusting | Weekly | Use a microfiber cloth to avoid scratches |
| Glass cleaning | As needed (weekly–monthly) | Spray cleaner on cloth, not directly on glass |
| Vacuum vents / check cord | Monthly | Unplug before cleaning; ensure airflow is unobstructed |
| Hinge/drawer adjustments | Every few months or when noticed | Tighten screws and apply lubricant to slides if squeaky |
| Remote batteries | When responsiveness drops | Keep spares on hand if you use the heater frequently |
how the Set Settles Into the Room
Living with the Highboy Farmhouse Fireplace TV Stand with 36-inch electric fireplace for a while, you notice it quietly takes on the rhythms of the room. Over time it claims a practical corner in your daily routines — where blankets are folded, remotes gather, and the painted surface picks up faint rings and the occasional scratch from ordinary use.In the evenings its low glow and the soft click of doors make it part of how the space moves, a familiar presence in regular household rhythms. After months it simply rests and blends into everyday rhythms.