decordip Garden and patio decoration inspiration
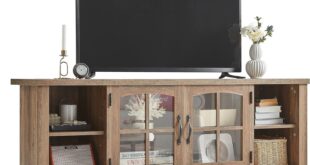
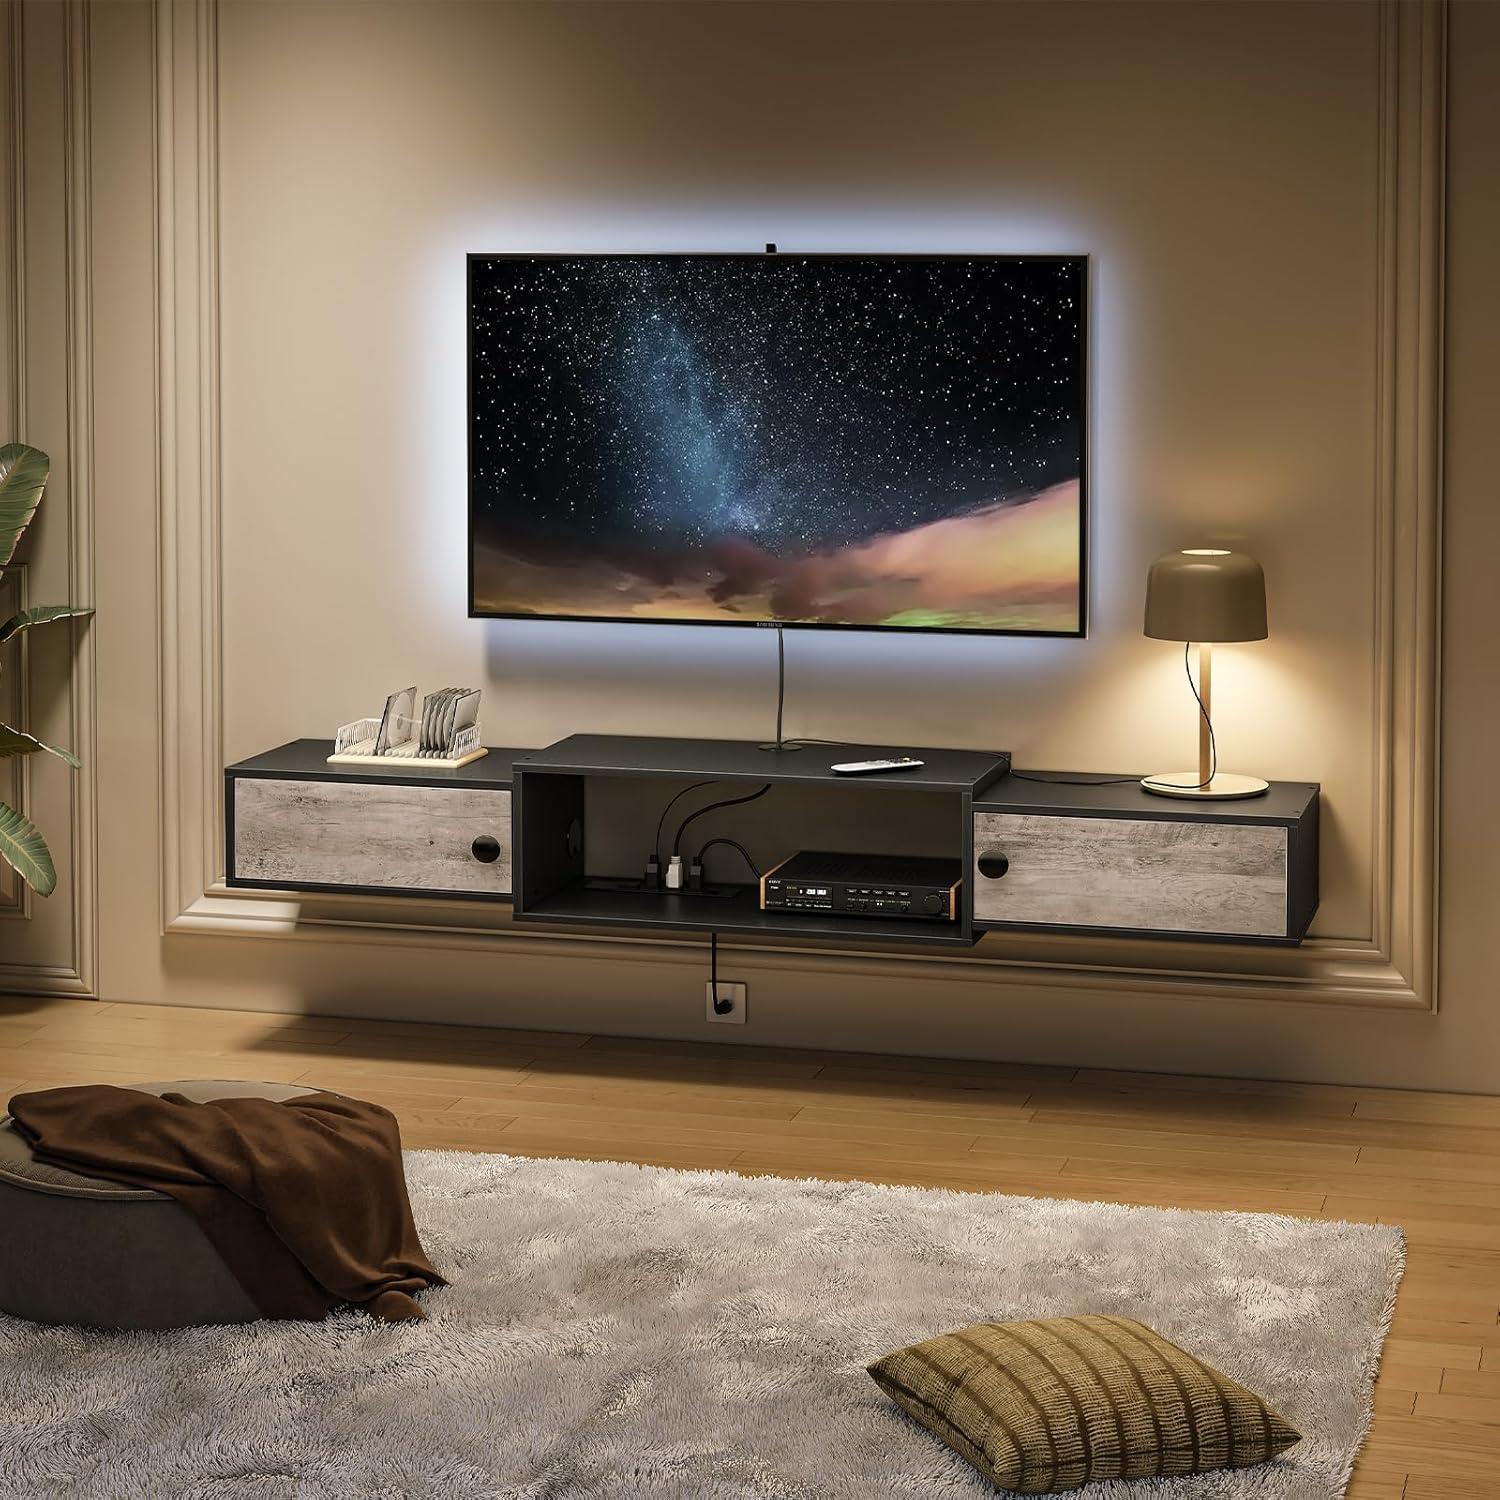
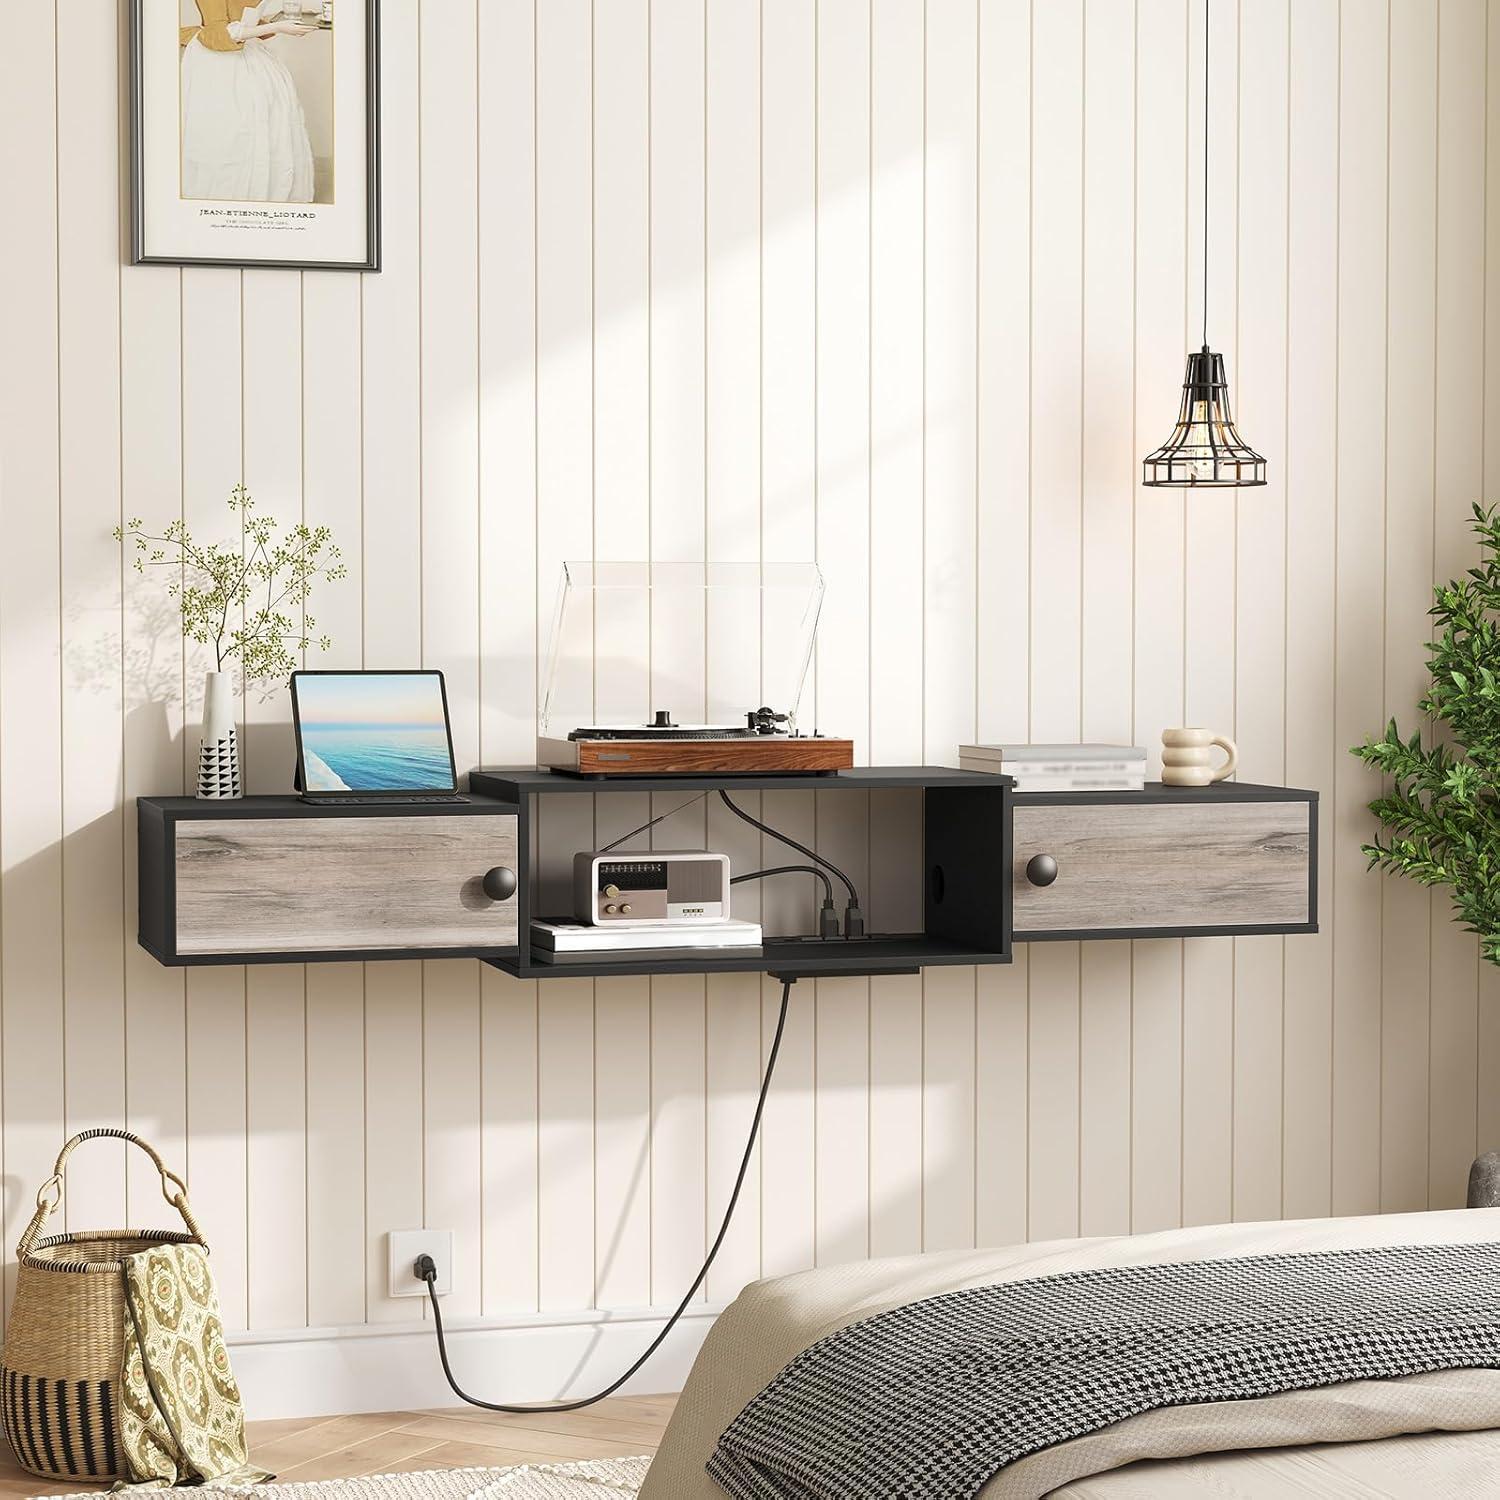
A horizontal plane seems to hover a few inches above the floor — that’s the HOOBRO 55″ Floating TV Stand with Power Outlets (BG11UDS01) in greige and black. From where you sit it reads as a low, steady presence beneath the screen, long enough to anchor the wall without shouting.Run your hand along the greige top and the finish is matte and slightly dry under the fingertips, while the black trim lends a crisp edge. When you open a side door a recessed power cluster and a tidy cubby reveal themselves, and cords slip back out of sight into a soft shadow. Scale-wise it behaves like a purposeful band across the room — considerable but not heavy — more architectural than decorative at first glance.
What you see at first glance with the HOOBRO fifty five inch floating TV stand with built in power outlets
When you first look at the unit mounted on the wall,the most obvious thing is the way it sits off the floor: a narrow shadow under the shelf makes the whole assembly read as a single horizontal plane rather than a piece of furniture,so your eye travels across the TV and the console without interruption. The finish and color split — a muted greige paired with black accents — gives a restrained,modern silhouette; seams for the doors and the tiny hardware are discreet,so nothing pulls focus away from the screen. Up close,you’ll notice small openings and a recessed area at the back where cables funnel away,and a compact access panel that hints at built-in power handling without dominating the front view.
- Floating silhouette — the gap beneath creates a lighter visual weight than a floor unit.
- Symmetrical doors and clean lines — create an orderly, centered appearance.
- Concealed cable openings — cords tend to disappear into the back rather than spilling out.
Set up with gear in place, the immediate scene is of a neat horizontal composition: the TV anchored above, the shelf forming a low, tidy baseline. If you open the doors or peer into the recessed area you’ll catch a glimpse of outlets and routed cords; closed, the whole thing reads as a simple floating block that keeps attention on the room’s focal point. Depending on lighting and viewing angle, the greige surface can look warm or slightly cool, and everyday habits — nudging a cable, angling a router — will occasionally reveal the practical details behind that pared-back first impression.
How the greige and black finish reads in your room when you lift it from the box
when you lift it from the box the first impression is about contrast and texture: the greige reads as a soft, mid-toned neutral while the black feels decidedly flat and absorbing. The surfaces often arrive with a thin protective film that mutes sheen until you peel it away; once removed the greige presents as a muted, slightly warm neutral and the black keeps a low lustre that doesn’t throw strong reflections. You’ll notice small handling marks or packing dust in corners at first,and fingerprints show up more readily on the black under certain angles,so there’s a brief period of rearranging and wiping while it settles into the room.
How the pair settles into your space changes with the light and what’s nearby — walls, floors, and the screen above all shape perception. A few typical observations follow from that first unboxing moment:
- Warm indoor light tends to warm the greige toward beige tones.
- cool daylight or LEDs can pull the greige toward gray,making the black look starker.
- Mixed or dim light mutes both; details soften and the contrast lessens.
| Lighting | How it reads |
|---|---|
| Warm bulbs | Greige warms; black feels softer |
| Cool light | Greige cools toward gray; black appears higher-contrast |
| Low ambient light | Both tones compress and read more uniform |
The materials, construction and dimensions that show how it will sit under your TV
You’ll first notice the panels and finish as you unbox and position the unit: the visible surfaces have a smooth, laminated look in greige or black and the cabinet feels like a composite wood construction rather than solid timber. The back carries a metal mounting plate that spans most of the width, and the hanging hardware sits flush so the cabinet hugs the wall once set.Inside, the hollowed cable channels lead from the shelf cavities to the rear, and the wiring pocket is integrated into the lower back so cords run discreetly instead of bunching beneath the TV. A few quick observations summarize how that construction translates into everyday use:
- Materials: laminated composite panels for the body with a metal bracket for wall attachment
- Access points: rear and underside cable openings that route cords into the cavity
- Doors and joins: symmetrical side doors that conceal storage and keep the front face continuous
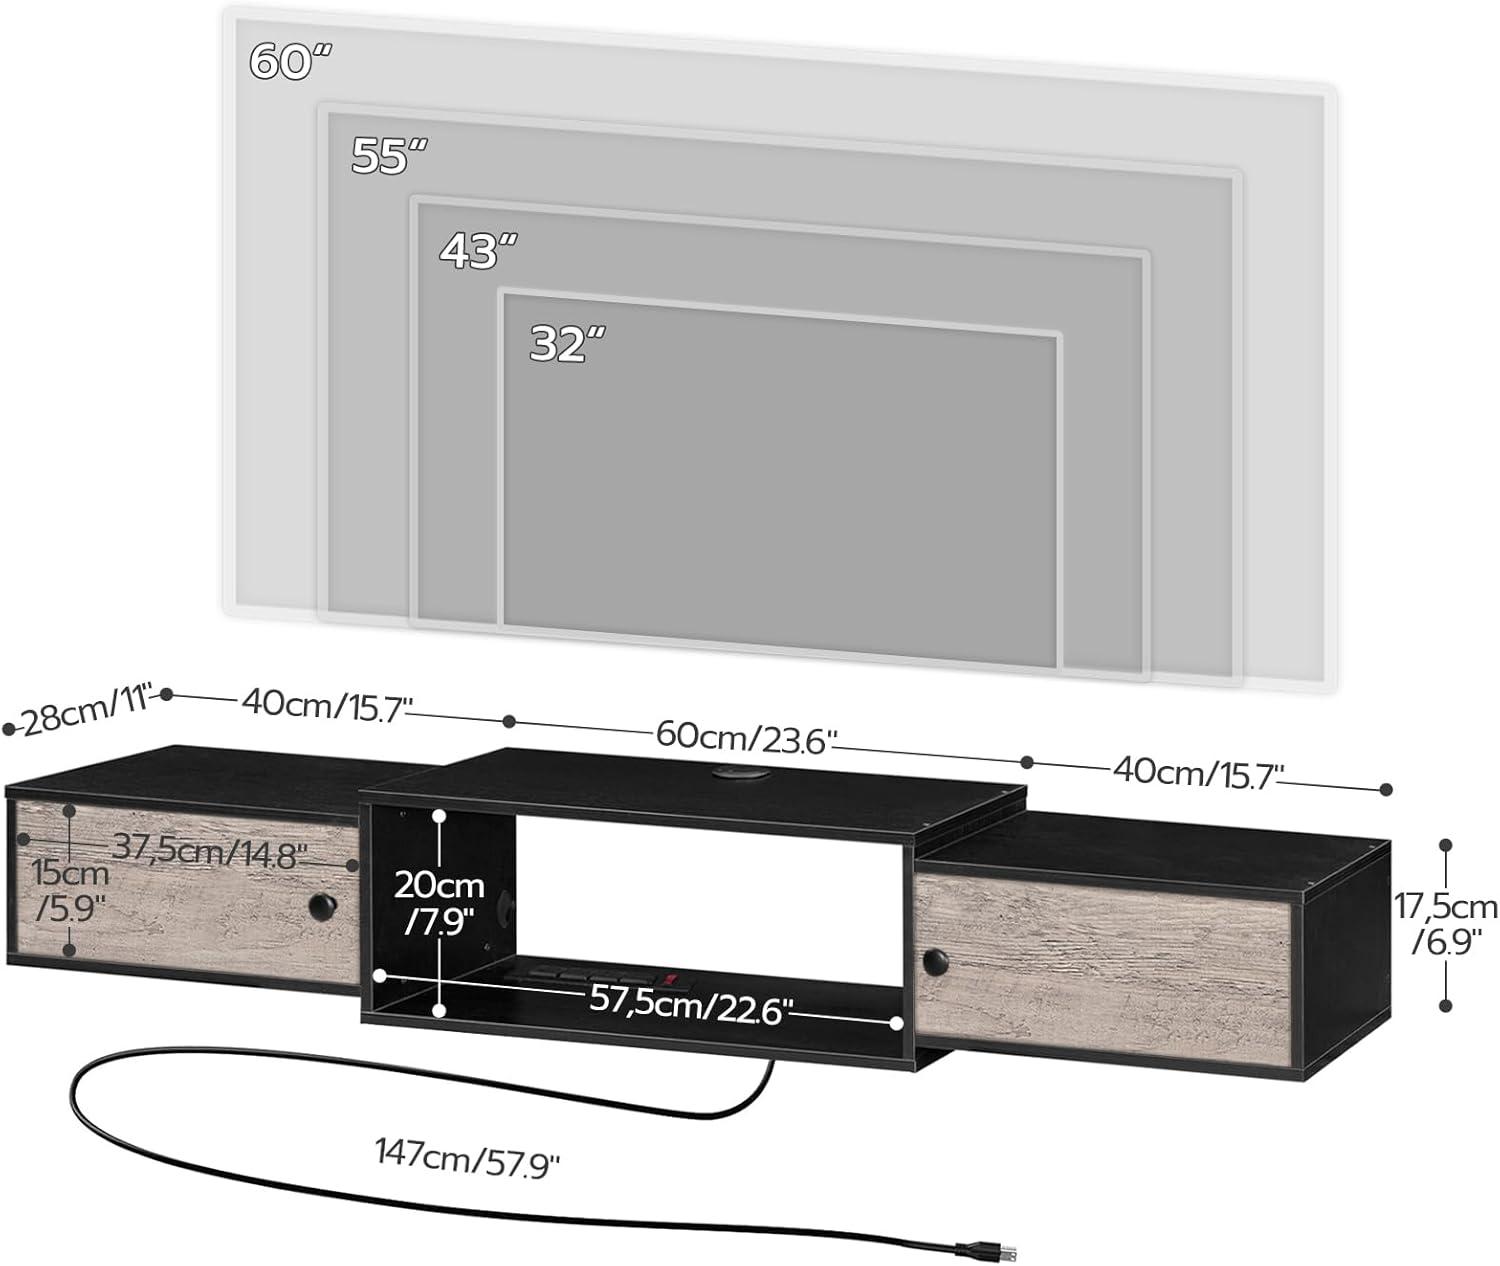
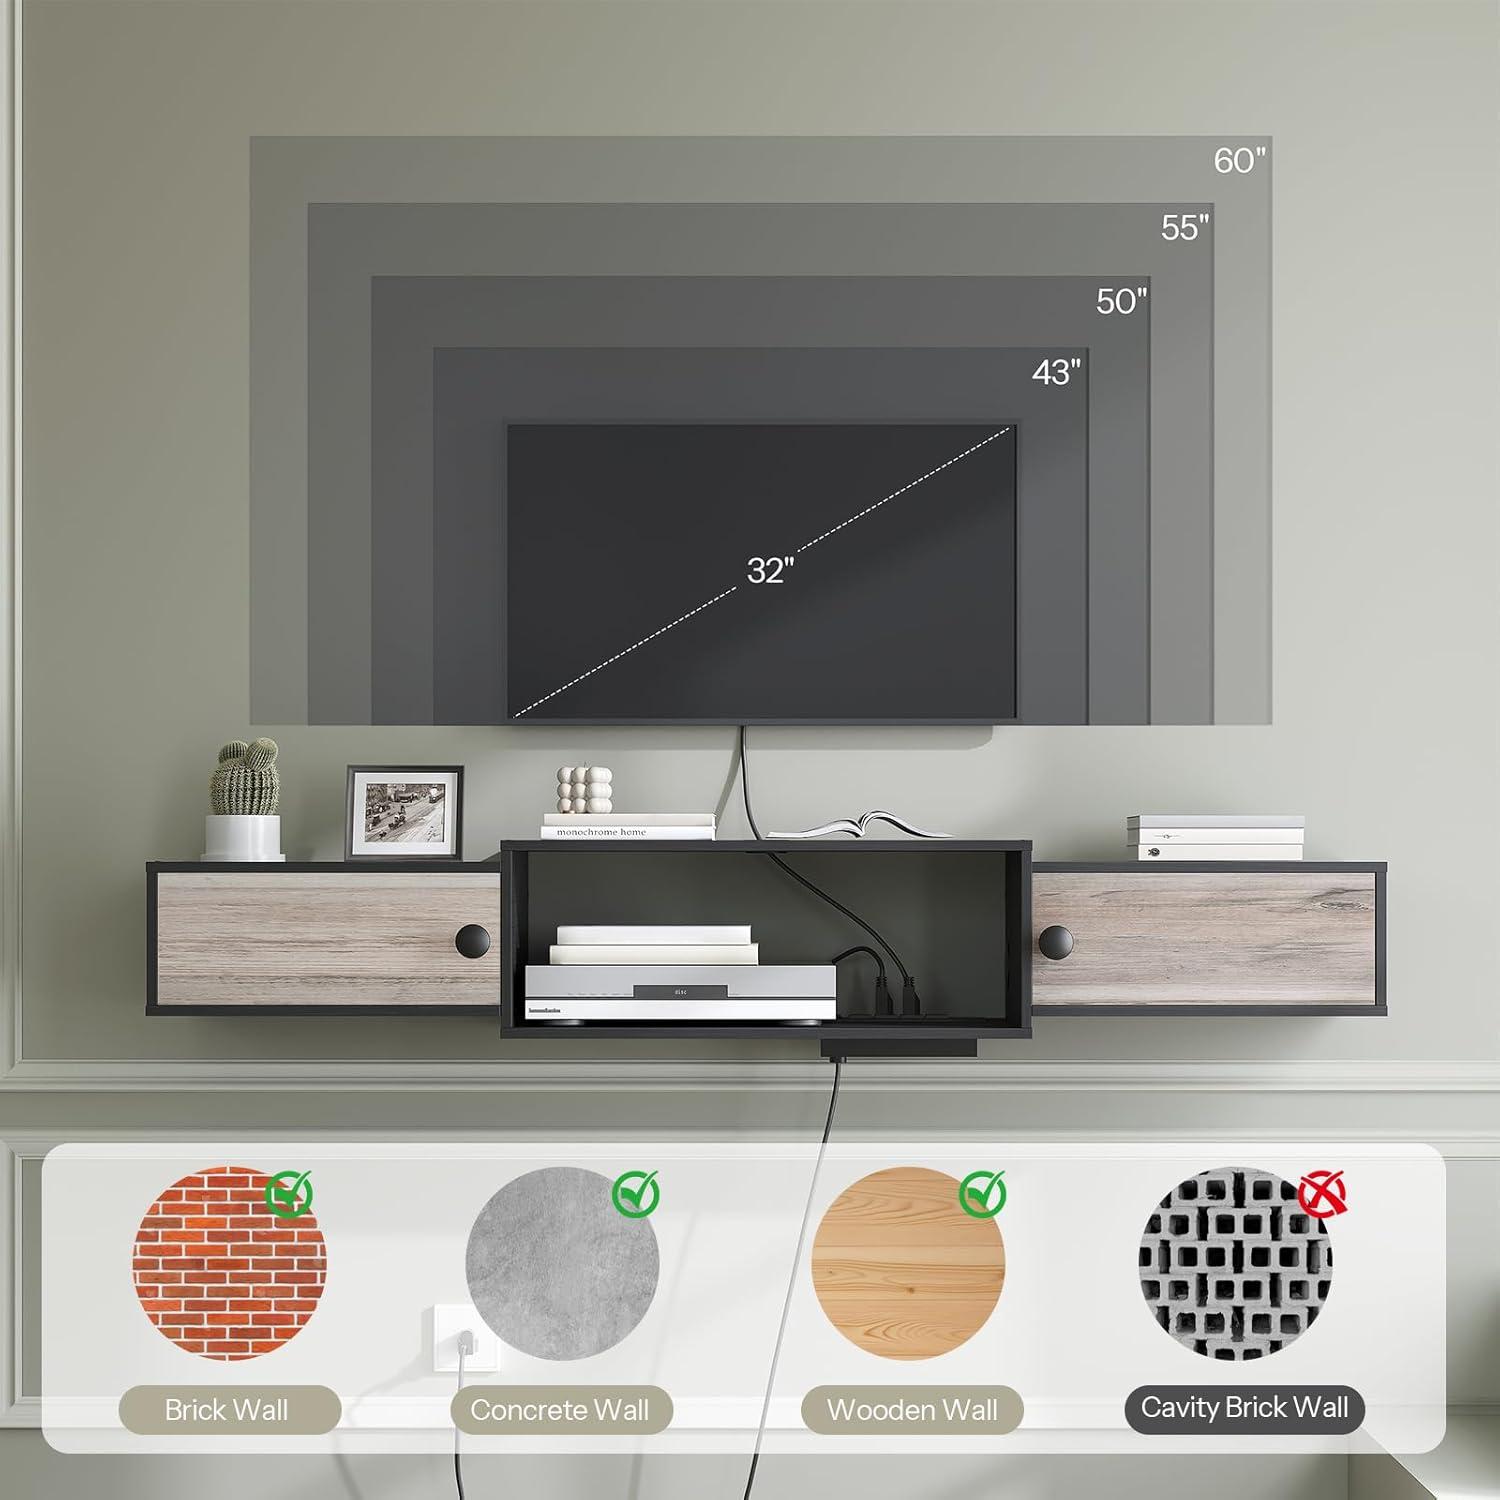
dimensionally the unit is built to sit directly beneath a mounted screen rather than act as a freestanding base; the overall width is 55″, and the shallow profile keeps the cabinet close to the wall so the TV’s lower edge and the shelf sit in near alignment rather than creating a deep step forward. in practical terms that means you’ll tuck media components into the recessed cavities and feed power through the integrated plugs without needing long runs of visible cable. The table below pulls the most directly relevant placement details together so you can picture how it will occupy the wall under your set.
| Feature | Observed detail |
|---|---|
| Overall width | 55″ |
| Recommended TV sizes | 32″–65″ |
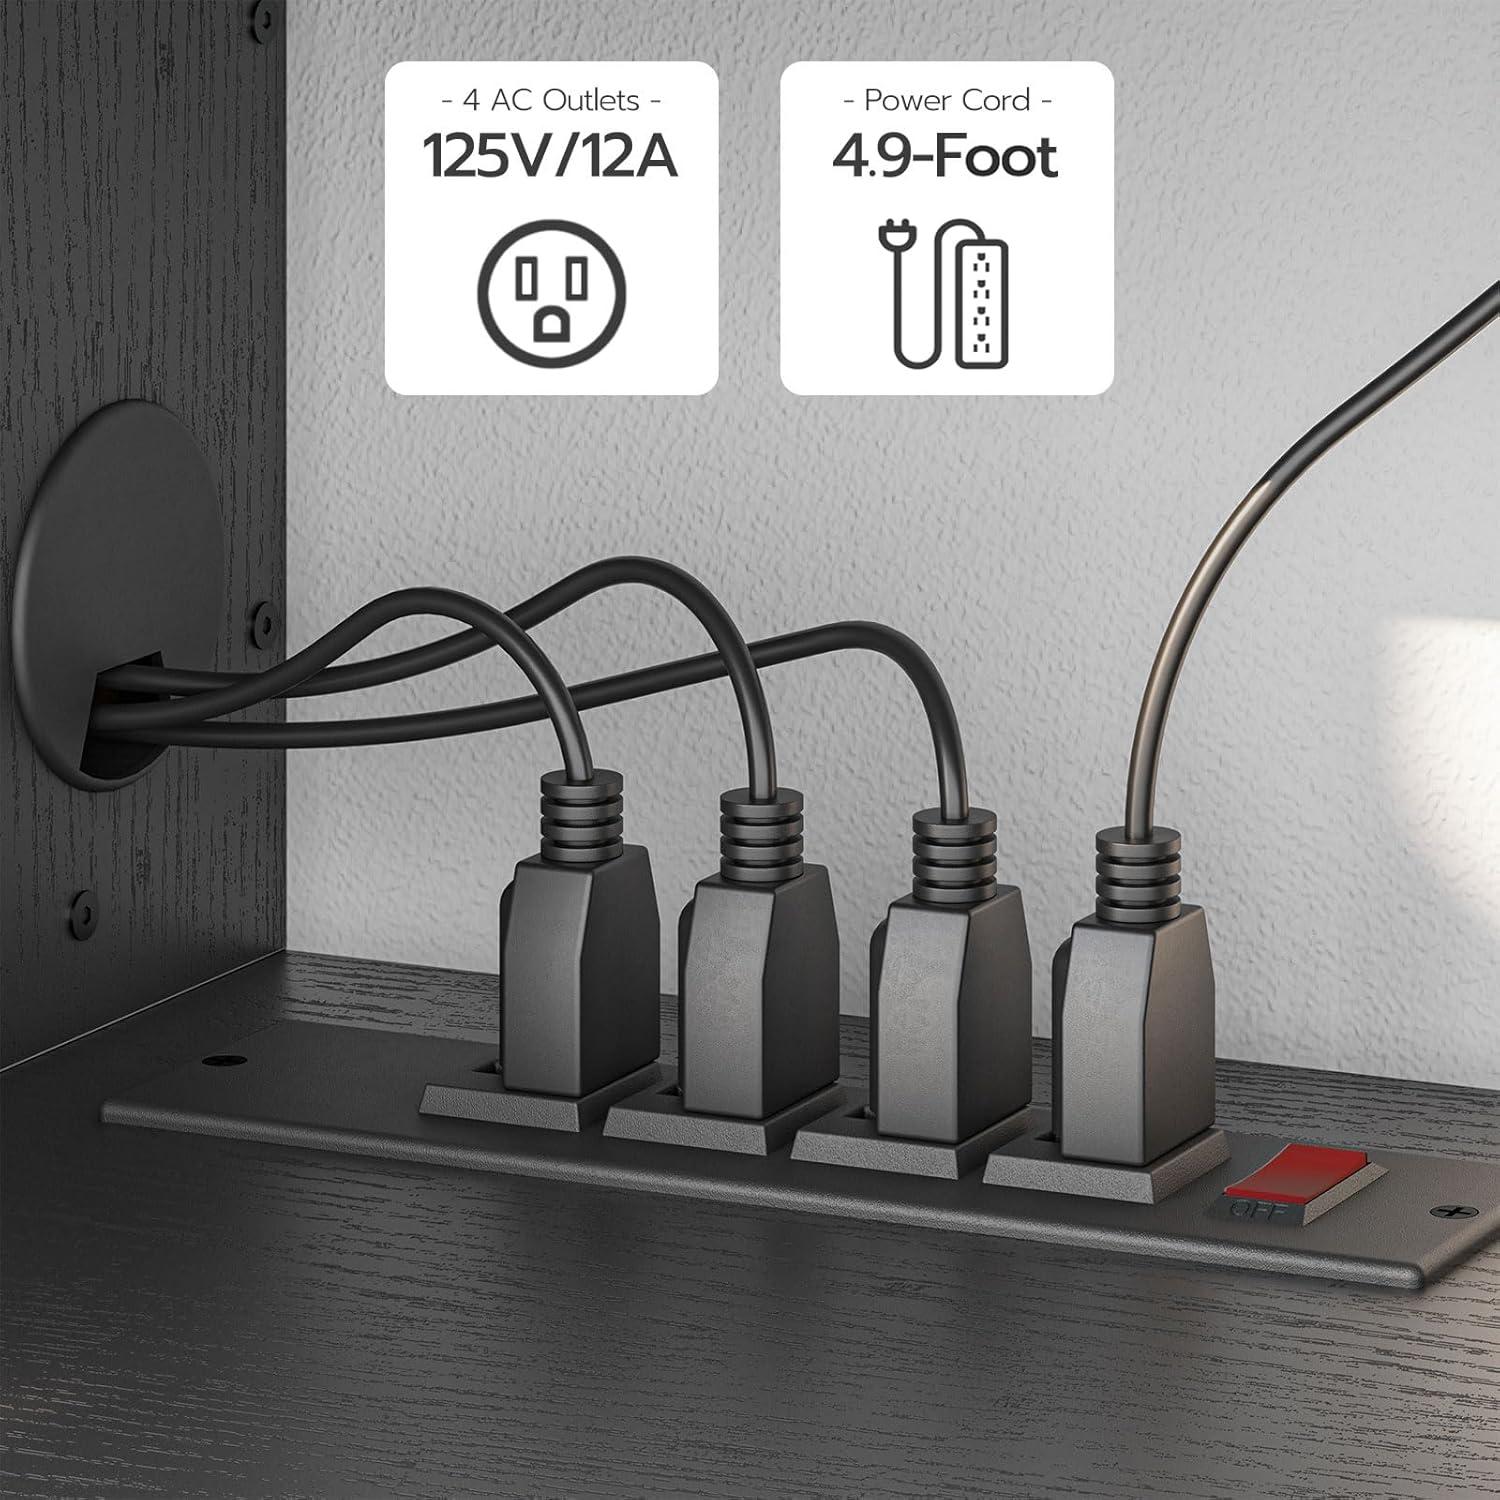
| Built-in power | 4 standard outlets inside the cabinet |
| Mounting | Metal wall plate, designed to sit flush against solid walls |
Mounting steps, included hardware and how the doors, surfaces and built in outlets feel and line up for your devices

When you start the mount, the process reads as a short, hands-on sequence: use the paper template to mark holes, check for level, drill pilot holes, insert the supplied anchors or lag bolts, secure the mounting plate and then lift the cabinet onto that plate and tighten the final fasteners. The instructions walk you through that order and you’ll find yourself pausing to re-check the level once or twice — the unit wants the bracket seated flush before the cabinet will hang true. Included hardware you’ll see in the box typically comes together in small labeled bags, which makes it easier to keep track while you work:
- Mounting plate and screws — the main heavy plate and the long bolts to attach it to the wall
- Anchors and shorter screws — for masonry or when a stud isn’t available
- Assembly screws and Allen key — for fastening the cabinet pieces
- Paper template and small accessories — a cardboard guide and a few plastic spacers
There’s a little nudging involved when hanging the cabinet: you’ll lift it into place, feel for the plate to catch, then use a socket or the supplied tool to cinch it tight. In daily use you’ll replay that small checklist — level, plate, tighten — when you adjust or re-route cables.
Open and close the doors a few times and you notice how they sit: the edges meet with only a hairline gap and the hinges give a steady, firm action rather than a soft, hydraulic close. The surfaces feel smooth under your hand and show fingerprints in bright light, so you may find yourself wiping them more often than expected. Inside, the built-in outlets are recessed into the rear panel; they line up near the cable pass-through so your game consoles, routers or set-top boxes can sit close to the back without awkward cable bends.In practice you’ll see two common patterns — smaller plugs and slim adapters plug in with room to spare, while bulkier power bricks can overlap adjacent sockets and sometimes require a short extension cord or a right-angle adapter to sit neatly. The table below summarizes the hardware you’ll handle during mounting and the typical count included in the package:
| Item | Typical Quantity |
|---|---|
| Mounting plate/long bolts | 1 plate / 4 bolts |
| Wall anchors | 4–6 pieces |
| Assembly screws & Allen key | 6–12 screws + 1 key |
| Paper template & spacers | 1 template + a few spacers |
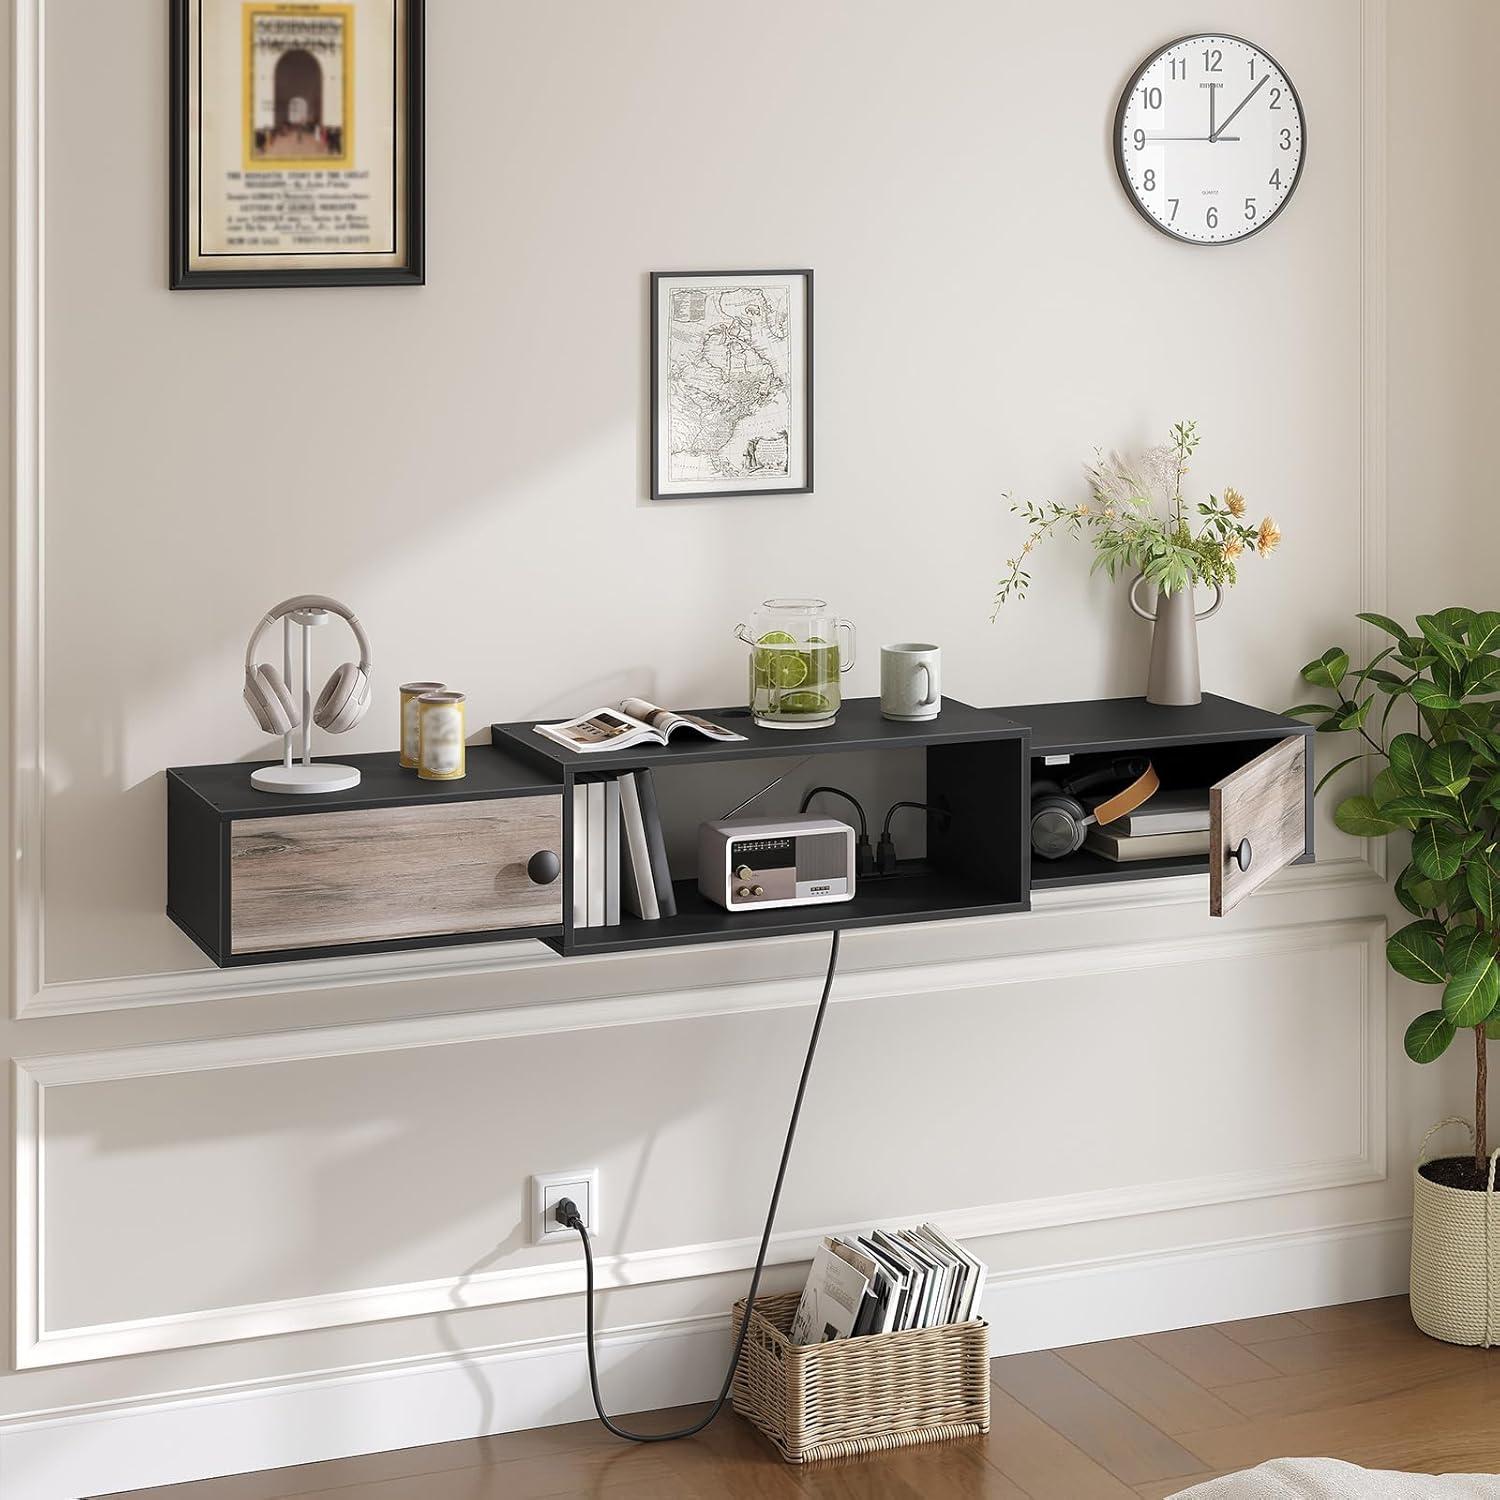
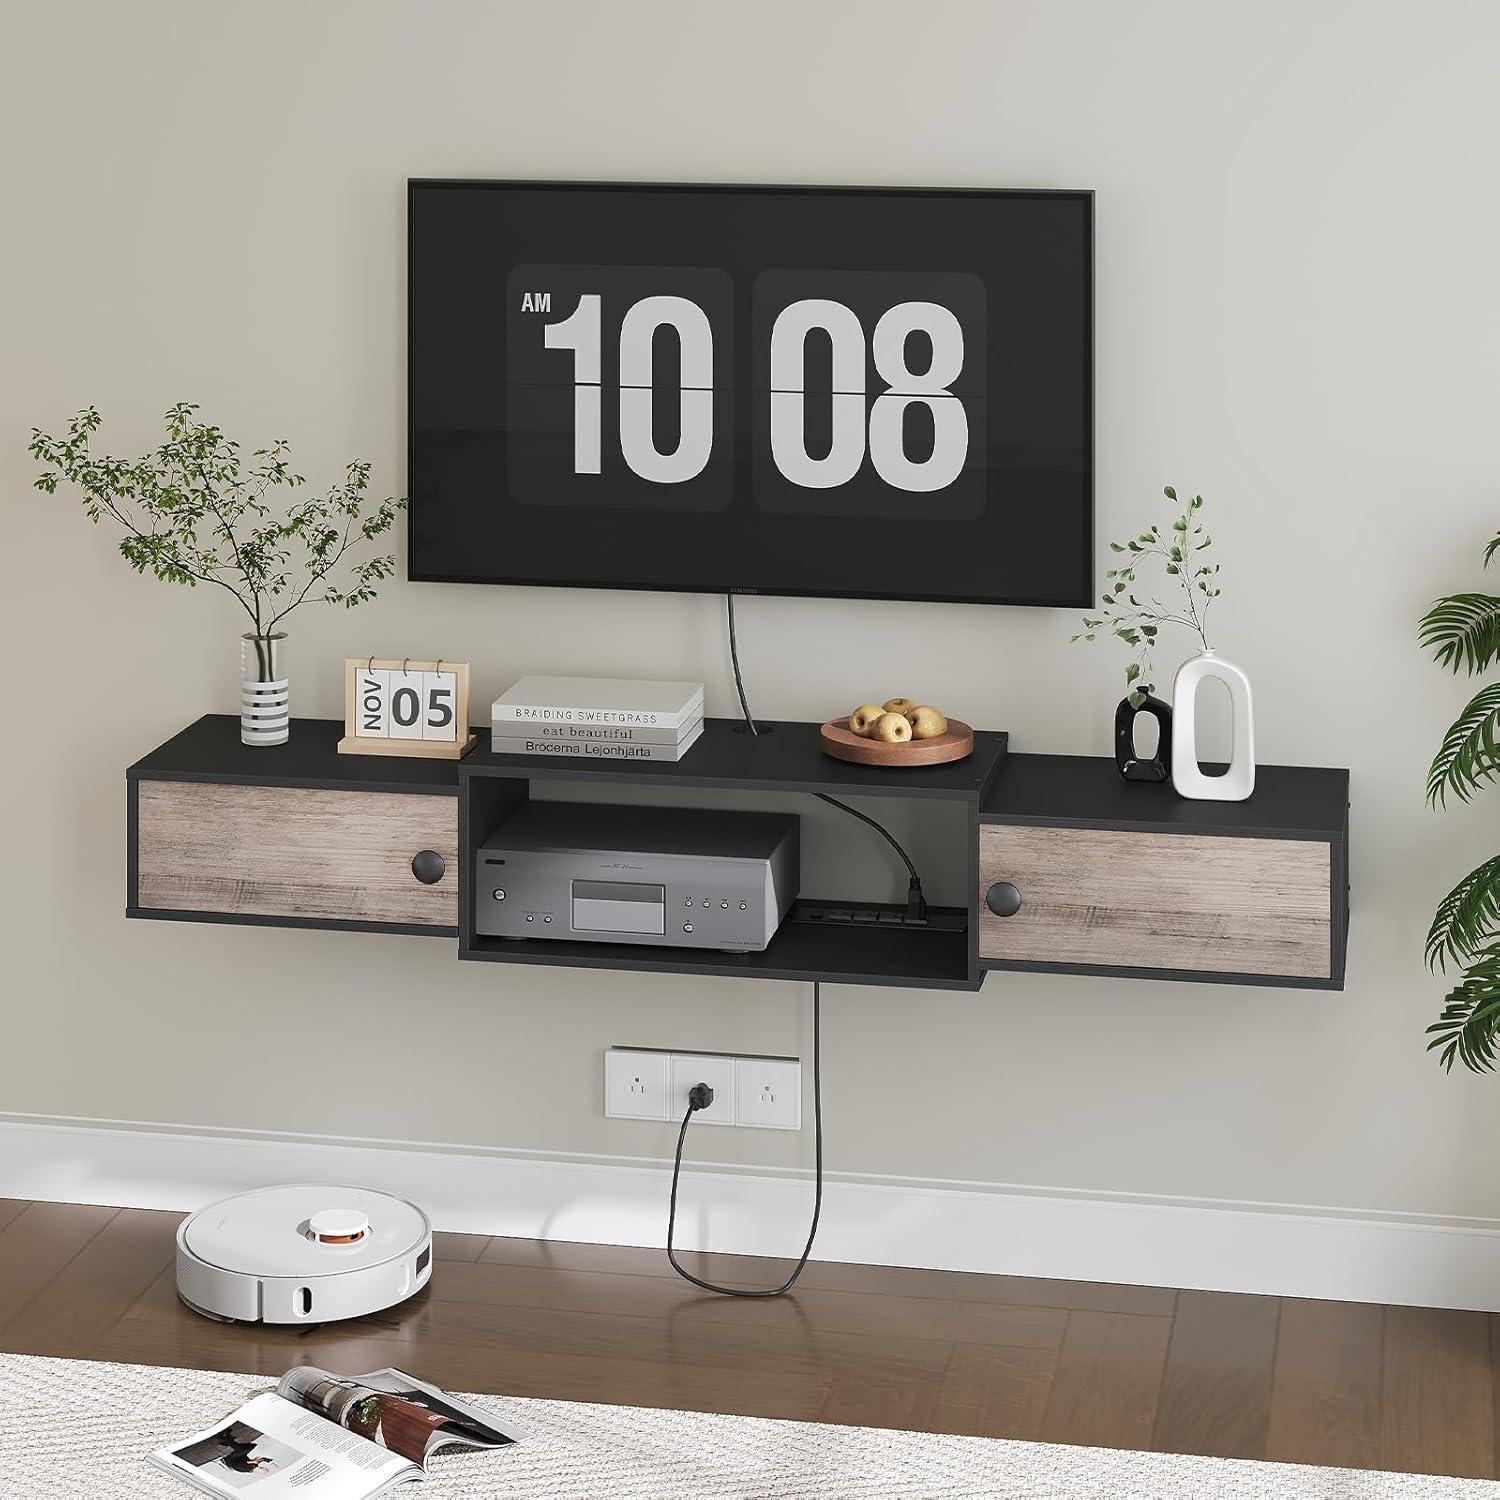
When you tuck media and consoles onto the shelves the result tends to read as a compact electronics zone rather than a jumble on the floor. The center shelf frequently enough becomes the visual anchor—soundbars, a streaming puck or a slim receiver sit there with their front faces aligned to the TV, while bulkier game consoles and disc players tuck to the sides or behind the doors so only their ventilation grilles and status lights peek out. Small accessories—controllers, remotes, a couple of game discs—usually land on the exposed shelf space or in a shallow tray; over a week or two you’ll notice little habits emerge, like leaving a controller angled on top of a console or sliding a router toward the back edge to clear viewing sightlines. In everyday use the arrangement feels staged but lived-in: a few cables loop where they must, a charger block sits near an outlet, and occasional micro-adjustments keep everything reachable during a gaming session or movie night.
typical layouts cluster devices by function and size, and that pattern shows up quickly once you start filling the unit.
- Center, low-slung items: soundbar or streaming box aligned with screen height.
- Side or behind-door storage: consoles and disc players kept visually minimal.
- Surface accessories: controllers, remotes, small baskets holding cables or spare batteries.
Below is a simple snapshot of how common items sit once arranged in a living room setup:
| Device | Typical spot | How it appears in the room |
|---|---|---|
| Soundbar / center speaker | Open center shelf | Aligned with TV, clean horizontal line |
| Game console | Side shelf or behind door | Mostly hidden; lights visible when active |
| Wi‑Fi router | Back of shelf or behind door | Low profile, antennae tucked back |
| Controllers / remotes | Surface or small tray | Casual, often left within arm’s reach |
How the HOOBRO floating console measures up to your expectations in everyday rooms
In everyday rooms the console often rewrites how surfaces are used: the wall-mounted position keeps the floor visually open and makes daily tidying feel quicker, while the shallow top surface collects small items that are moved around—remotes, a stack of mail, a morning cup—so occasional wiping becomes part of the routine. The presence of integrated power and a tucked-away wiring route tends to reduce the parade of extension cords across the room, and devices that are left plugged in look less like temporary fixtures. There are contextual limits worth noting: doors that close against stored items can need a small nudge after frequent access, and the shelf’s fixed height asks householders to plan where cushions, lamps, or low furniture will sit nearby.
| Room | Typical daily role | Common practical note |
|---|---|---|
| Living room | Central media hub for TV, consoles, and charging | visual neatness improves, though visible dust on flat surfaces appears sooner |
| Bedroom | Secondary screen or charging station with discreet storage | Less floor clutter around bedtime routines; reachability of outlets matters for bedside devices |
| Study / home office | Compact spot for a router, small peripherals, or archival media | Keeps cables out of immediate workspace but limits stackable storage depth |
- Everyday maintenance: a quick wipe-down schedule usually keeps it looking orderly.
- Interaction pattern: doors are accessed several times a day for remotes or game controllers, so alignment can matter in the long run.
- Visual effect: the floating silhouette subtly shifts attention upward, which influences where wall art or lighting is arranged.
Observed across different homes, the console integrates into routine behaviors while introducing small, recurring tasks—light dusting, occasional door adjustment, and a brief moment to route a newly added cable—that become part of everyday use; full specifications and configuration details are listed here: Product listing and specifications
The cabinet internals, cable access points and visible hardware you notice after installation
Once the unit is up on the wall and you open the doors, the interior reads as a practical service cavity rather than a decorative cube. A horizontal metal mounting rail and its anchor points remain visible through the back cutout, and the power module is mounted under the top shelf so its face and cord exits are easy to spot. Cables are usually routed through a central rear hole and a pair of smaller side openings; some of those holes have molded grommets while others are plain cutouts, so you’ll notice a mix of tidy runs and places where you tuck slack to keep things from bulking up. Hinge plates,magnet catches and a few exposed screw heads are apparent around the door openings,and the shelf interiors show the factory pre-drilled positions and ventilation gaps that let heat from routers or players dissipate quietly.
Visible hardware and access points you’ll notice after installation tend to include a few recurring elements:
- Rear cutout: the largest opening for power and main AV cables.
- Side/inner holes: smaller pass-throughs often used for Ethernet, HDMI or thin coax.
- Mounting rail and anchors: partly exposed if you look through the back opening.
- Hinges and catches: screws and plates visible when doors are opened.
| Access point | What you’ll likely route through it |
|---|---|
| Central rear cutout | Power cords and thicker AV bundles |
| Side/internal holes | HDMI, Ethernet, and smaller signal cables |
| Top gap behind TV | Thin cables like coax or a slim HDMI |
You’ll find yourself nudging cables into place after the initial install and occasionally re-bundling to prevent rubbing against screw heads; the arrangement leaves some usable room but also shows where the power module and fasteners consume internal space.
A Note on Everyday Presence
living with the HOOBRO 55″ Floating TV Stand with Power Outlets, BG11UDS01, you notice how it settles into corners of daily life rather than making a sharp first impression, picking up the faint marks of hands and cups and the soft ease of things moved frequently enough. Over time it maps onto your routines — a habitual landing spot for remotes, a low shelf that absorbs the brief weight of a morning mug — and its surfaces show the quiet abrasion of regular use. As the room is used it becomes part of the cozy background, steady in the way familiar objects are, present in the small pauses between activity. It stays.