decordip Garden and patio decoration inspiration
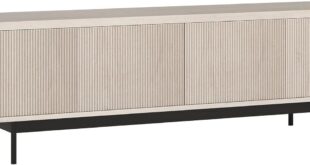
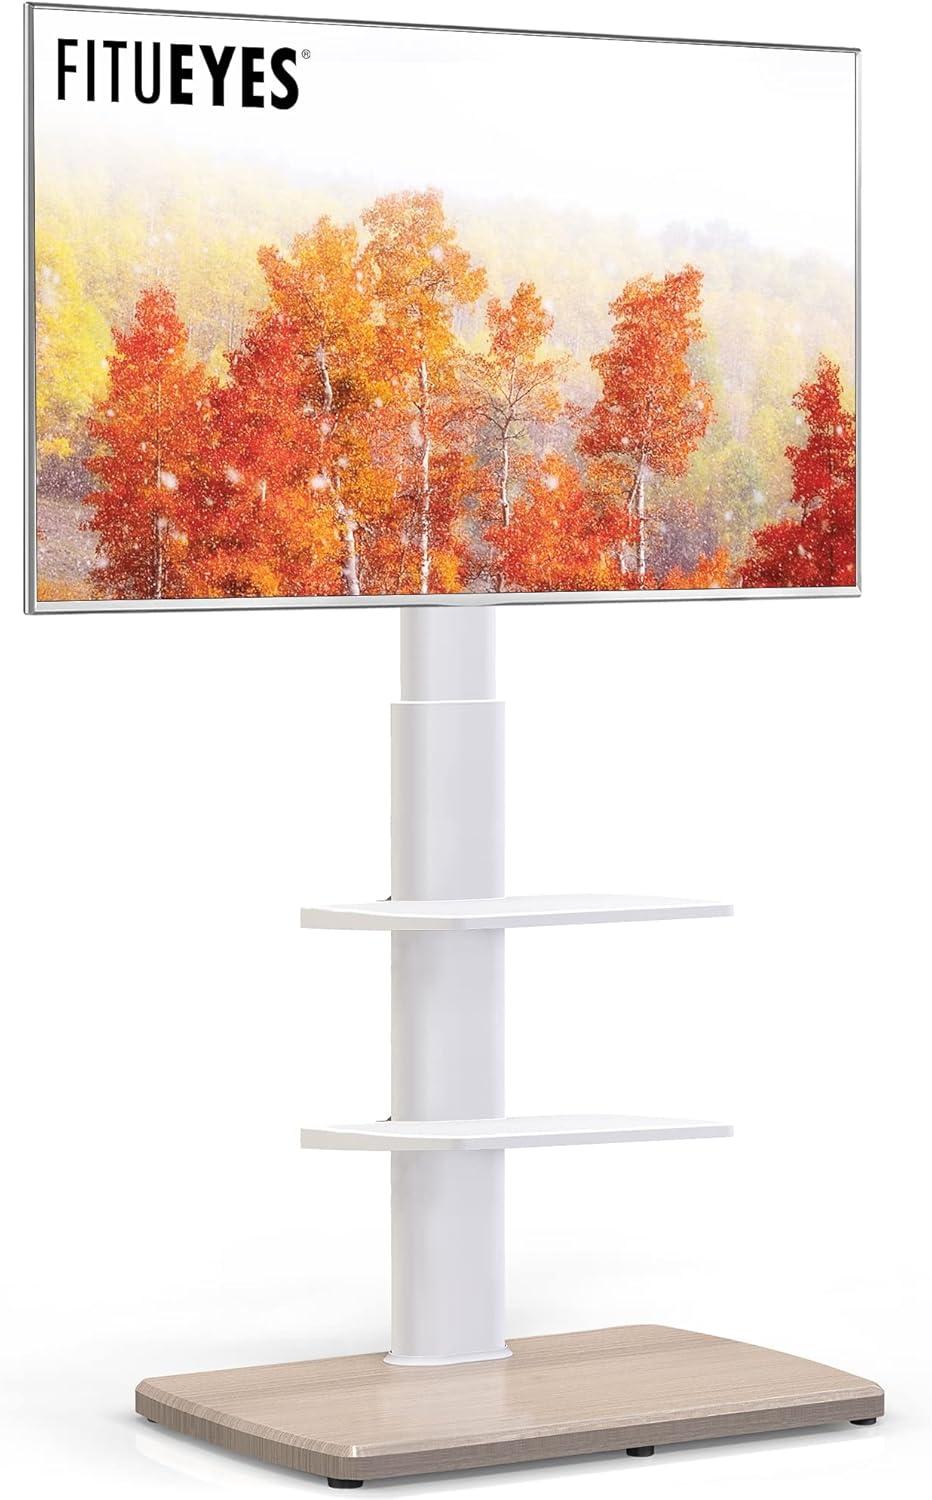
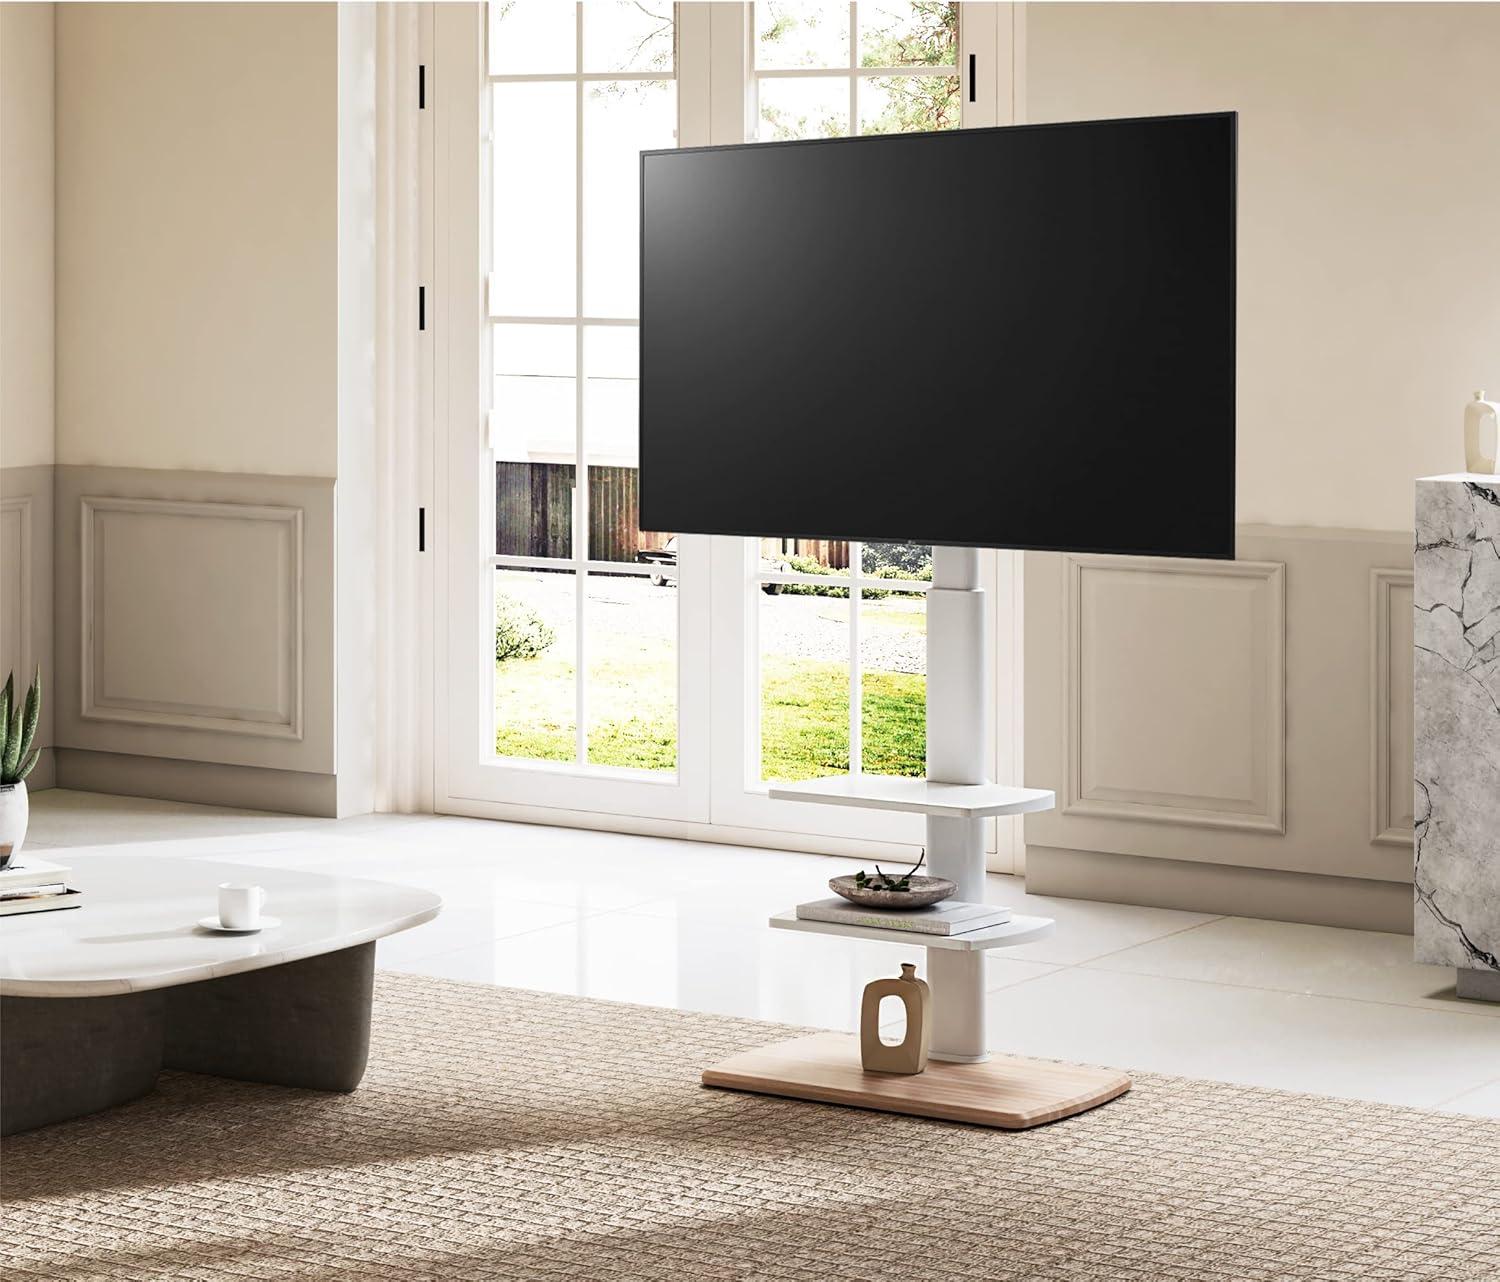
You notice it as you step into the room: a white column holding your screen a touch higher than a low TV cabinet, its slim steel post rising from a wood‑textured base. The FITUEYES Floor TV stand sits there with a 55‑inch set, giving your wall a taller, lighter focal point. Light catches the powder‑coated metal and makes the finish read clean; the plastic shelves yield a little under your palm while the base resists when you nudge it.You unlock the casters and the whole thing glides sideways with an almost lazy motion; locked, it stays planted. Up close the fastenings look deliberately plain rather than precious, and from a few paces away the piece reads more utilitarian than ornamental.
A close first look at your FITUEYES floor TV stand and what comes in the box
when you open the shipping box the first things you notice are the organized packing and the layers of foam and plastic that keep each component separate. Parts arrive mostly unassembled: the heaviest piece sits at the bottom wrapped in kraft-style protective cardboard, while slimmer metal pieces and the mounting plate are tucked against the sides. A folded instruction booklet with illustrated diagrams sits on top of the hardware bags; the bags themselves are mostly labeled or grouped by screw type, and a small set of tools (an Allen key and a short wrench) is included in one of the smaller packets. Several surfaces have a thin protective film that you peel away during setup, and some smaller bits—rubber pads, plastic caps—are in tiny zip bags rather than loose in the box.
On a speedy inventory you’ll find the main structural parts laid out and easy to match to the pictures in the manual.The kit includes the base, the vertical support, the mounting bracket, two removable shelves, caster wheels (with lock tabs), and a sealed hardware pack with multiple screw sizes and a few spare fasteners. Below is a simple glanceable inventory you can check against as you unpack:
- Base — single heavy panel, wrapped
- Vertical post — one long section
- Mounting plate — pre-attached brackets visible
- Shelves — two detachable trays
- Caster wheels — set with locking tabs
- Hardware pack — grouped screws, washers, spacers, and small plastic pieces
- Tools & manual — allen key, wrench, and illustrated instructions
| Item | Quantity (as packed) |
|---|---|
| Base | 1 |
| Vertical post | 1 |
| Mounting plate | 1 |
| Shelves | 2 |
| Caster wheels | 4 |
| hardware pack | 1 |
| Tools & manual | 1 |
Unpacking and your early impressions of the finish and assembly parts

You peel back the outer carton and find the parts arranged in several smaller boxes and plastic bags rather than one loose pile. Foam pads and cardboard separators protect the largest pieces, and the instruction sheet is a single folded booklet with mostly diagrams — there are few blocks of text. as you sort through the bags you’ll spot a numbered sticker on each pole and on the wooden base, which makes matching pieces by the diagram straightforward; smaller hardware is grouped by type in labelled envelopes, and the casters and their mounting bolts come in a separate pouch. The unboxing feels methodical rather than chaotic, and getting everything laid out on the floor takes less time than wrestling parts out of one giant mixed bag.
Early impressions of the finish and the individual assembly parts come from handling rather than measuring: the white surfaces show a smooth, satin-like appearance and resist obvious smudging at first touch, while the smaller plastic shelves have a faint texture that breaks up glare. The metal uprights have visible machine holes and stamped alignment marks that help guide bolt placement, and the included fasteners look sorted by profile so you don’t have to guess which screw goes where. A few small details stand out as you work: the casters seat into pre-drilled pockets, some plastic trim pieces are slightly flexible, and the instruction drawings call out spacers that arrive in a tiny zip bag. Below is a brief inventory of what you unpacked and how each item presents itself.
- Instructions: Mostly pictorial, parts numbered and easy to follow.
- Hardware packs: Separated and labelled; allen key included.
- Large parts: Shelves and base wrapped individually, with foam between stacked pieces.
| item | Observed detail |
|---|---|
| Wood-textured base | Well-protected,feels moderately heavy when lifted |
| Metal uprights | Powder-coated look with alignment marks and pre-drilled holes |
| Plastic shelves | Textured surface,lightweight and slightly flexible |
| Casters & bolts | Separated in a pouch; casters seat easily into pockets |
The frame shelves and materials you can examine up close
If you take a close look at the upright and mounting hardware, the metal post shows the kind of finish you can expect to feel: a slightly textured white coating over hollow steel, with visible seam lines where sections meet and small weld marks near the bracket anchors. The swivel plate and mounting bars are held with hex bolts and washers that sit flush against the metal; you’ll notice the stamped holes for different VESA patterns and the little plastic caps that cover exposed ends. The casters screw into threaded inserts on the base and each wheel has a small locking tab; turning the lock is a tiny, habitual task you’ll do the first few times you move the stand around.
On the shelving and base you’ll see a mix of molded and veneered surfaces: the two mid-level shelves are thin, molded panels with ribbing on the underside and small rubber pads where devices sit, while the bottom platform has a wood-textured finish with a printed or stamped mark on the underside. There’s a vertical channel for routing cables and a series of paired slots where the shelves clip in and can be repositioned. A quick checklist of what to inspect up close can be helpful:
- Frame finish: fine textured paint, seam/weld details
- Shelf surface: matte molded plastic with anti-scratch pads
- Base: wood-textured panel with edge veneer and labeling underneath
- Hardware: hex bolts, threaded inserts, caster locks
| Component | What you’ll see up close |
|---|---|
| Upright/frame | Textured white-coated steel, seam lines, weld points, pre-drilled mount holes |
| Movable shelves | Molded plastic panels, underside ribs, rubber device pads, clip slots |
| Bottom base | Wood-textured veneer, stamped/printed markings underneath |
| Casters & fasteners | Nylon wheels with metal stems, locking tabs, assorted screws in labeled bags |
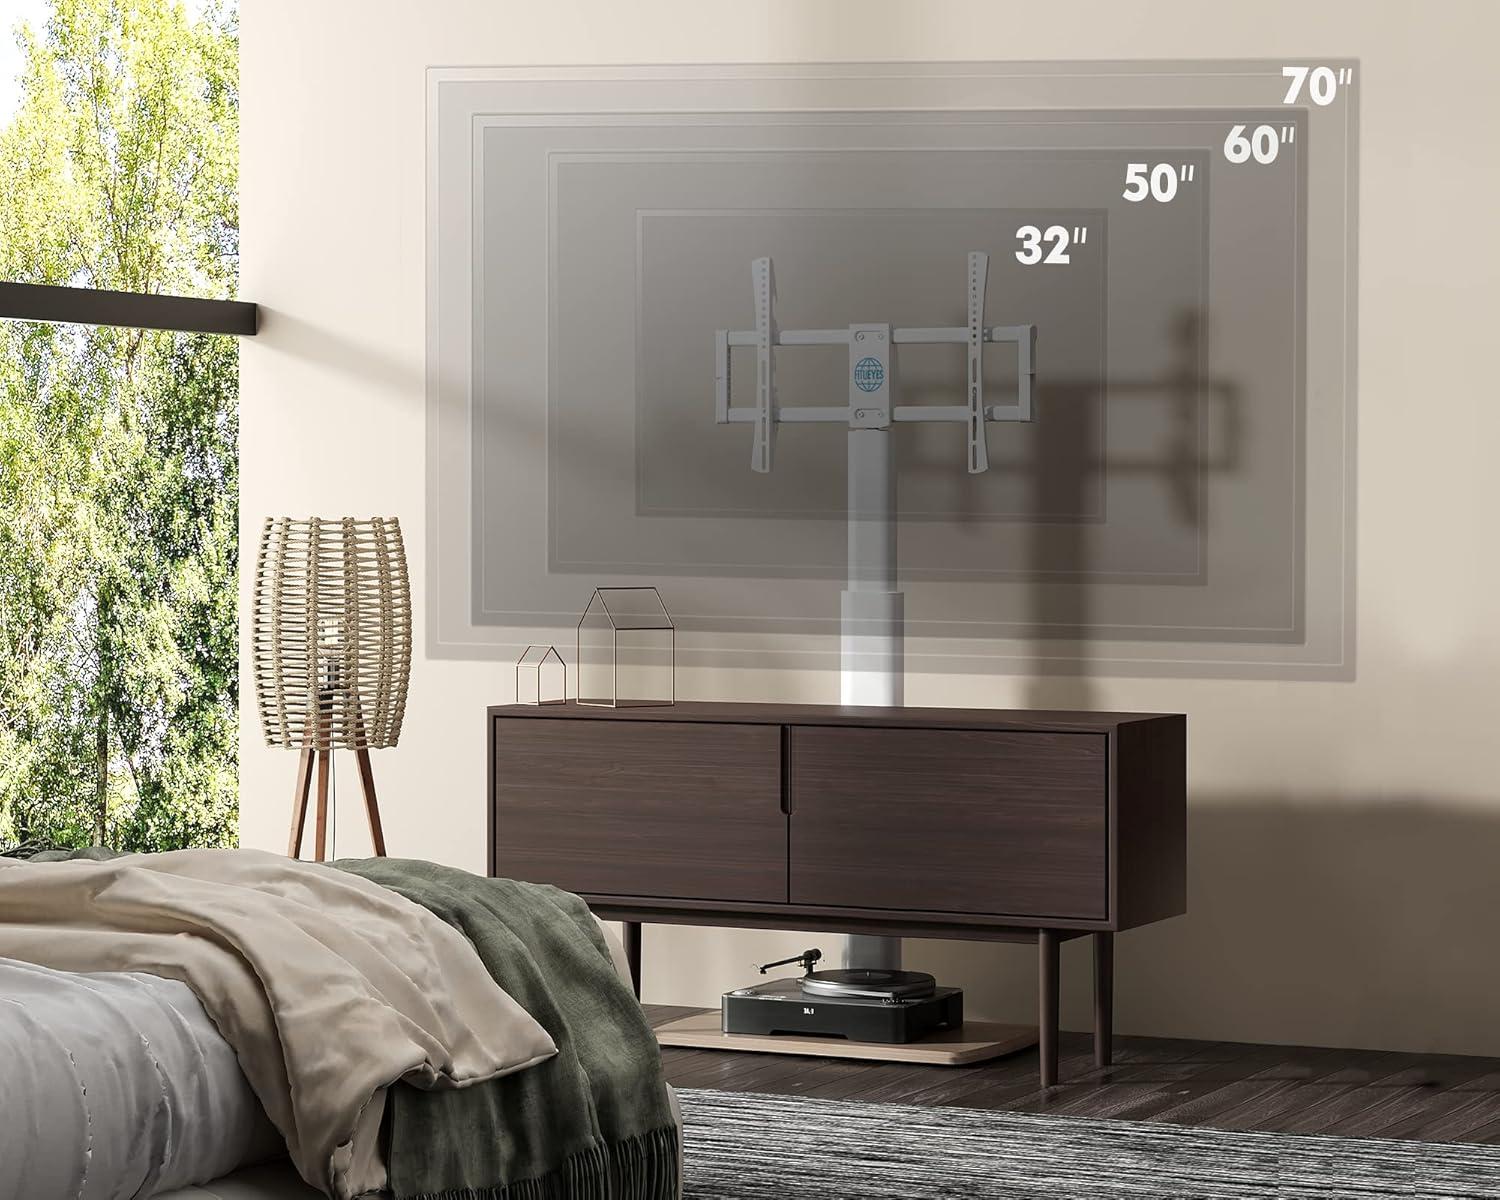
Measured dimensions the height adjustment range and how it fits your corner or wall
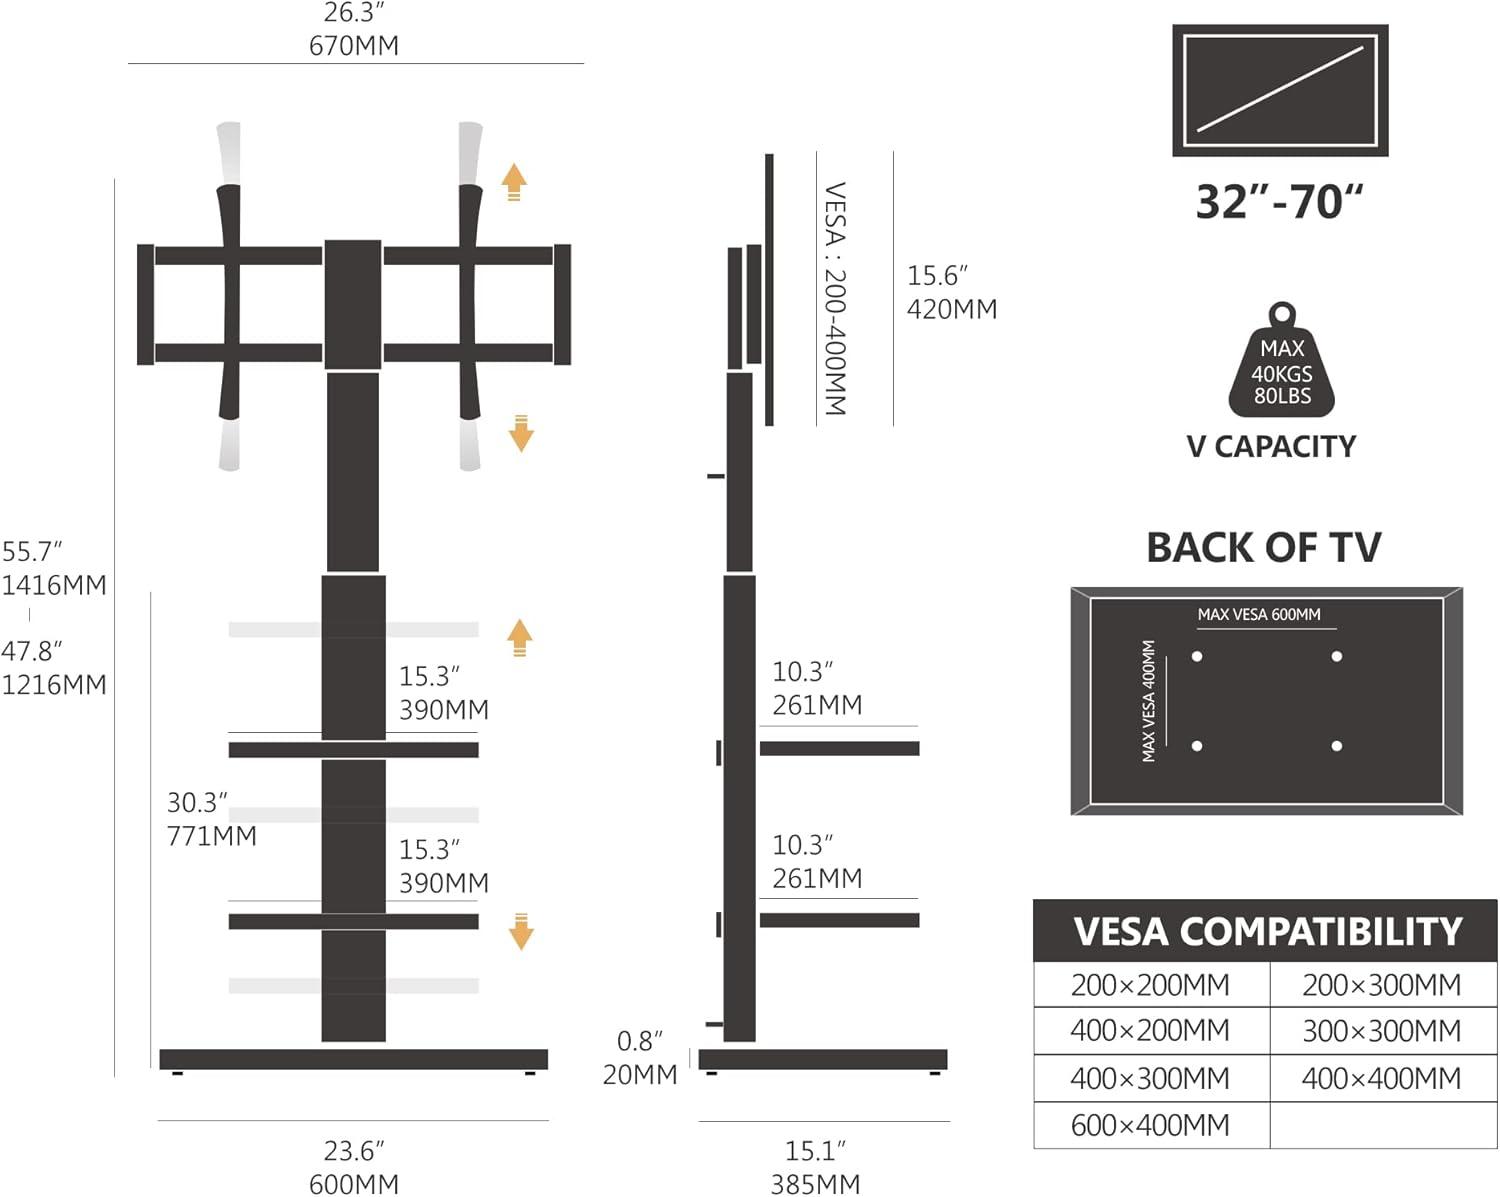
You’ll find the vertical mounting column allows the screen’s center to sit roughly between about 47.8″ and 55.7″ above the floor when set to the lowest and highest positions respectively; measured by eye and tape, that range comes in at just under 48″ to about 56″. The adjustment doesn’t slide continuously — it’s made by relocating the mount to different bolt positions on the upright post — so you’ll move the bracket in distinct steps rather than glide it to an arbitrary height. In practice this means small, quick swaps between a few fixed levels when you’re tuning the display to your usual seating height, and the plate where the TV bolts on leaves a modest gap behind the screen that’s visible once it’s installed.
Measured footprint and clearance matter most when you push the stand into a corner or up against a wall. The base runs about 23.6″ long by 15.2″ deep,and with the mount and TV attached you’ll typically see a few inches of space between the rear of the TV and a vertical wall — roughly 2–4″ depending on the TV’s rear profile and how high you set the mount. The mount’s ±30° swivel is useful for angling the screen away from a corner, but tilting or fully swiveling the set reduces the effective clearance on one side, so the screen edge can approach the wall more than when it’s centered. The table below summarizes the key measured figures as they appeared in a typical setup.
| Measured feature | Typical value observed |
|---|---|
| Height adjustment range (bottom of mount to top of mount) | ≈ 47.8″ – 55.7″ (≈48″–56″) |
| Base footprint | ≈ 23.6″ (L) × 15.2″ (D) |
| Rear clearance to wall with mount attached | ≈ 2–4″ (varies with TV back profile) |
| Swivel range | ±30° from center |
In your living room how sightlines seating and screen placement play out
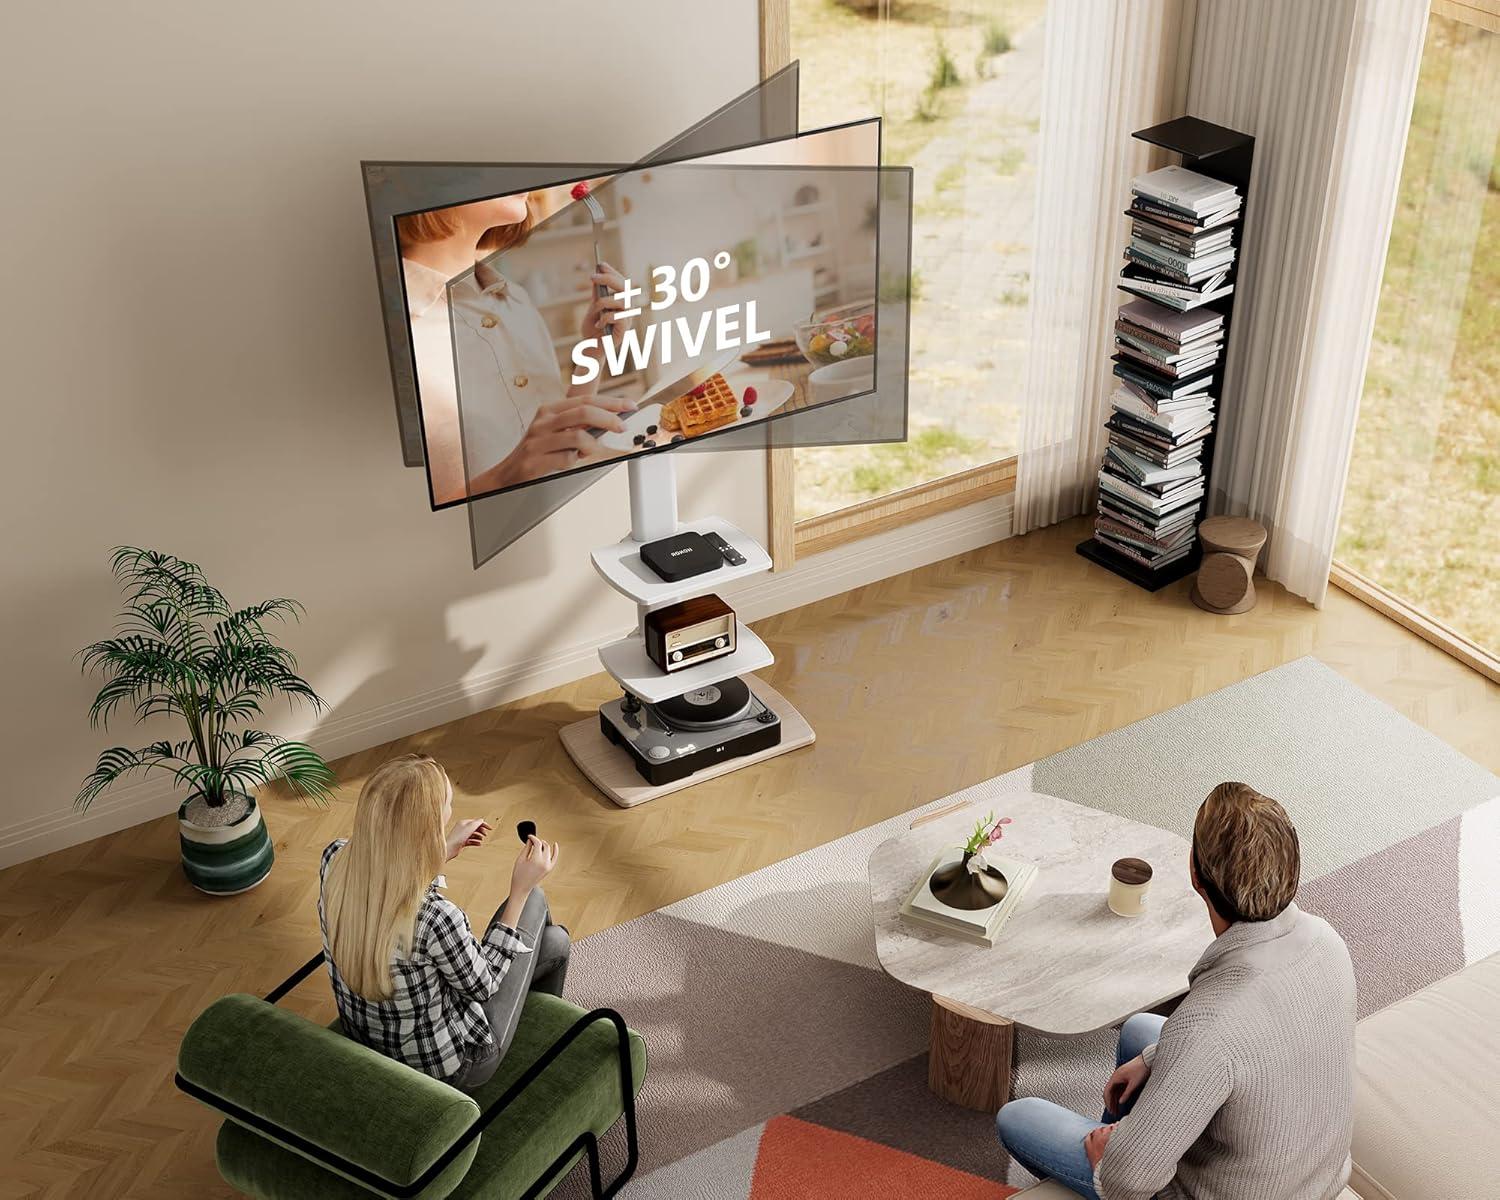
when the screen sits on a freestanding floor mount in your living room, sightlines tend to be a small choreography of seating height, peripheral seats and the odd nudge of the stand. From the main couch the display often lines up with your natural eye level if you’ve positioned the seating close and centered; from a lower lounge chair or a taller recliner the picture can feel slightly higher or lower, and you’ll find yourself twisting the screen a few degrees or angling your head. In wider, open-plan rooms the stand’s mobility means the screen becomes a movable focal point — you might roll it a little toward the dining area for a game night, or swivel it to catch less window glare in the afternoon — so sightlines evolve with activities rather than staying fixed. Small, incidental adjustments (an inch forward, a tiny tilt) are common and tend not to disrupt the room visually as the stand reads as a single, portable object rather than a built-in fixture.
| Seating position | How sightlines play out |
|---|---|
| Primary sofa | Centered sightline, occasional minor tilt or roll to reduce reflections or include other viewers. |
| Side chairs / recliners | Offset angles create a perceived higher or lower screen; small swivels usually restore a pleasant view. |
| Open-plan / dining area | Shared sightlines mean the screen frequently enough sits on a compromise angle; mobility lets it be reoriented per use. |
- Primary sofa: the view is steady but you may notice people shifting cushions or standing to change the angle — not unusual in casual TV time.
- Secondary seating: side seats frequently enough force a rotated viewing angle; you’ll see the screen used at a slight diagonal more than perfectly head-on.
- Corner placements: sightlines tighten toward the center of the room and the screen becomes a pivot point for multiple sightlines rather than a single axis.
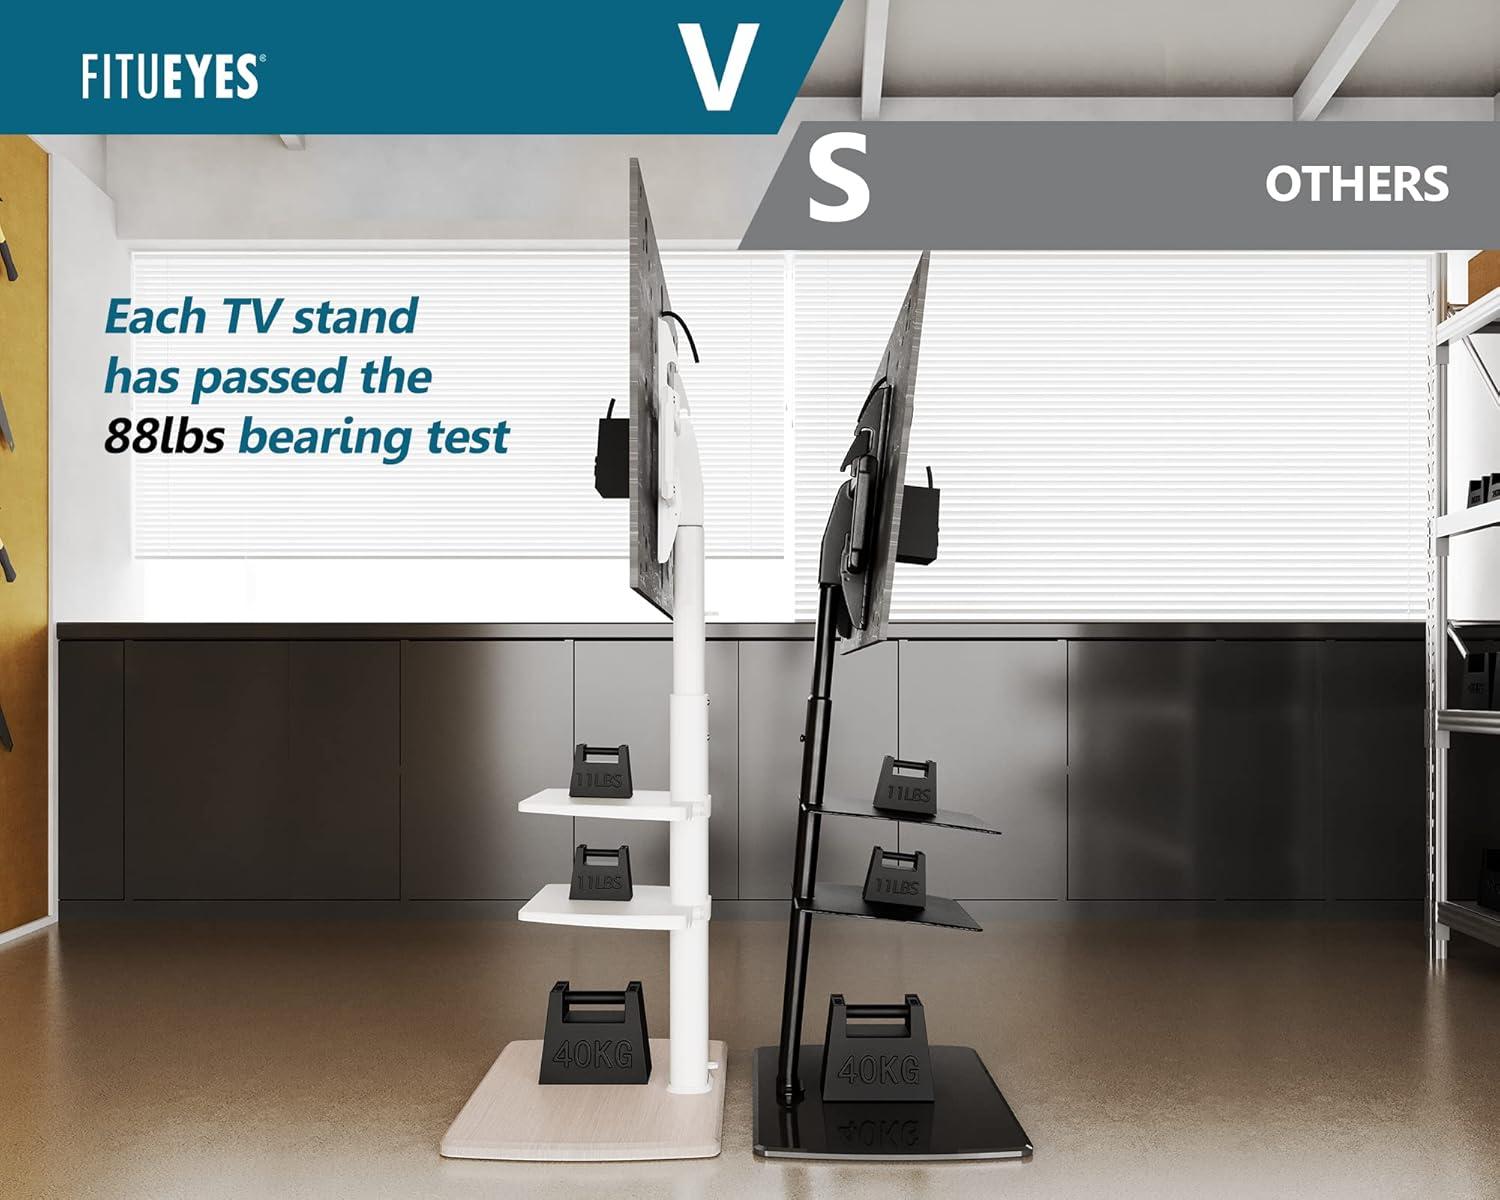
How the stand measures up to common expectations and the practical limits you may encounter
Across many real-life setups, expectations around ease of assembly, mobility, and secure support tend to line up with what gets reported: the stand goes together without exotic tools, the casters make relocation straightforward on hard floors, and the structure holds larger screens within its rated capacity. At the same time, a few practical limits appear often enough to count as lived constraints rather than rare exceptions. The swivel range is modest, so dramatic re-orienting of the display is not feasible; the vertical adjustment covers a limited span, which can leave the screen a bit high or low for certain seating arrangements; and the lightweight plastic shelves behave differently under heavier components compared with the metal frame and base. Movement across thick rugs or highly uneven surfaces can feel stiffer, and several accounts note that leaving the caster locks engaged is significant to prevent a top-heavy wobble when the stand is nudged or when screens are turned.
- Assembly notes: generally straightforward, though some fasteners may take a little patience to align;
- Mobility notes: rolls smoothly on hard floors, performance on deep-pile carpeting varies;
- Accessory capacity: shelves fine for small consoles and remotes but less reassuring for very heavy AV components.
| Common expectation | Practical limit observed |
|---|---|
| Wide swivel and full repositioning | moderate swivel angle that covers typical viewing shifts but not large reorientations |
| Effortless rolling on any surface | Very good on hard floors; rolling on thick rugs can feel resistant |
| Generous shelf strength | Plastic shelves are convenient for small devices but show limits with heavier gear |
For full specifications and configuration details, see the product listing: Product details and specifications
Everyday details of cable management shelf use and surface care you will notice
In everyday use you’ll notice the shelf and back channel acting as a modest staging area for the tangle that comes with a living room setup. Cables tend to collect in the same few spots: behind the middle of the shelf where the power strip usually sits, along one side of the column where you route HDMI and optical leads, and in the small gap between the shelf lip and the mount where thinner cords slip through.Small habits emerge — you’ll find yourself nudging longer cords into the channel after moving the stand, or looping spare length and securing it with a tie so it doesn’t drape down and catch on the caster. The shelf hides most of the bulk but leaves visible bundles if you don’t flatten them; fingerprints and the occasional dust line also become more noticeable around cable entry points, especially where the white surface meets black plugs.
Surface care shows up as a gentle, recurring chore rather than a single deep clean. Light dusting or a soft wipe restores the white finish quickly,while scuffs or marks from sitting electronics or adapters can linger in the textured edges of the shelf and may need a bit more attention. you’ll also notice the way the shelf corners collect crumbs and how loosened ties require periodic retightening after the stand is rolled. Below is a brief snapshot of common issues and how they usually present in daily life:
- Power strip placement — bulked cables under the shelf, slight shadowing on the underside.
- HDMI bundle — kinked or looped cables near the mount after swivels or moves.
- Surface marks — fingerprints and light scuffs around device contact points.
| Issue | What you’ll notice | typical response in daily use |
|---|---|---|
| Dust accumulation | Thin film along shelf edges and cable openings | Quick wipe with a soft cloth during regular tidying |
| Loose cable loops | Visible bundles hanging or catching on casters | Re-looping and tightening ties after moving the stand |
| Surface marks | Smudges where devices sit or are adjusted | Targeted cleaning or mild spot treatment as needed |
How It Lives in the Space
After a few weeks you find the FITUEYES Floor TV Stand for 32 39 40 43 49 50 55 60 65 70 inch TVs, Modern TV Stands with Shelf for living Room Bedroom, Height Adjustable Corner TV Stand White slipping quietly into routines, not a focal point but another surface in the room. In daily routines it shapes how the corner is used — where the remote lands, a stack of magazines softening its edges, and the occasional glass leaving a pale ring that begins to mark its surface.You notice the height and angle become unremarked, scuffs and fingerprints gathering in small ways, and how it takes part in the regular household rhythms. It settles and stays.