decordip Garden and patio decoration inspiration
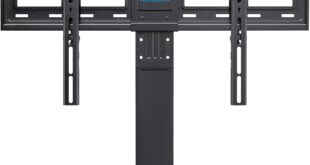
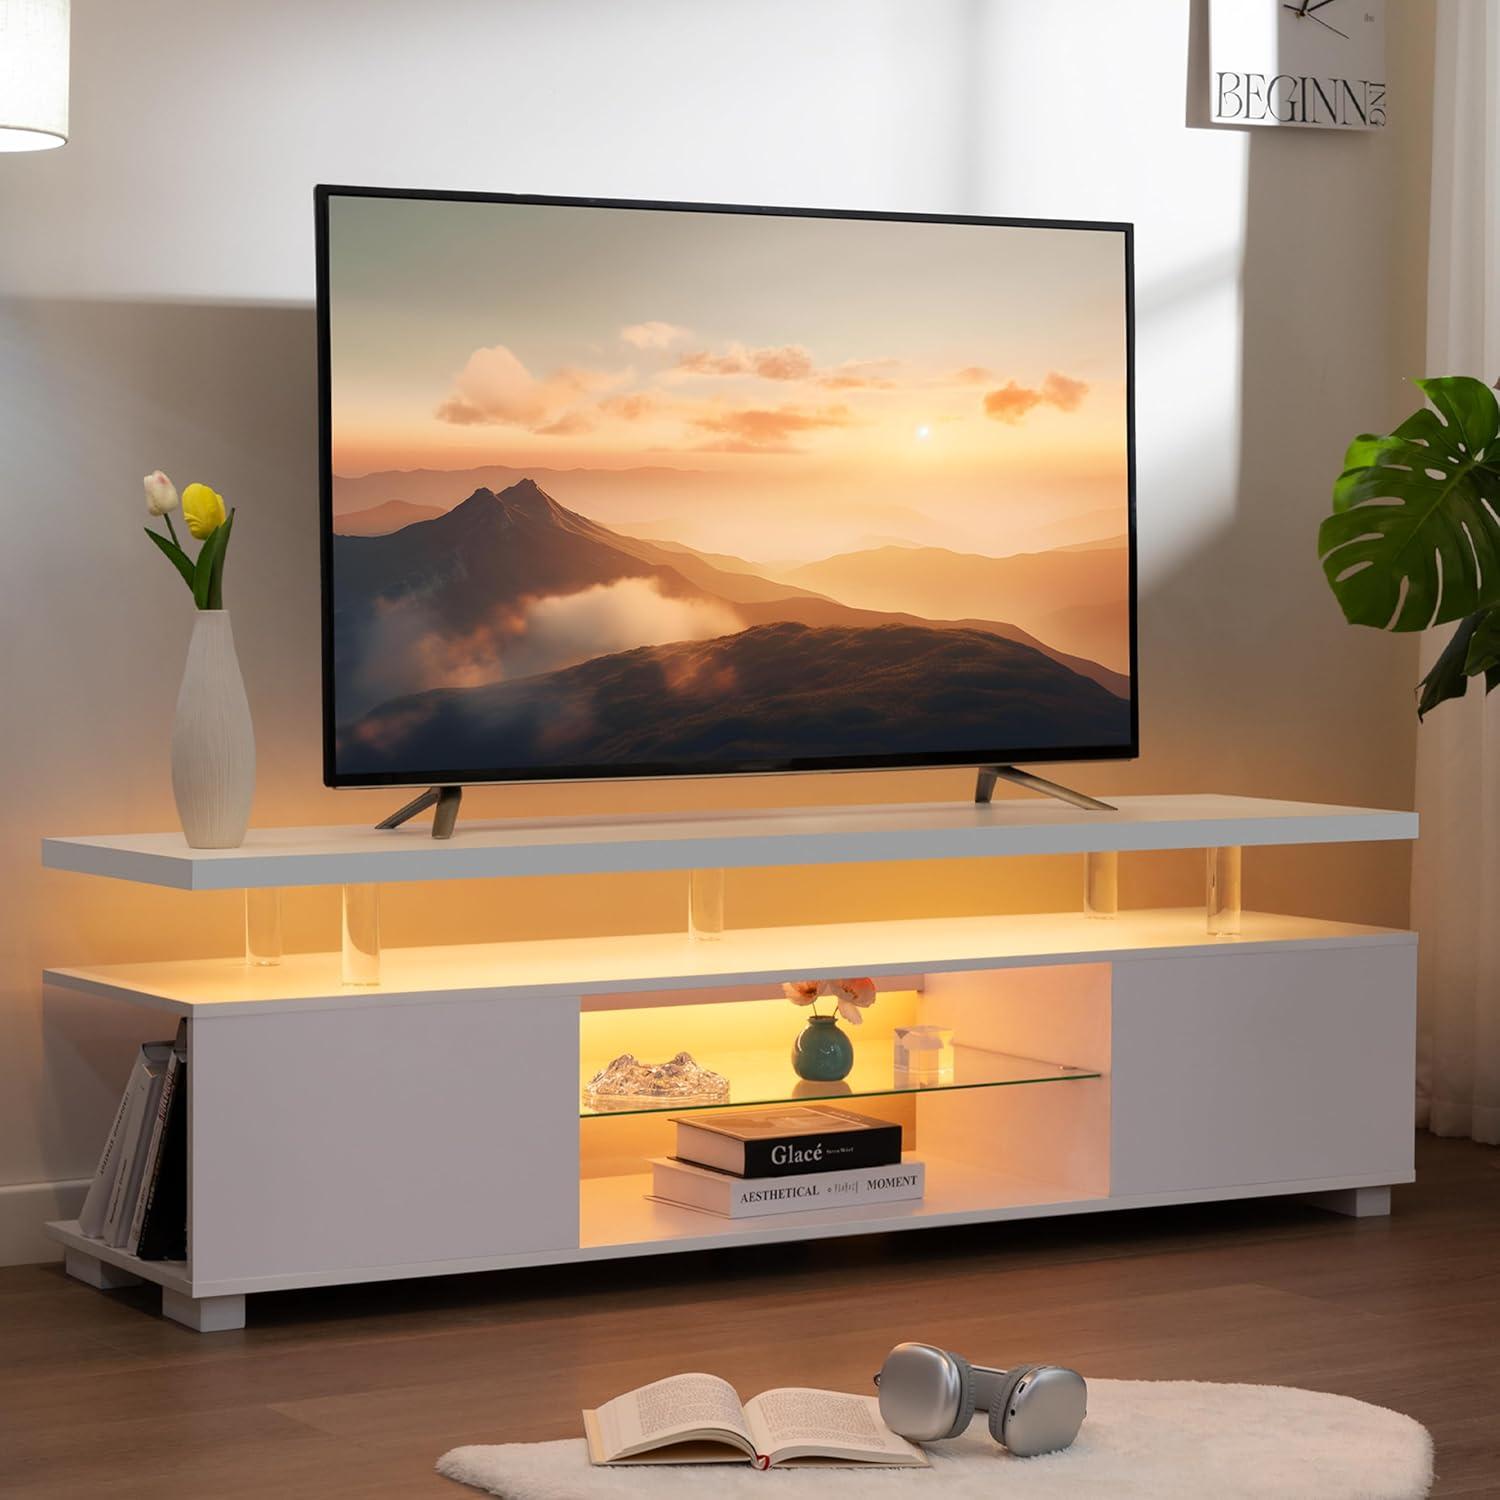
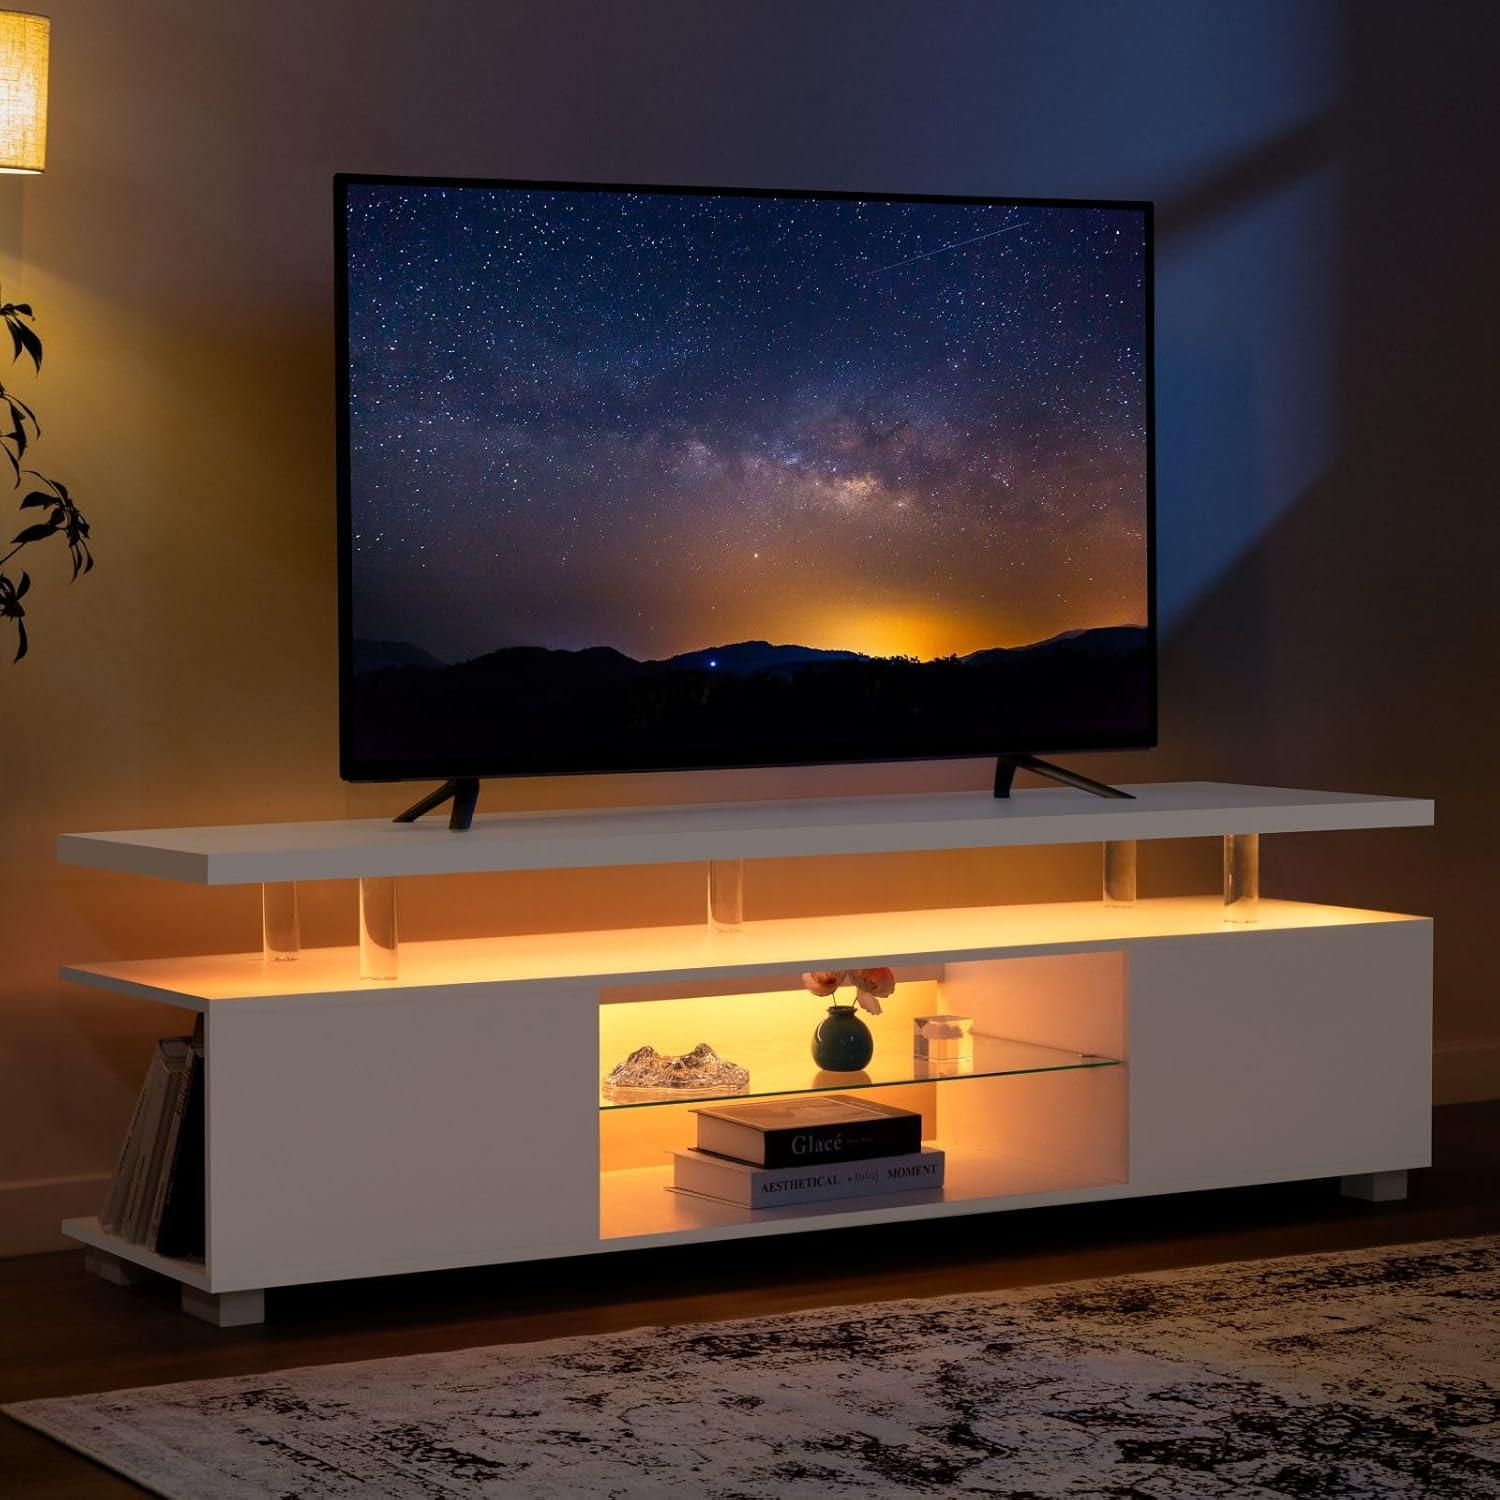
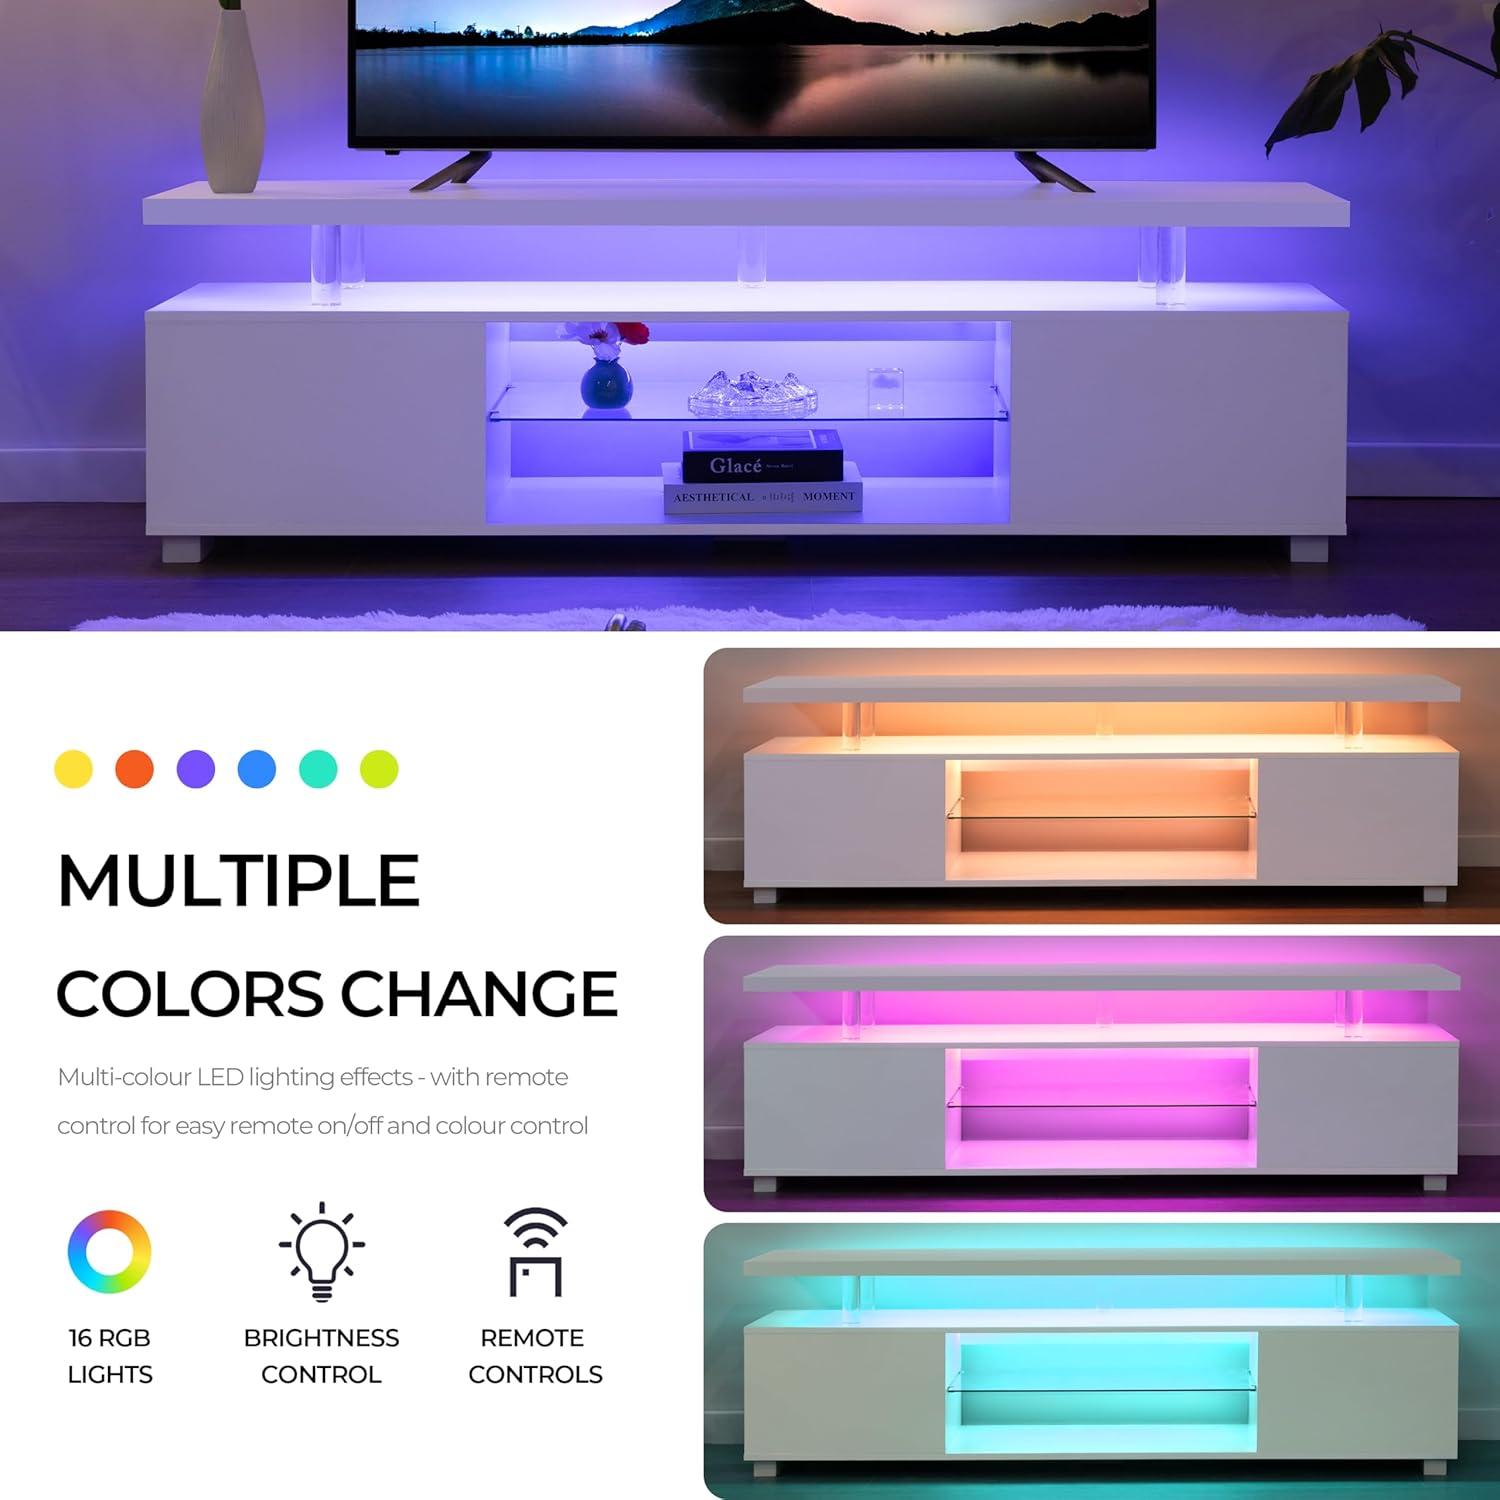
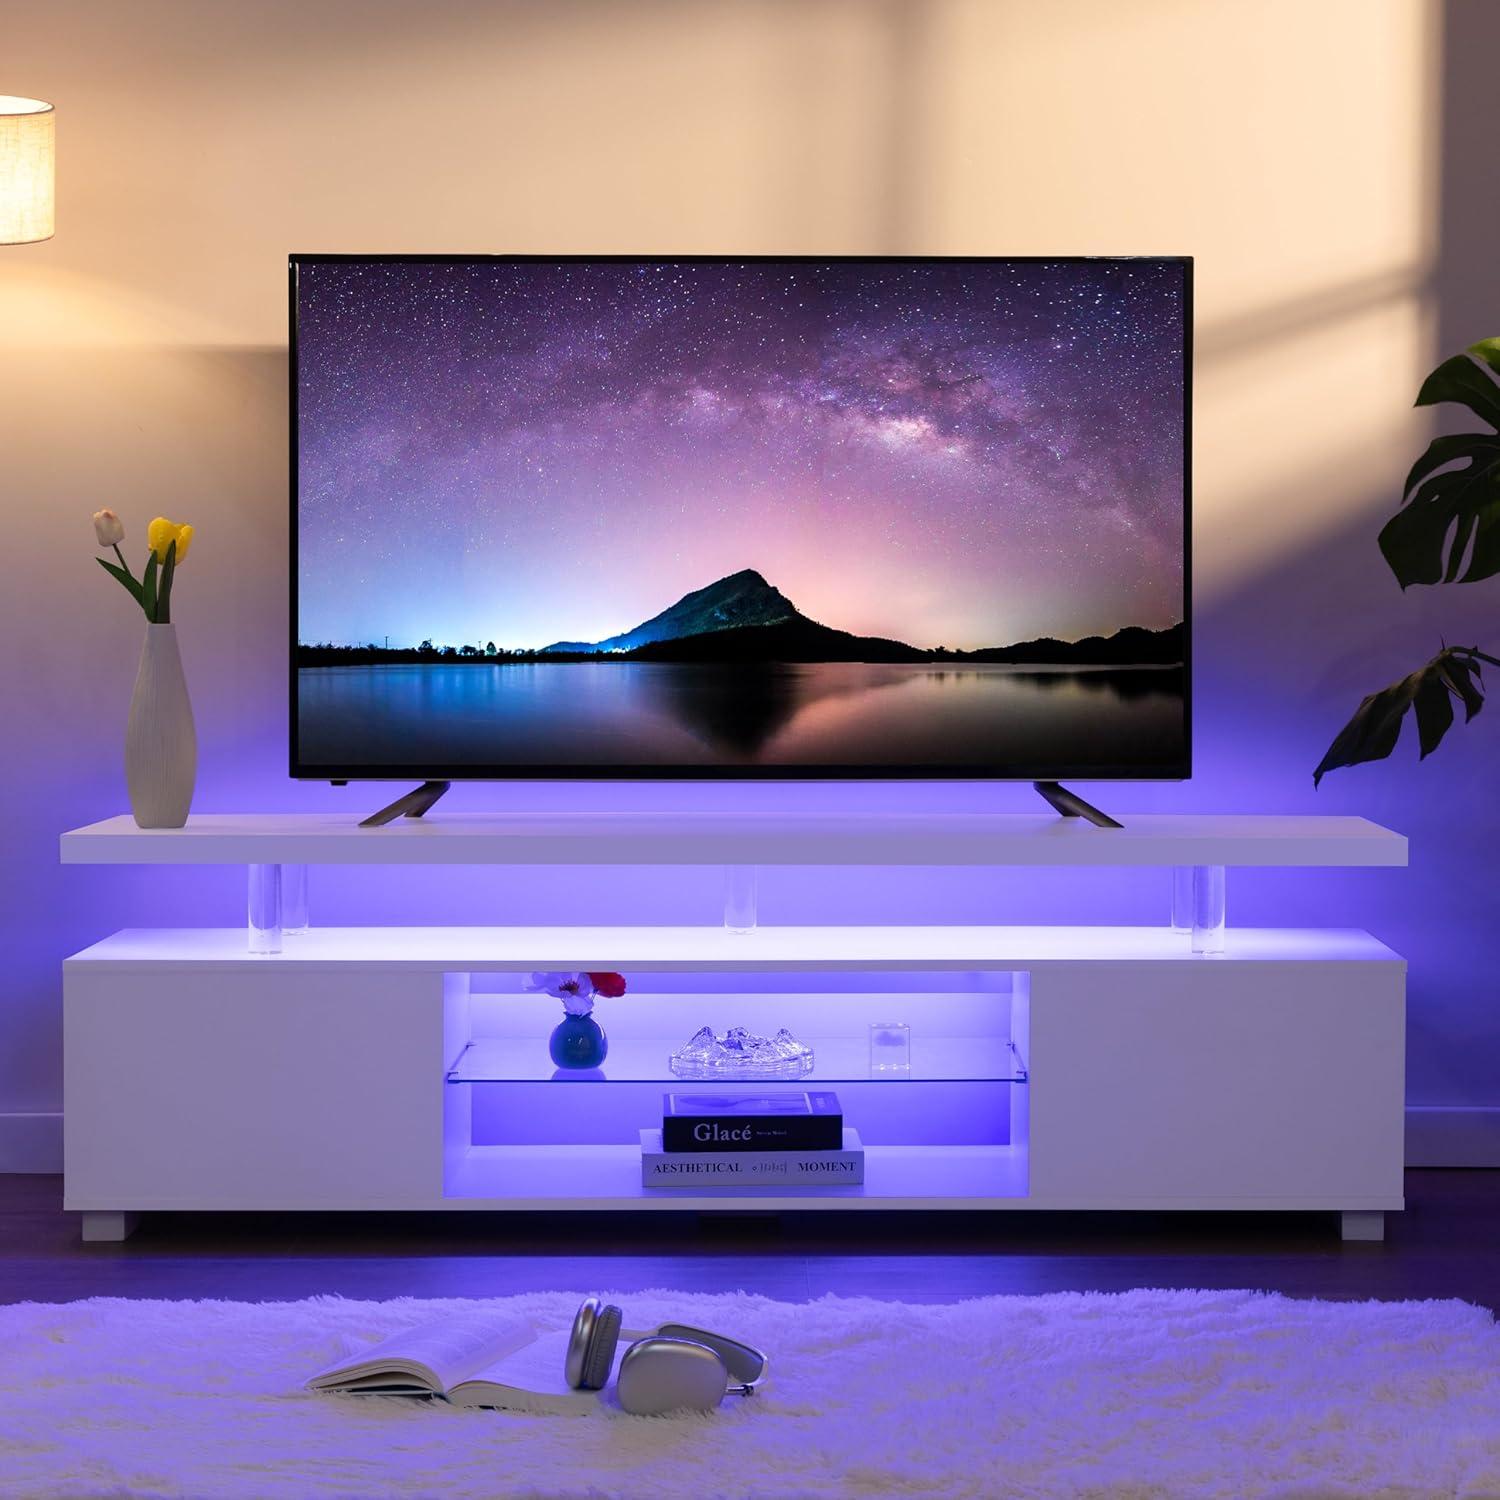
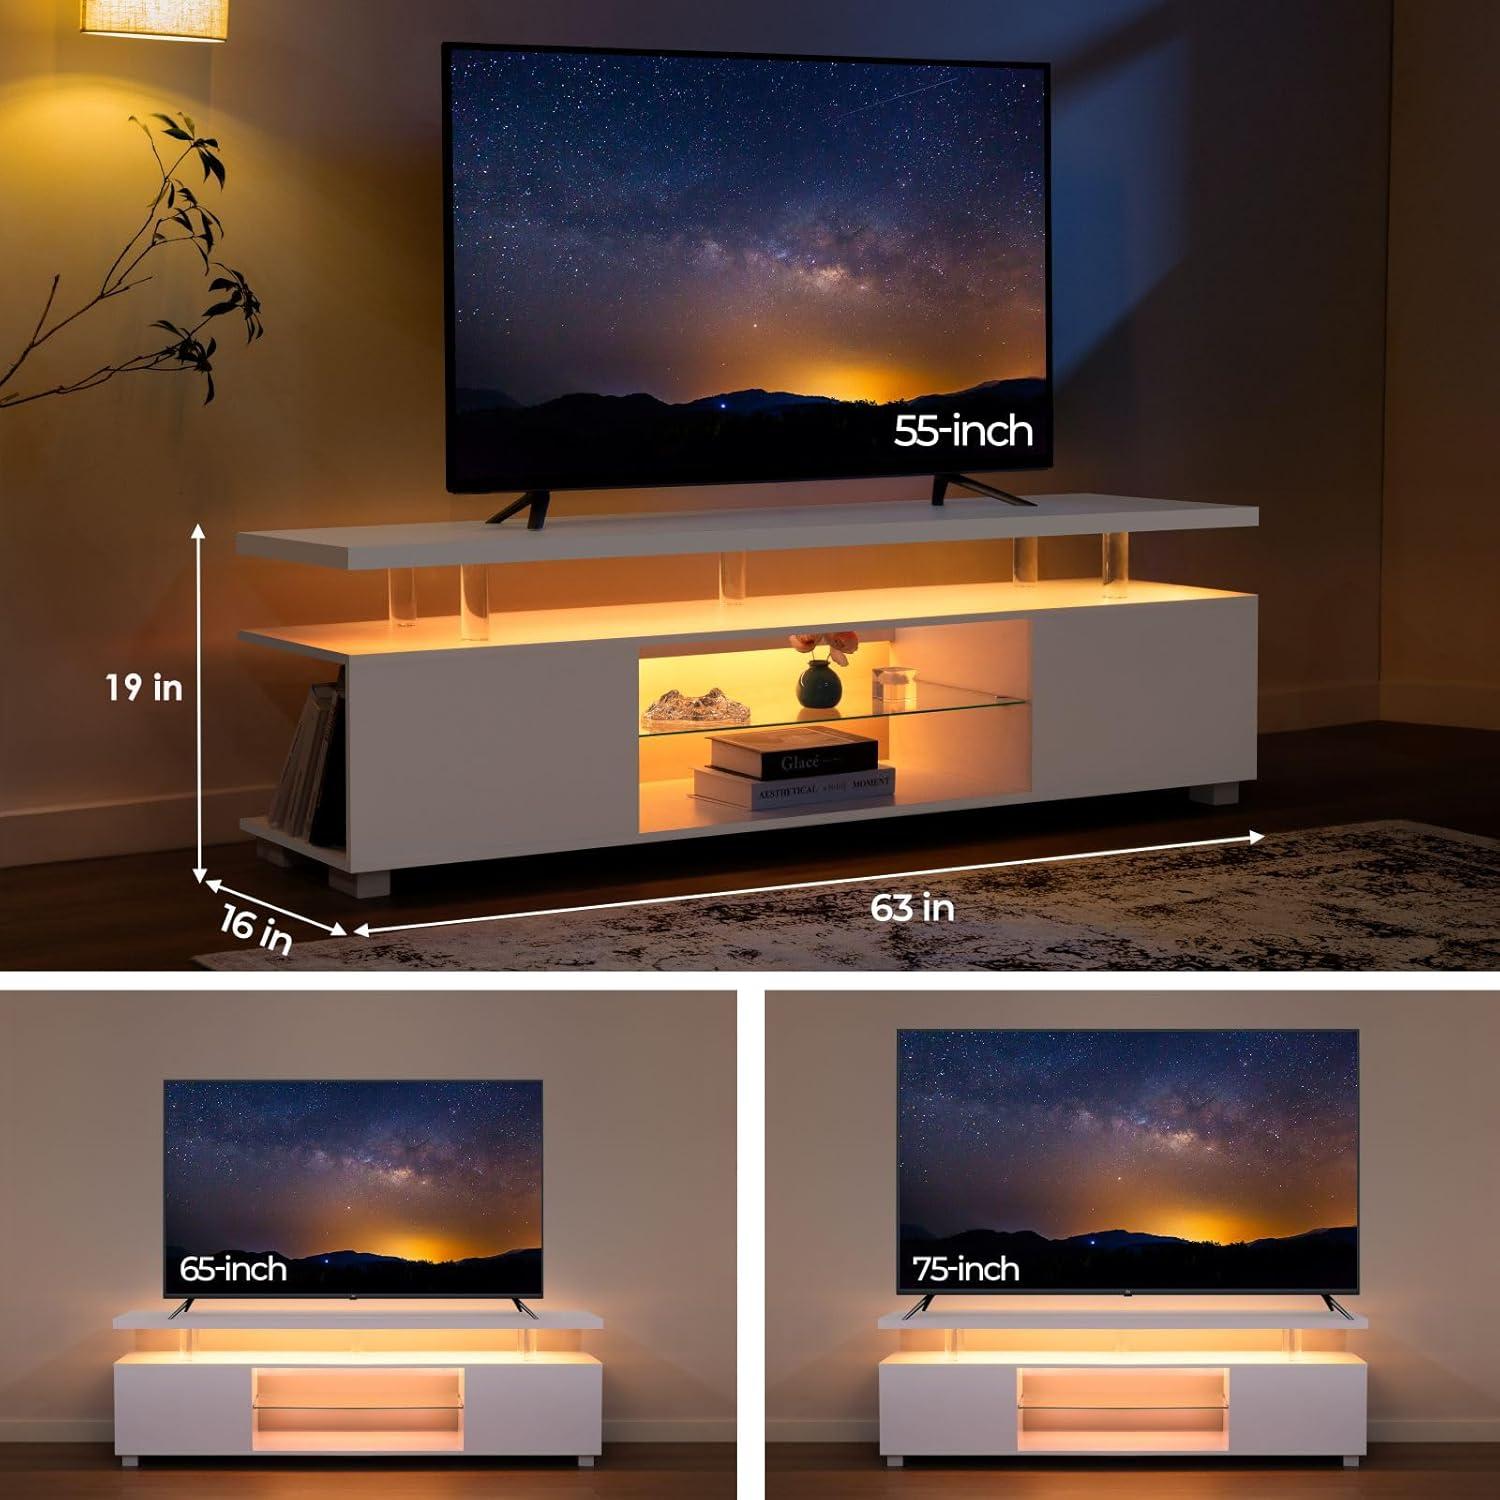
A low, long white slab catches your eye as you walk in—clean lines that quietly anchor the TV wall. You recognize it from the listing as the Cubehom TV Stand for 75+ inch TV,though in the room it reads more like a simple,modern console than a marketplace title. The painted surface feels smooth under your hand with a faint give at the edges, and up close you notice factory seams and the occasional hairline imperfection.A set of LED strips behind the top shelf throws a soft halo on the wall at night, turning the unit from crisp furniture into something cozier. In daylight the piece looks airy and wide; when a large screen sits on top, the shelving beside it feels snug and purposeful rather than decorative.
A first look at the long white TV stand and how it sits in your living room

When you slide the stand into position, it immediately reads as a low, horizontal anchor beneath your screen. From a short distance the white surface reflects ambient light and can brighten the wall area during the day; in dimmer conditions it becomes a subtler backdrop that lets lamps or TV glow take center stage. It usually sits close to the wall but not perfectly flush—there’s frequently enough a small, practical gap where cables tuck or the baseboard clears—and you’ll likely nudge it a little during the first few days to line it up precisely with your seating sightline.
How it occupies the room feels familiar and a bit functional: it stretches the eye across the media wall and helps define the viewing zone without adding visual height. You may find yourself arranging small decor on the top or shifting loose items into the openings,and the piece can either open up or compress perceived floor space depending on how much breathing room you leave around it.A few quick observations that tend to come up when you live with it are below.
- Visual footprint: reads wide and low, creating a horizontal emphasis in the room.
- Interaction with seating: sightlines from sofas or chairs change little once it’s centered, though you might still tweak it’s position.
- Daily habits: slight adjustments and routine tidying—moving remotes, coaxing cords—are common in the first weeks of use.
The modern silhouette, finish and materials and what they reveal about your unit’s construction
The long, pared-back silhouette reads immediately as a modern piece: low and horizontal rather than tall, with unbroken planes that make the top feel like a single continuous surface. When you run a hand along the edges or peer down the shelf gaps you pick up clues about how that effect is achieved — thin-looking tops often hide a reinforced core or edge banding, and recessed legs or a subtle plinth usually mean the weight is carried by internal cross-bracing rather than chunky external legs. The white finish alters what you notice, too: a glossy lacquer reflects seams and any imperfect joins, while a matte or satin white tends to mask minor surface irregularities and reveals the grain or texture beneath. Small details — a tiny visible seam where two panels meet, a row of neat screw caps inside a cabinet, or a routed channel for LED strips — tell you weather the unit was designed for flat-pack assembly, modular replacement of parts, or built-up rigidity with glued joints and dowels.
Look for these quick visual and tactile hints as you inspect your unit:
- Edge profile: thicker rounded edges usually point to veneered or solid edging; razor-thin edges frequently enough rely on hidden reinforcement.
- Join lines: continuous grain or matched seams suggest veneering; repeated cam-lock impressions indicate knock-down construction.
- Finish behavior: gloss highlights minor dents and dust; satin/matte softens them and shows texture more readily.
| Finish / Material | What it typically reveals about construction |
|---|---|
| High-gloss lacquer | Layered surface over MDF or particleboard; seams and repairs are more visible. |
| Matte laminate | Thin protective surface on engineered board; easier to mask joins but can show wear on edges. |
| Veneer over board | Real wood look with thinner substrate; requires careful edge-banding and matching at joins. |
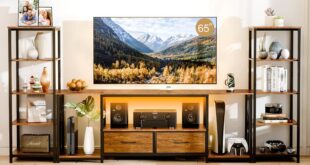
How the proportions and shelf depths line up with common furniture in your rooms
In many living rooms the unit’s horizontal run reads like an extension of the media wall: low enough to sit visually in line with sofa backs and long enough to span beneath a wide-screen display without feeling cramped.This proportioning means shallower shelves tend to work well for items that are slim-fronted or meant to be visible — such as, soundbars and streaming boxes usually sit comfortably on the front edge, often with a slight overhang of cables tucked behind. By contrast, bulkier AV gear is more likely to be placed on the floor beside the stand or slid partly forward; it’s common to see one or two devices shifted out from the back of a shelf so ventilation and cable access are easier. Everyday adjustments — nudging a console sideways to clear a bracket, angling a router for better reception, or leaning a small decorative object against a drawer face — are typical ways occupants reconcile shelf depth with what they already own.
The following snapshot captures how typical components interact with shelf proportions in most rooms; entries describe observed behavior rather than exact measurements.
- Soundbars: Sit neatly on top or along front shelf edge; cables usually remain hidden behind the stand.
- Game consoles / streaming boxes: Fit with some clearance; often shifted to one side to leave room for ventilation.
- AV receivers / oversized components: May not sit fully recessed; frequently placed on the floor or on risers.
| Common item | Typical shelf interaction | Common positioning outcome |
|---|---|---|
| Soundbar | Normally sits flush or just forward of front edge | Mounted on shelf top or directly on stand surface |
| Streaming box / small console | Fits with modest clearance; may be offset for airflow | Placed on shelf,sometimes stacked or angled |
| AV receiver / deep components | Often protrudes or cannot sit fully recessed | relocated to floor,side cabinet,or external shelving |
Full specifications and configuration details are available at https://www.amazon.com/dp/B0CL962FHN?tag=decordip-20.
Where you can tuck consoles, remotes and decor and how the storage is arranged
The top surface and central shelving give you the most obvious real-estate: the top holds your screen and a few display pieces, while the middle open bay is where consoles sit when you want easy access to discs, controllers and airflow. on either side there are lower cubbies and a couple of shallow pull-out spaces where you can casually drop remotes, gamepads or a small decorative tray; you’ll find yourself shuffling a controller from the top shelf to a side nook during a long session. Small decor—books, plants, framed photos—works best toward the outer edges so it doesn’t block vents or sensor lines, and the LED glow from the back tends to make anything placed near the rear feel more integrated into the setup.
Storage is arranged as a mix of visible and hidden compartments with intentional access points for cabling.Open shelves let you slide consoles in and out without opening doors, while the enclosed sections hide power strips and seasonal items; there are cutouts at the back to feed cables down so you can park a console and keep its cords mostly out of sight.
- Open shelf — quick access, visible ventilation
- Enclosed cubby — hides power bricks and extra cables
- Shallow pull-out / tray — ideal for remotes and small accessories
The arrangement also implies a few trade-offs: some bays are shallow enough that a large AV receiver won’t slide in, drawers are better for thin remotes than bulky controllers, and open areas will collect dust faster than closed ones.
| Zone | What fits / access note |
|---|---|
| Top surface | TV plus a couple of decor items; keep vents clear |
| Center open bay | Consoles and streaming boxes with easy front access |
| Side cubbies/doors | Power strips, extra cables and items you want hidden |
Living with it day to day in your home, from cable management to equipment access
Day-to-day use centers around the small, routine motions you hardly notice until something gets in the way. Cables tend to be threaded through the rear openings and then tucked along the underside of the bottom shelf; in practice you’ll find yourself looping HDMI and power leads with velcro or zip ties to keep the front edges tidy. The LED wiring and its controller usually live near a corner, so swapping light settings or swapping out the battery in the remote happens without pulling the whole unit away from the wall. When you move a console or reach for the TV’s inputs the most frequent annoyance is the little tug as cords shift — a quick rearrange behind the stand becomes part of cleaning day rather than a project in itself. Dust gathers in the cable bundle more than on the visible surfaces, and every few weeks you’ll pause to vacuum behind the stand where the cords enter the wall outlet.
Accessing equipment feels familiar after a few uses: you slide a console forward to swap discs, unplug a stick from a rear USB port, or angle a Wi‑Fi dongle to improve signal. Small habits develop, like leaving the power strip accessible on the lowest shelf or routing longer cables along the back lip so they don’t hang down. A few common interactions include:
- Quick swaps: moving a controller or game console in and out when changing activities.
- Port access: reaching into the rear cutouts to switch HDMI or ethernet leads.
- Light control: keeping the LED controller reachable for color tweaks or power cycling.
| Access point | Typical use |
|---|---|
| Rear cutouts | Power, HDMI and ethernet routing |
| Open shelves/top surface | Remote line-of-sight, temporary device placement |
These small routines—tucking cables, pulling a console forward, or reaching for the light remote—become the way the stand fits into your daily rhythm rather than a series of one-off tasks.
How well the stand suits your space, where it meets your expectations and where limitations show
Placed against a wall the unit often reads as the visual anchor for a media area: its horizontal presence pulls attention across the room and the integrated lighting tends to add a soft evening glow that many households notice when lights are dimmed. In everyday use the low, elongated silhouette frequently meets expectations for creating a minimalist, contemporary look without crowding sightlines, but it can also surface practical frictions — for example, the top surface can sit lower than some mounting habits prefer, and the shelf openings sometimes constrain deeper or taller AV components. Reports of occasional panel imperfections or slightly misaligned parts mean the fit can feel less seamless until those issues are addressed, and length that suits one living room may feel short in another depending on where othre furniture sits and how the TV is mounted.
In daily routines people tend to adapt rather than redesign the room: small shifts in speaker placement, coaxing cables through rear gaps, or moving decorative items onto nearby surfaces are common responses when something doesn’t sit quite right. observed patterns include:
- Long wall placement: balances the space visually but can leave dead zones at the edges if the seating area is narrow.
- Under-mounted TVs: can create extra headroom or require risers to align sightlines with seating.
- Cable and component juggling: shallow shelf depths sometimes require creative stacking or external shelving for bulky receivers.
| Setting | typical fit in practice |
|---|---|
| Open-plan living | Anchors the TV zone but reads as a low horizontal element that ties adjacent areas together |
| Compact rooms | Can dominate a short wall or require adjustments to seating distance |
| Home office/bedroom | Often provides a tidy visual base, though taller peripherals may need seperate storage |
See the full specifications and current configuration details on the product listing
Assembly steps and routine upkeep you will encounter after installation

When you get the unit out of the box, the first practical step is the usual spread-and-check: clear a work area, lay out panels and hardware, and match each part to the illustrations in the packet or the online video guide. Assembly tends to follow a predictable pattern — base and side panels first, then internal shelves, finishing with the top and any back panels — and the provided fasteners and cam locks work in scaled sequences rather than all at once.As some pieces are long or awkward to hold in place,you’ll find the process goes smoother if you prop long panels on cushions or have a second pair of hands for the final alignments.Expect small adjustments during assembly (repositioning a shelf,easing a screw into a tight hole),and keep the spare screws and the instruction sheet handy until everything’s tightened and working.
- Quick checklist while assembling: inventory parts,position long panels flat,loosely fasten until alignment is good,then tighten.
| Typical task | Usual time |
|---|---|
| Unpacking & part check | 10–20 minutes |
| Core assembly (solo) | 45–90 minutes |
| LED hookup & cable routing | 10–30 minutes |
After it’s in place, the upkeep mostly consists of small, periodic actions rather than heavy maintainance. Dust collects on horizontal surfaces and behind the TV, so you’ll likely run a microfiber cloth along the top and inside open compartments every week or two; for the finish, a damp cloth with a mild cleaner is what most people reach for, though you’ll notice fingerprints and smudges show more on lighter finishes and get wiped more frequently enough. The LED strip and remote that come with the unit require occasional attention — batteries need replacing, adhesive backing on strips can loosen if temperatures change, and connectors sometimes need a quick reseat if the lights flicker. You’ll also find it useful to revisit cable routing after the first few days as devices settle into their spots, and to retighten a couple of screws or cam locks after a month or two as joints settle.
- Periodic tasks: dust weekly-ish, clean surfaces monthly, check LEDs and cables every few months, retighten fittings now and then.
How It Lives in the space
Over time you notice how the TV Stand for 75+ inch TV, LED TV Stands for Living Room,White TV Stand,Long TV Stand for Living Room, Modern TV Stand with Storage Bedroom,Home Office settles into the room, finding a familiar line between sofa and window. In daily routines it shapes how you use the space — which surfaces collect cups and books, where chargers gather, the small shifts that make certain spots feel more agreeable. You see the surface wear as part of living: pale sun lines on top, soft scuffs at the edges, the smudges that mean it’s been touched and used. It becomes part of the background of ordinary days and it stays.