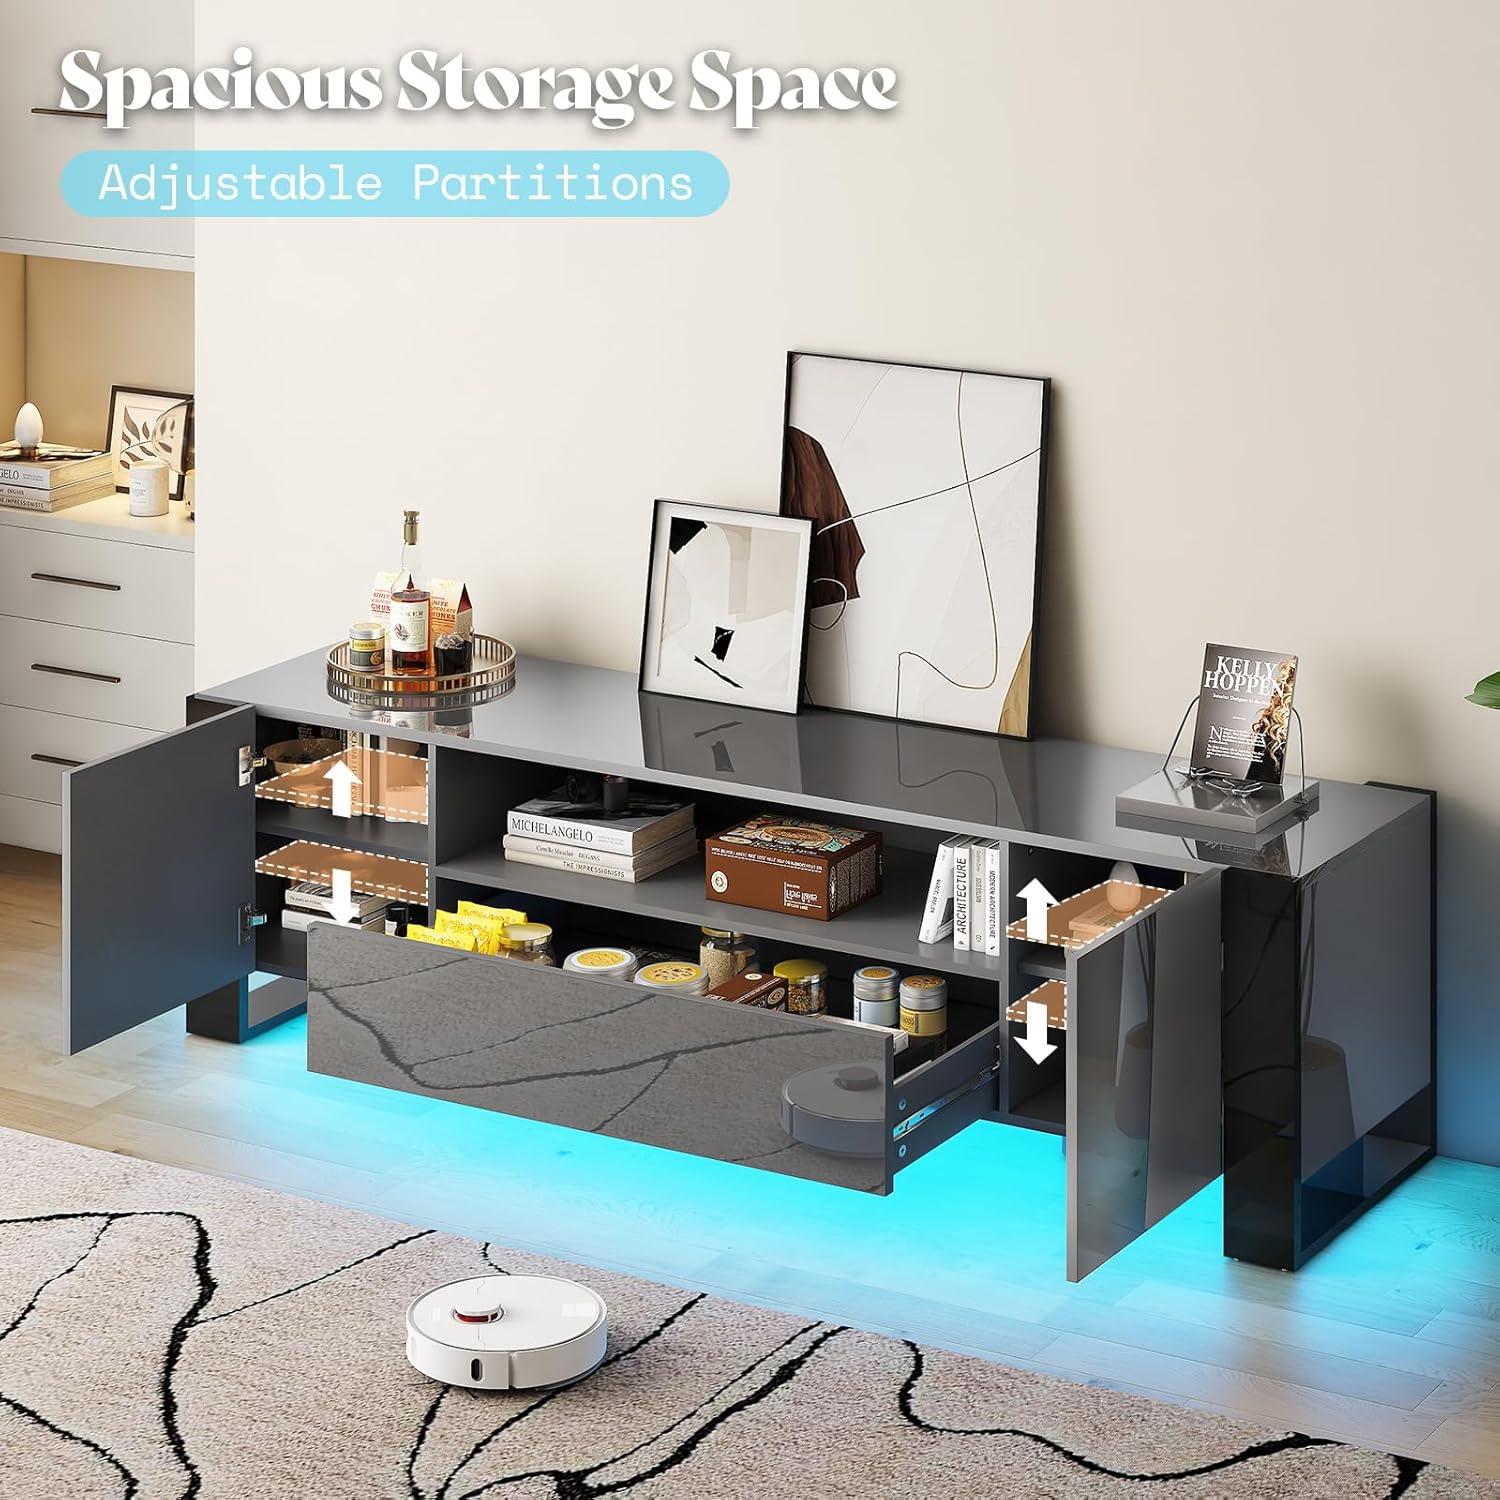
AMERLIFE 70 inch TV Stand with LED, how it fits your space

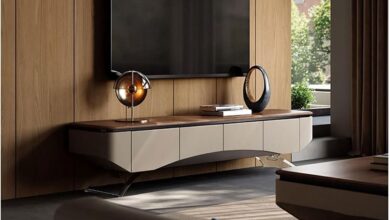
Sunlight skims across the glossy top and you catch your reflection—soft, a little smudged—on the gray surface. It reads low and wide in the room, the length of the AMERLIFE 70‑inch TV console quietly anchoring the wall without shouting. Under your hand the finish is smooth and cool, the pine legs adding a faint, warm contrast at the base, while the drawers glide with a near-silent hush. When the LEDs come on they lay a thin, ambient wash around the cabinet, softening the TV’s silhouette more than stealing attention. It feels lived-in instantly, the kind of piece you notice as you move through the space rather than stare at from across the room.
At a glance what your new AMERLIFE 70 inch TV stand looks like in a room
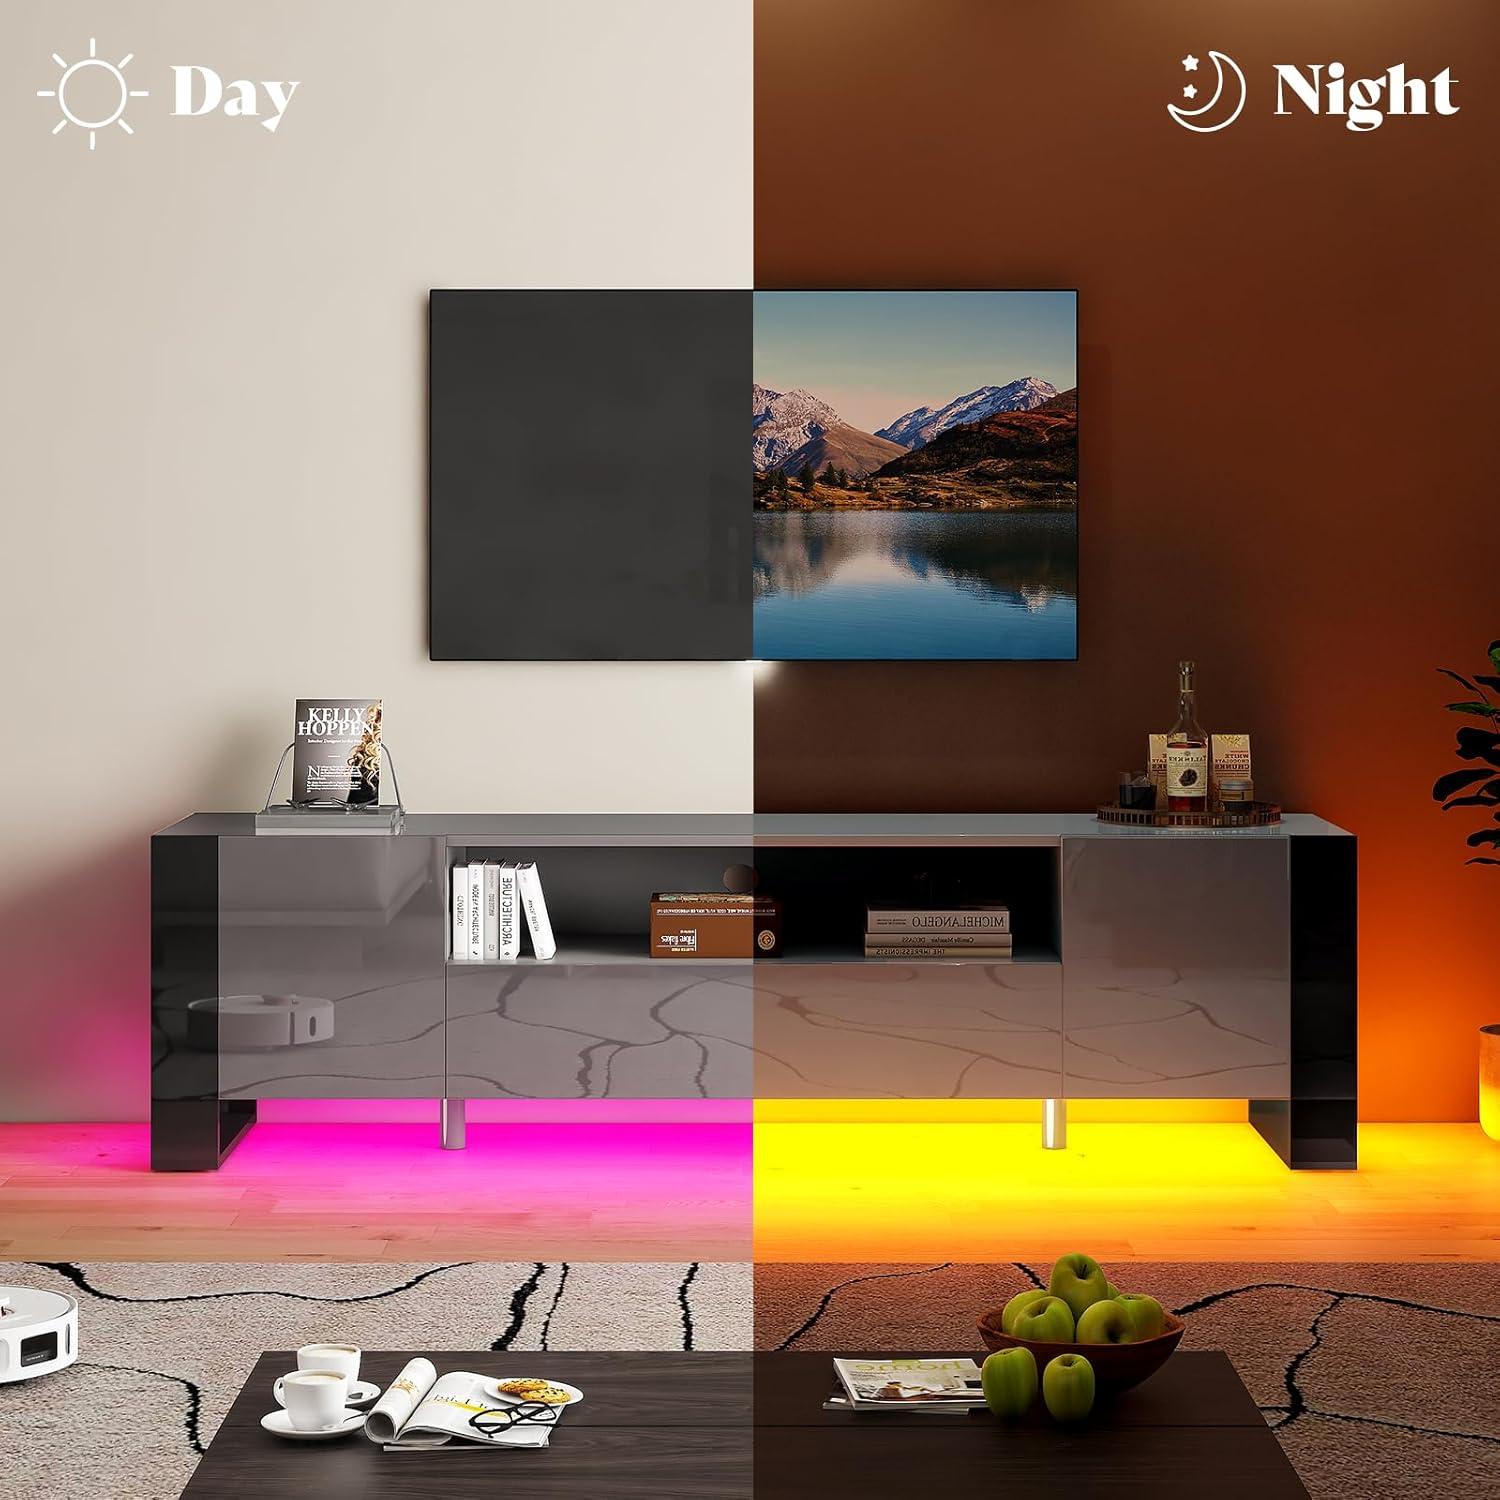
From across the room the piece reads as a low, horizontal anchor beneath your screen — it doesn’t shout, but it defines the lower third of the wall. the surface catches and bounces light, so lamps and windows create soft highlights that move as the day changes; those highlights also make dust and fingerprints more visible than on a matte finish.At night an integrated light wash around the base brings a diffuse halo that draws attention outward from the TV and softens the wall behind it. A few swift visual cues you’ll notice at a glance:
- Clean horizontal line that frames the TV without adding visual clutter
- Reflective surface that shifts with daylight and indoor lighting
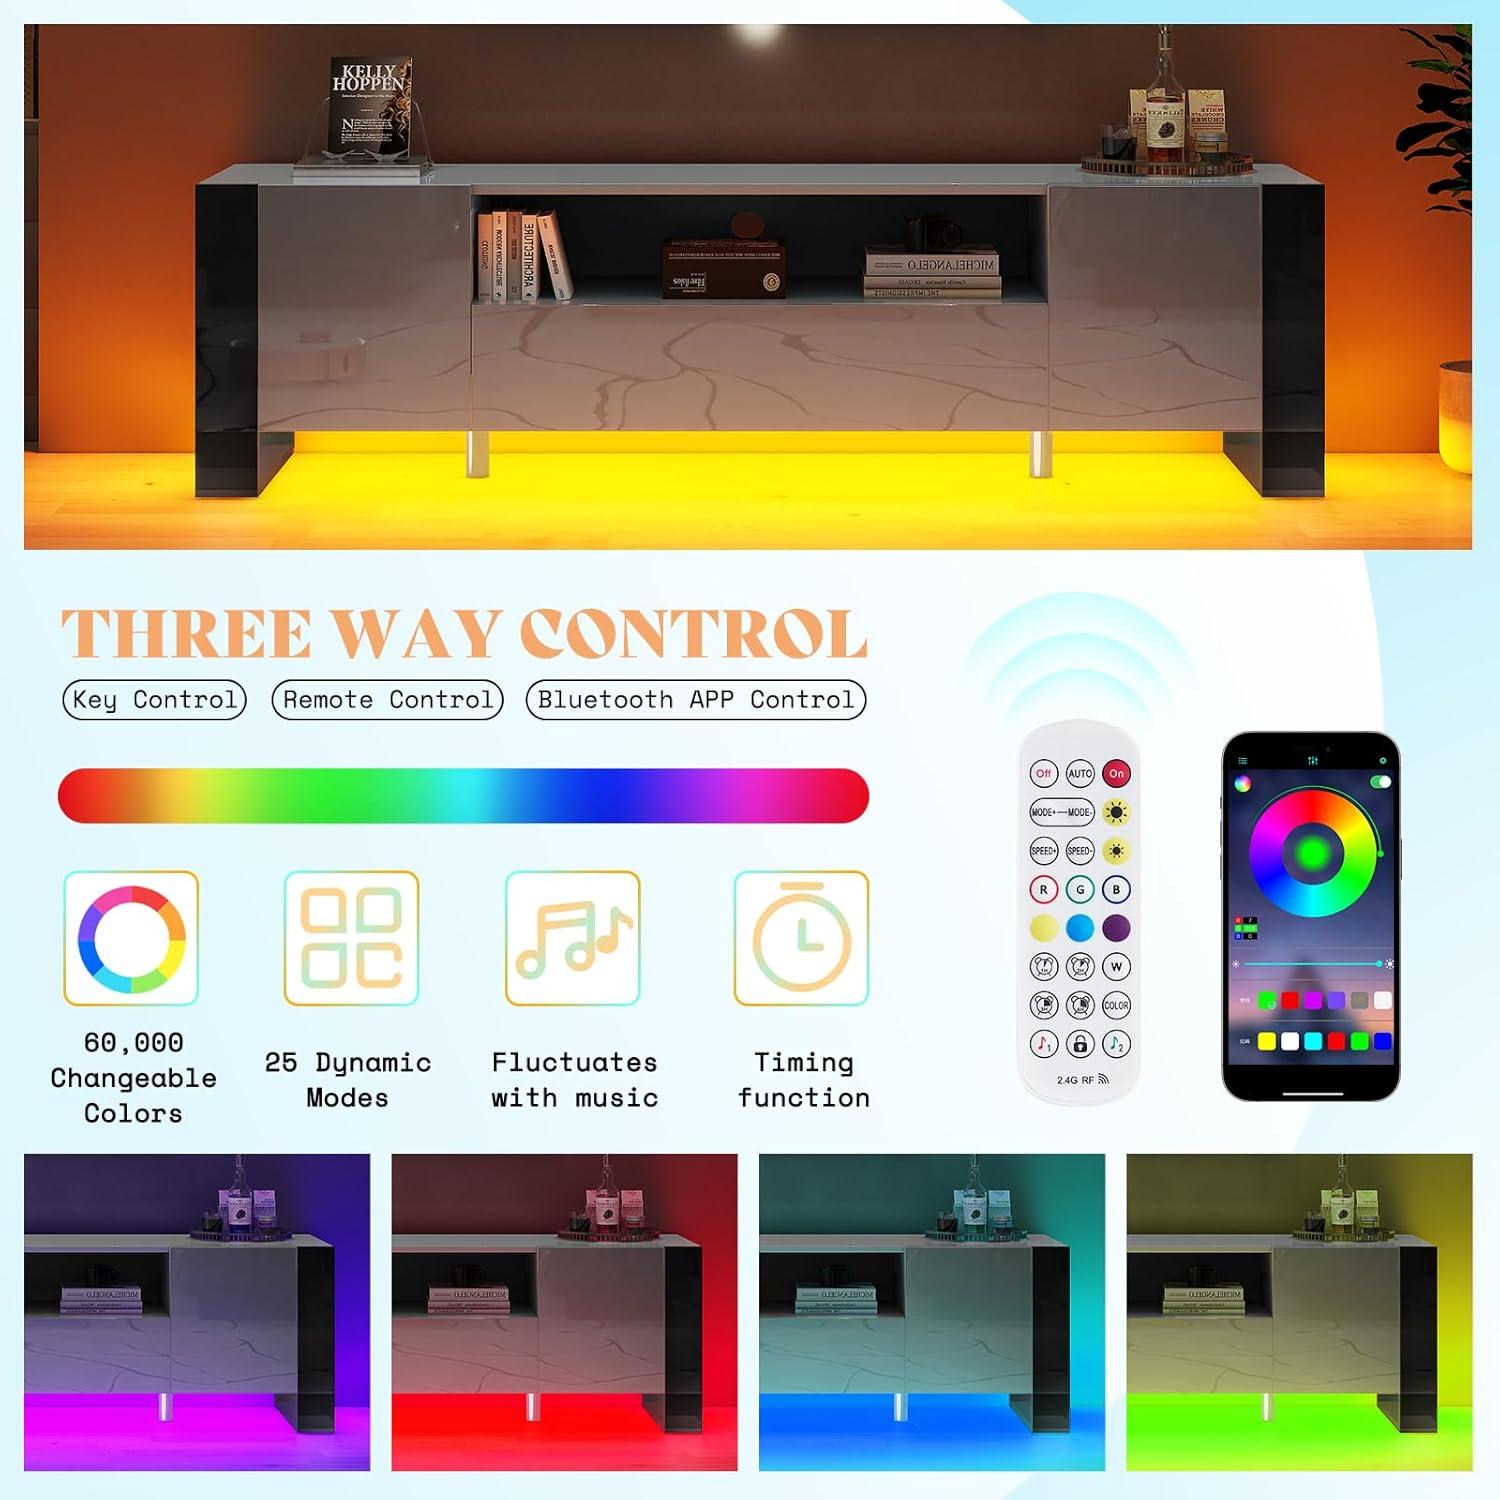
- Subtle ambient glow that changes the room’s mood after dark
Up close, the low profile makes the top surface useful as a staging area for remotes, a small lamp, or a couple of decorative items without feeling crowded; items sit against a continuous plane, so the arrangement tends to look orderly unless you pile things on. The finish shows daily use — smudges and dust are more apparent in certain light — so the stand’s presence in the room is part of a small maintenance rhythm. How it reads against artwork, shelving, or a plain wall shifts with the room’s lighting: during daytime it blends through reflected sheen, while in dimmer settings the colored wash becomes a defining visual element that can make the whole corner feel more intentional.
| Lighting condition | Typical room effect |
|---|---|
| Daytime | Subtle sheen and reflections; integrates with natural light |
| Evening / low light | Ambient glow highlights wall and creates a softer backdrop |
Unboxing and first look: what you notice about assembly, finish, and the LEDs
When you open the box you first notice the parts are wrapped in several layers of protective film and foam; larger panels arrive flat and the smaller hardware packs are separated and labeled. The instruction sheet walks you through a linear sequence of steps and most fasteners are grouped together, which means you spend a chunk of time matching labeled bags to numbered parts rather than hunting for stray screws. Putting the main panels together tends to require small alignment nudges — dowels slide into pre-drilled holes but you occasionally realign a panel before the cam locks engage — and some steps ask for a bit of patience when lining up edges. A short hex key is included in the hardware kit, and while many screws turn easily by hand you’ll probably reach for a longer driver for the deeper ones.
- Included tools: a basic allen key and clearly bagged fasteners make it straightforward to start right away.
- Protective finish: most glossy faces come with peel-off film; remove it last to avoid smudges during assembly.
- LED setup: the light strip, controller box, and remote are packed together, with adhesive backing and connector plugs visible on first inspection.
The high-gloss surfaces show their character as soon as you lift a panel — light catches across the sheen and you can see minor variations where protective film met the coating, plus a faint factory scent that fades after airing out.edges and seam lines are visible when parts are temporarily fitted, which is useful during the build because you can spot where a panel needs a tighter cam lock or a small alignment tweak. The LEDs power up in-box if you attach the controller, and initial testing reveals a wide range of colors and several preset modes; in bright room light the effect is subtle, while in dimmer conditions the hues and transitions become much more pronounced. You’ll also notice the LED strip’s adhesive and wire routing points — there’s room to tuck the controller out of sight but the cable routing requires a moment of planning to keep things tidy.
| Component | What to check on arrival |
|---|---|
| Fastener packs | All bags labeled; verify quantities before you start |
| Gloss panels | Protective film intact; light surface marks unlikely but easy to wipe |
| LED assembly | Controller, remote, and connectors present; adhesive backing on strip |
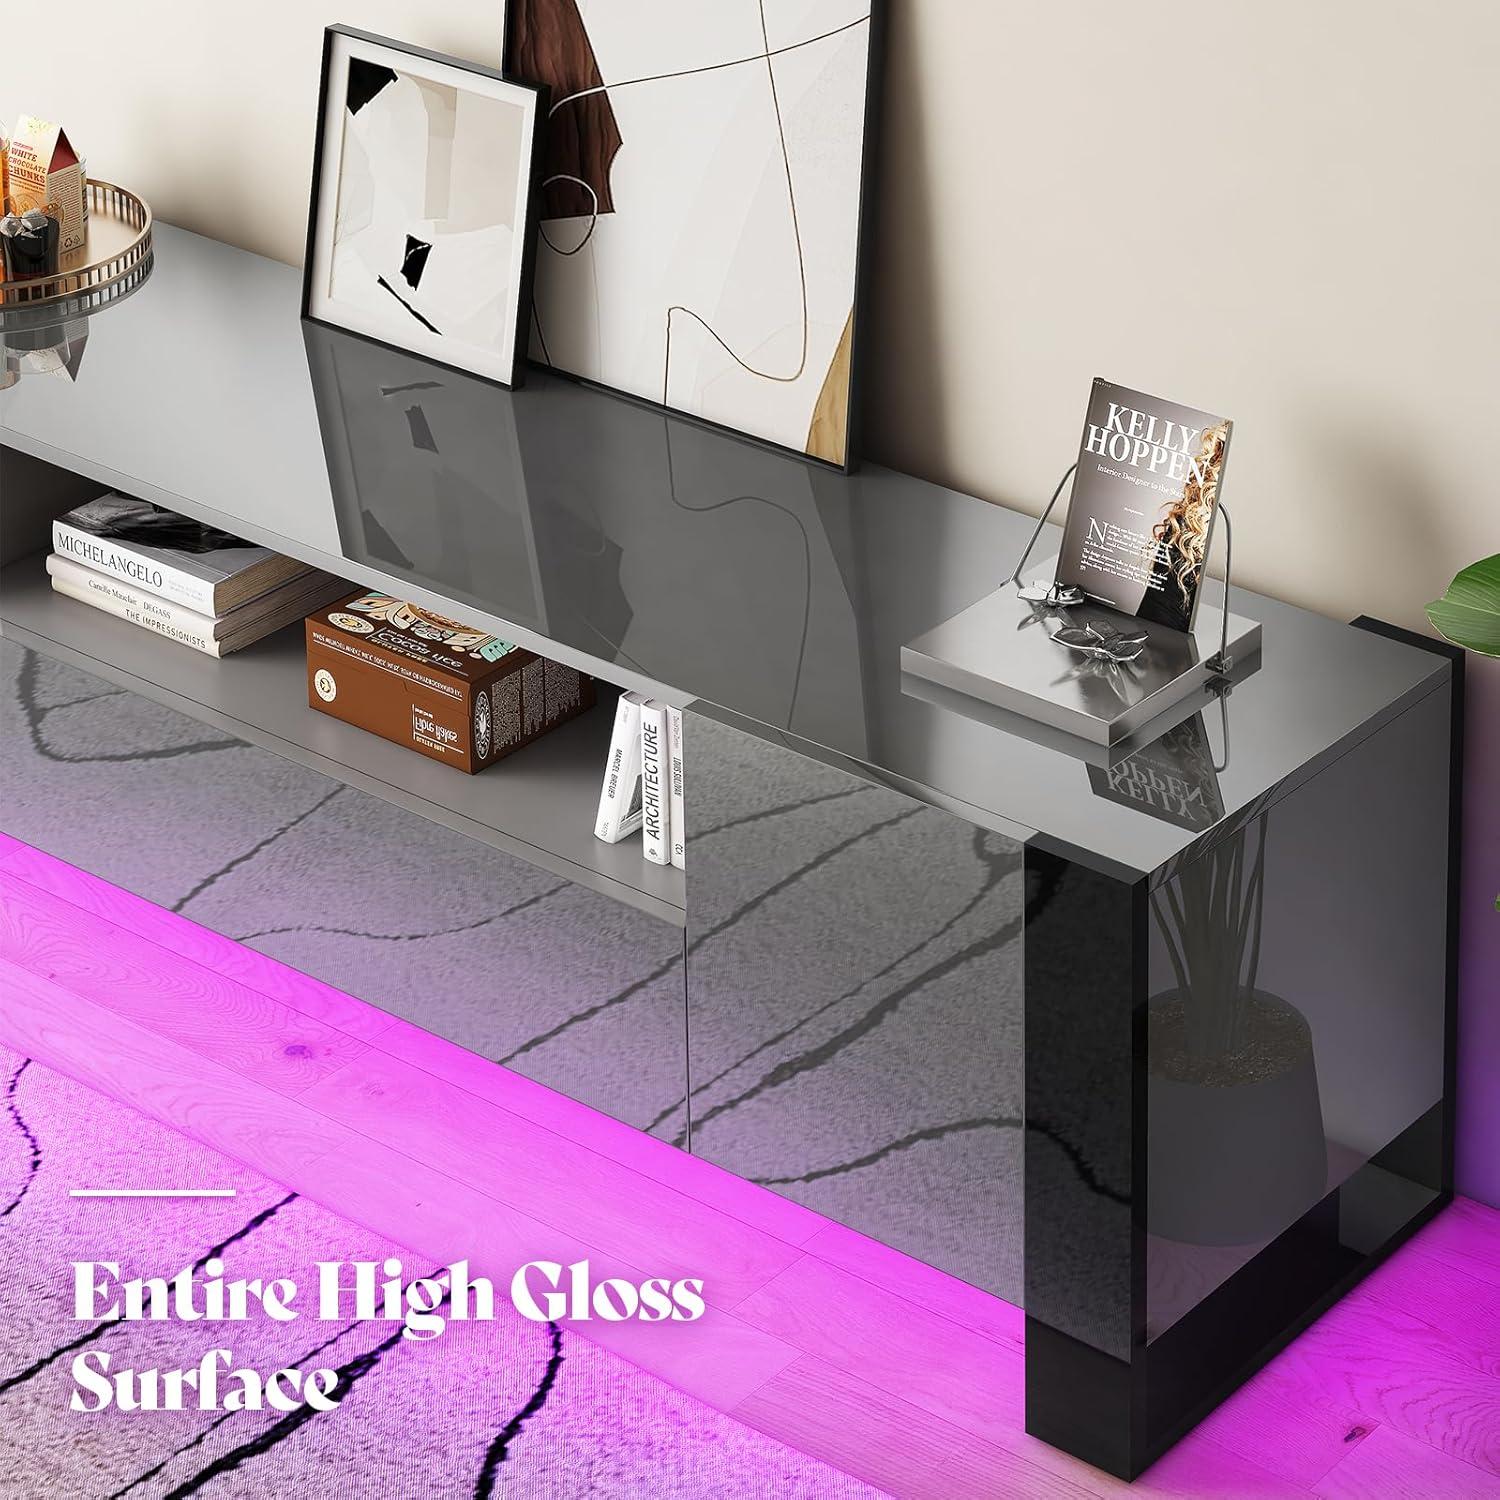
The grey high gloss surface and materials up close as you run your hand along the cabinets
When you draw your hand along the grey high-gloss surface, the first thing you notice is how continuous and mirror-like the finish feels under your palm. The lacquered face gives a cool, almost slick glide, with only the faintest suggestion of texture where panels meet. Light catches and shifts as you move, and that shifting makes fingerprints and tiny dust motes more visible than they are on matte surfaces; you find yourself smoothing a crescent of prints with the heel of your hand without meaning to. Around the doors and drawer fronts there’s a subtle change in resistance — a very slight edge or bevel that your fingertips register as a boundary, and a thin line where two pieces were joined that you can detect if you press a fingernail into it.
A few small, everyday details stand out as you handle the cabinets:
- Finish: uniformly glossy with a reflective sheen that tends to highlight smudges.
- Temperature: cool to the touch at first contact,warming quickly where your hand lingers.
- Seams and joins: perceptible but low-profile — you feel them rather than see them when gliding across.
- Acoustic cue: tapping the surface produces a muted, solid sound rather than a hollow ring.
| Surface detail | What you feel |
|---|---|
| Gloss coating | Silky glide, shows skin oils |
| Edge joints | Subtle ridge under fingertips |
| Drawer front | Smoother motion near handle area |
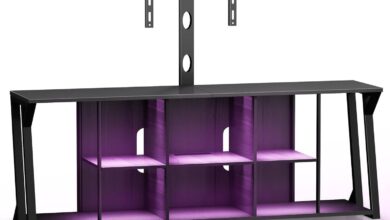
How the dimensions and layout determine where you can situate your TV and components
Where the unit sits in a room often comes down to simple spatial interactions: width determines whether it spans a whole wall or leaves room on either side, depth governs how far the screen and speakers will project into a walking path, and overall height sets the TV’s eye level relative to your couch. You’ll notice small adjustments happen naturally — nudging the stand a few inches off the wall to reach an outlet, angling it slightly to avoid glare from a window, or sliding a game console partly under a shelf so the controller cable reaches without tugging. A few quick, visible checks you’ll find yourself making again and again include:
- Viewing height — how the console’s top lines up with your typical seated eye level;
- Cable access — whether outlets and power strips sit within easy reach or require longer runs;
- Traffic flow — if the stand’s footprint interrupts thin passageways or doorway sightlines.
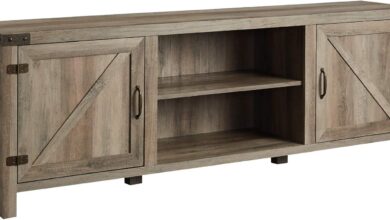
The arrangement of shelves, drawers and open space inside the unit shapes where components practically end up. Open shelves with low clearance tend to host flat streaming boxes or soundbars laid front-facing, while deeper, taller compartments get used for consoles and receivers that need venting and room for cables; sometimes that means stacking devices vertically or letting a controller rest on top because the shelf depth doesn’t quite accommodate a second device side-by-side. remote sensors and airflow also influence small placement choices — you’ll frequently enough leave a little front-facing gap for the IR eye or pull a drawer partway open during long gaming sessions to keep a console cooler. The table below summarizes common component/layout interactions in straightforward terms:
| Component | Layout factor that affects placement |
|---|---|
| Soundbar | Top-surface clearance and front-facing visibility |
| Game console | Shelf depth,ventilation space,cable reach |
| Streaming box | Easy front access for remotes and small footprint fit |
| Receiver | Tall compartment space and rear cable routing room |
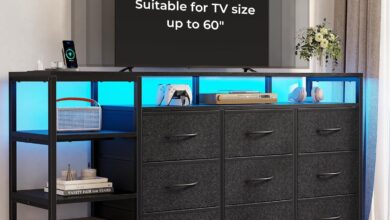
Living with this console: everyday use in a living room,a gaming setup,and a media corner
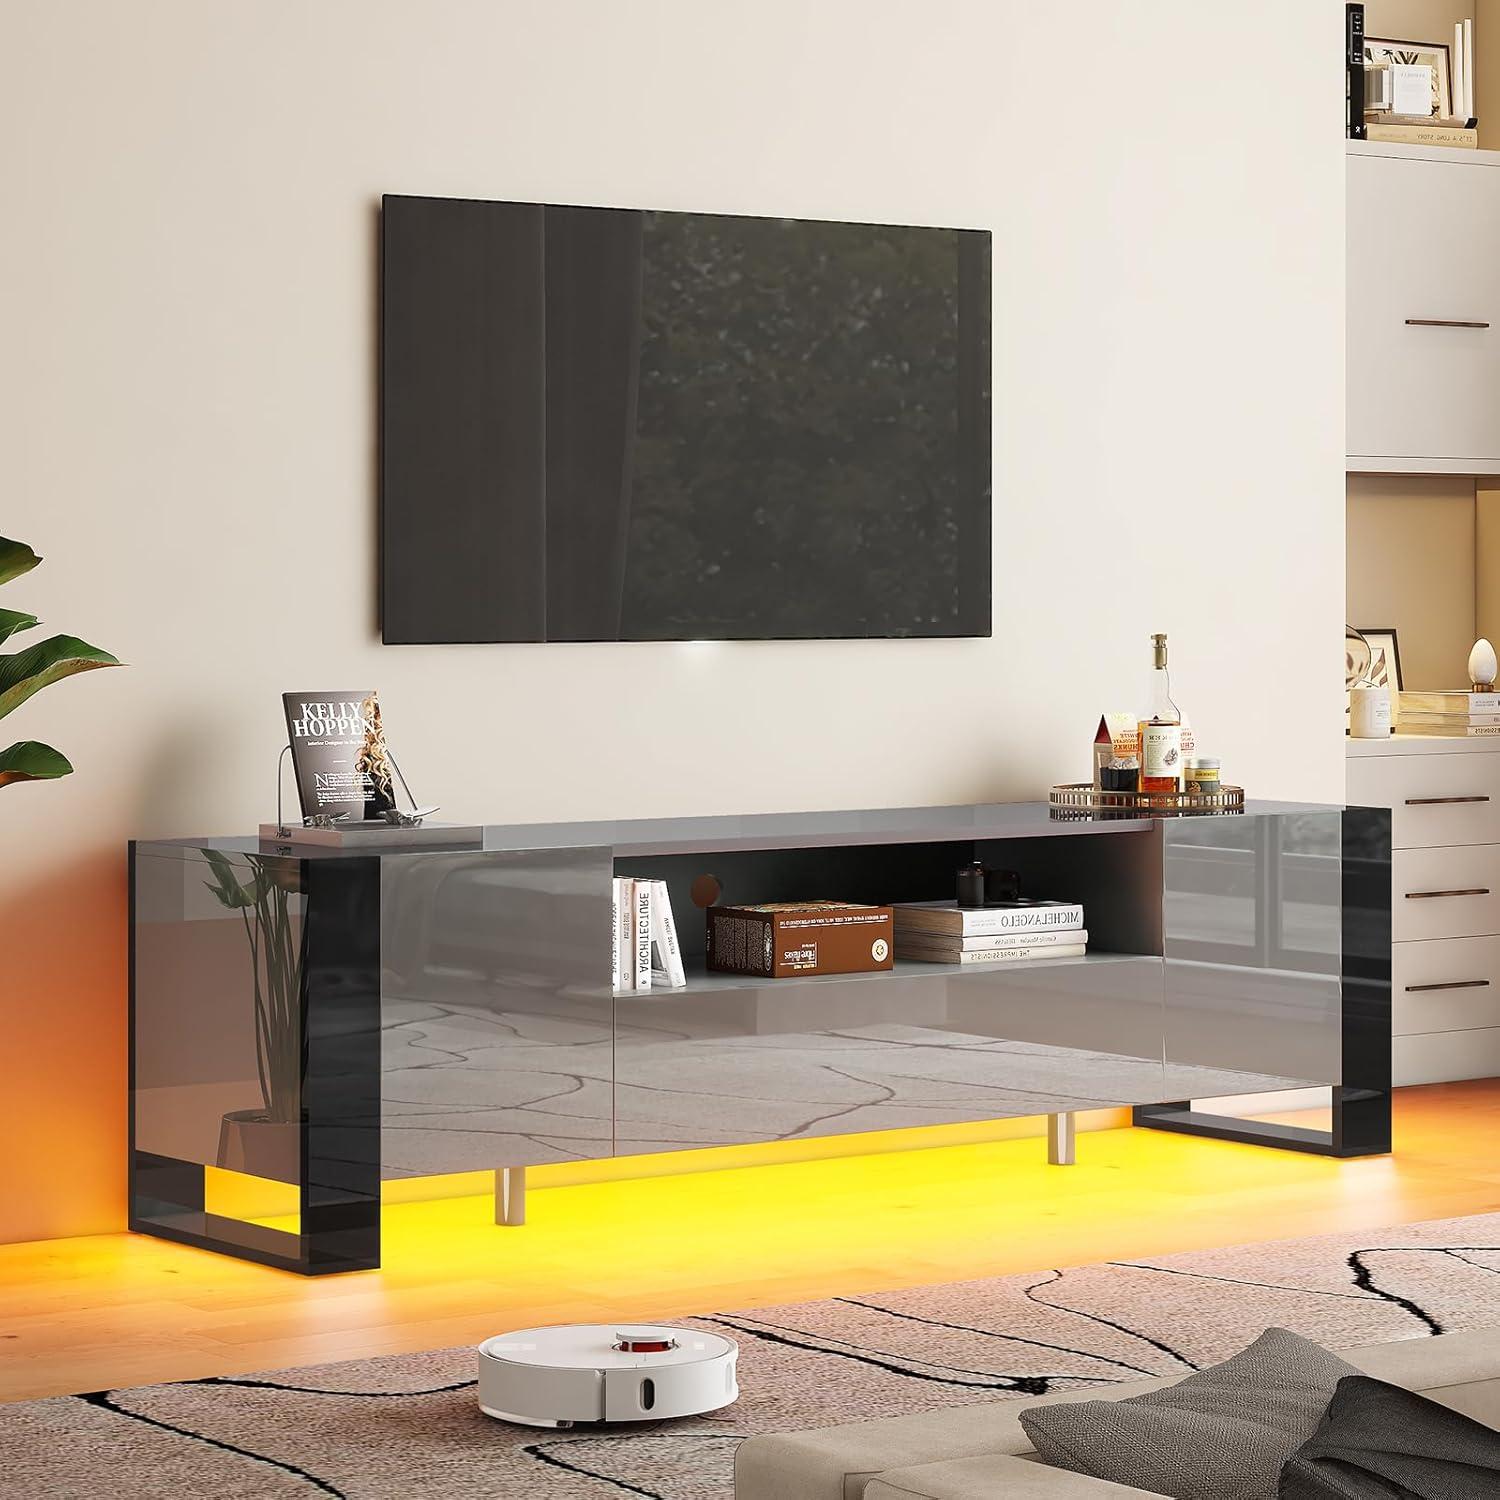
In a typical living room the console settles into daily routines more than dramatic moments. Evening TV sessions often end up with the LED backlight set to a low, warm hue to offset screen glare; daylight can make the high-gloss surface show reflections and fingerprints, so occasional wiping becomes part of the habit. On a media corner shelf the console becomes a stage for a soundbar and streaming dongles, and small adjustments — nudging the TV forward a few inches, angling the remote receiver, or dimming the LEDs for late-night viewing — happen without much thought.The surface is where remotes, a coastered drink, and a magazine might rest between uses, and cables that were tucked behind at setup sometimes reappear as devices are swapped or recharged.
In a gaming room the console tends to shape micro-routines: controllers are dropped into the same spot, the LED color is changed to match a session’s mood, and quick cable swaps happen mid-match. Observations across setups fall into a few recurring patterns:
- Ambient light — LEDs add immersion but sometimes require tweaking to avoid screen washout.
- Maintenance — glossy finishes attract fingerprints and light dusting becomes part of upkeep.
- adjustment — small, frequent tweaks (angle, color, device placement) are common rather than one-time fixes.
| Setting | typical evening routine | Common small adjustments |
|---|---|---|
| living room | Dim lights, warm LED accent, streaming movies | Reduce LED brightness, reposition remotes |
| Gaming setup | Match LED to game, quick controller swaps | Change LED color, reroute charging cables |
| Media corner | Background lighting for browsing, short viewing sessions | Re-seat streaming dongles, nudge TV forward for IR |
Full specifications and configuration details are available on the product listing.
how it fits your expectations and what limits you might encounter in your space

In many living-room arrangements the console reads as a low, reflective anchor rather than a towering piece; the high-gloss surface and LED trim interact with ambient light so the unit can either brighten a dim corner or pick up glare from windows and bright lamps. Assembly and placement tend to involve a couple of small adjustments — aligning the legs, routing power and AV cables, and angling the front slightly to reduce reflections — which often happens casually while positioning other furniture. The LED accent changes the visual weight of the unit across the day, so its presence feels more pronounced in the evening and subtler in daylight; fingerprints and dust on the glossy finish also become more noticeable with use and may prompt occasional wiping routines.
Common spatial limits that appear in everyday use include power access, sightlines, and traffic flow around the unit.
- Power and cabling: The LED system and any sources stored nearby require nearby outlets or longer cable runs, which can create visible cable runs if outlet placement is inconvenient.
- Reflections: Gloss surfaces and screen placement can produce unwanted reflections depending on window positions and overhead lighting.
- Walkway clearance: In tighter layouts the console’s projection from the wall may affect circulation and furniture arrangement more than expected.
| Room characteristic | Practical observation |
|---|---|
| Bright, sunlit room | LED effect is muted during the day; reflections on the surface are more noticeable. |
| Small footprint living area | Placement choices are constrained by walkways and door swings. |
| Media-heavy setups | Extra outlets and tidy cable management become a priority to hide peripherals and lights. |
See full specifications and configuration options
Caring for the high gloss finish and maintaining the LED elements as you use it
In everyday use the glossy surface tends to show fingerprints, smudges and the occasional dust streak more readily than a matte finish, so you’ll notice cleaning becomes part of the routine. In most cases a soft microfiber cloth and a dampened corner (plain water or a drop of mild dish soap) will lift oils without leaving haze; wipe gently in long, even strokes rather than scrubbing in circles. Abrasive pads, household glass cleaners with ammonia, or anything that foams can dull or micro-scratch the finish over time, and placing wet glasses or hot items directly on the top can leave marks that are harder to remove. You’ll also find small, everyday habits help keep the surface even: lift rather than drag decorative pieces, dry spills promptly, and occasionally check the seams where dust can collect so dirt doesn’t get worked into the coating.
LED care is more about keeping the system ventilated, dry, and electrically secure as you use it; a light dusting of the light strips and the cabinet’s back panel every couple of weeks usually prevents dimming from dust buildup. Avoid spraying cleaners toward the LEDs or into the controller housing, and be aware that frequent unplugging can sometimes require a short re-pair or reset through the app or remote. small maintenance touches you may adopt include:
- Quick weekly pass: microfiber dusting across the top and front edges.
- Monthly check: glance at connector plugs behind the unit for snugness and any exposed wiring.
- After updates: a brief re-sync if lights seem out of step after firmware or app changes.
A simple reference table below summarizes cleaning materials commonly used around the stand and those worth avoiding to preserve both the finish and the light elements.
| Recommended | Avoid |
|---|---|
| Microfiber cloth, distilled water, mild dish soap | Abrasive pads, ammonia-based glass cleaners |
| Compressed air for tight gaps (short bursts) | Spraying liquids directly at LED strips or controller boxes |
| Gentle cable management checks | Frequent hard unplugging without proper shutdown |
How it Lives in the Space
Over time you notice how the AMERLIFE 70 inch TV Stands with LED Lights, High Gloss TV Console settles into the room’s rhythms rather than standing out as something new. It quietly claims spots for remotes and magazines, the surfaces gathering the faint fingerprints and small scuffs that mark regular use, and the cabinets soften into an everyday habit of opening and closing. In daily routines you reach without thinking,the LED glow simply part of the evening light and the piece moving through comfort behavior as the room is used. After a few weeks it stays.