decordip Garden and patio decoration inspiration
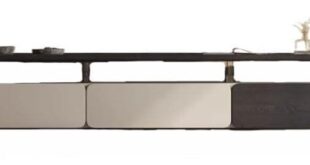
Under yoru palm the top feels like a smooth, slightly warm veneer, and the rounded edges give a reassuring softness as light pools across it. The piece you pulled from the box was listed as “Adjustable Tv stands Design Ornaments Wood Tv Cabinets Display Home Furniture Tv Cabinet,” though in the room you simply call it the Adjustable Wood TV Cabinet. It reads low and significant — a broad horizontal silhouette that anchors the wall without shouting. A small notch at the back reveals itself as a neat exit for cords,coaxing wires discreetly toward the socket instead of letting them spill onto the floor. Open the doors and the grain and joinery feel straightforward and honest; the cabinet’s visual weight balances the screen above more than any flashy detail. Standing back, you notice it more for its material presence and soft contours than for a single feature.
A first look at how this adjustable wood TV cabinet sits in your living space

When you first place the cabinet in a room it tends to read as a low, grounded anchor rather than a bulky focal point. Pushing it flush to the wall narrows the visual gap behind the TV and keeps wall sockets accessible; you’ll find yourself nudging it a few centimetres during setup untill sightlines and cable runs feel right. Up close the rounded edges and the shallow profile change how light and shadow fall across the front, so the piece can either blend into the background or pick up reflections from nearby lamps depending on where you put it. Small, everyday habits—like shifting a lamp a little left or scooting the cabinet to level it after vacuuming—are common the first few days as you settle it into your usual routine.
In everyday use the cabinet’s position alters how the room feels: placed directly against a wall it tightens the conversation area; pulled a short distance out it can create a subtle sense of depth behind seating. You’ll probably try a couple of positions before one becomes the default, and the top surface often ends up holding remotes, a speaker, or a rotating array of decor that changes with the seasons. Note that when the cabinet is tucked into a corner or under a window it can make the space feel anchored, whereas centering it on a long wall tends to emphasize horizontal lines and lengthen the room.
- Against a wall — minimizes depth and keeps walkways clear
- Floating slightly — adds depth and softens the edge between furniture and wall
- Under low windows or shelves — layers vertical elements without competing for attention
| Typical placement | Visual affect in the room |
|---|---|
| Flush to a main wall | Conceals depth; organizes tech and cables out of immediate view |
| Set away from the wall | Creates a gentle shadow line and a feeling of depth |
| Corner or niche | Fills or else awkward space and anchors adjacent seating |
How the carved ornaments and proportions shape the room’s mood

When you enter the room, the carved ornaments act like a subtle secondary layer on top of the cabinet’s silhouette: they catch and scatter light, create tiny shadow lines, and interrupt broad flat planes so your eye moves along the surface rather than stopping at a single mass. In casual, lived moments—walking past with laundry, lowering the blinds, or adjusting a lamp—you may notice the patterns appear more or less pronounced depending on angle and time of day. A few concise observations clarify how that plays out in use:
- Light play — shallow grooves produce soft banding, deeper cuts throw sharper contrast.
- Tactile cues — visible texture invites a closer look and sometimes a fingertip linger, even when you’re distracted.
- Visual rhythm — repeated motifs set a cadence that either aligns with other room patterns or introduces a quiet counterpoint.
the proportions of those carvings relative to the cabinet’s overall scale shape whether the piece feels like a quiet backdrop or a visual anchor. Smaller, finer ornamentation tends to read as detail—something that dissolves into the room unless you deliberately focus on it—whereas larger motifs give the surface weight and can make the whole cabinet read as a purposeful feature. In everyday arrangements you’ll find this interacts with spacing and sightlines: when the carved field is dense it can softly compete with moving images on a screen, and when it’s sparse the attention usually settles on the objects placed nearby. The simple table below summarizes common perceptual effects you might notice at a glance or over a few evenings:
| Carving scale | Perceived effect in the room |
|---|---|
| Fine, close-knit | Subtle texture, integrates with other patterns |
| Medium, rhythmic | Creates a measured presence without dominating |
| Large, bold | acts as an anchor, draws the eye and sets tone |
Close inspection of the timber, joints, and surface treatments you can see
When you look closely at the timber surfaces, the grain and finish reveal the method of manufacture more than a flat description would. The face panels show a fairly consistent grain pattern that suggests a veneered sheet over a substrate — you can pick out repeating figure and slightly darker streaks where the veneer match meets across a seam. Edges where the shelves end are capped with a thin banding; at those edges the end grain is less pronounced and the color shifts a hair, which is normal when a veneer or laminate meets an edge strip. the visible coating is a low- to mid-sheen lacquer or polyurethane: it catches light without a hard mirror gloss, and in recessed areas around cutouts you can sometimes see a tiny accumulation of finish or slightly different sheen where the spray overlapped.Small repair marks or filler in the occasional knot or knot-hollow are present if you look close, and there are faint, parallel sanding lines across some internal panels where finishing was done by machine rather than by hand.
Open a door or look beneath the unit and the way the pieces meet becomes clearer: seams where panels butt together are filled and sanded,and back panels sit in routed grooves rather than being glued flat against the carcass. You’ll notice a mix of connection methods — cam locks and concealed dowels on the visible faces, screws with plastic caps on the underside, and European-style hinges that disappear when the door is shut. the joins at corners are neat but not invisible; a thin bead of adhesive is sometimes visible along the inside joins, and small gaps under pressure points can appear after assembly. Key visible details include:
- Edge treatment: banded edges with a subtle color shift where the band meets the face.
- Joint types: cam-locks/dowels at panels, grooves for the back panel, screwed brackets underneath.
- Finish artifacts: overlapping spray marks in recesses and occasional filler at knots.
| Element | What you can see |
|---|---|
| Panel faces | Consistent veneer grain, low–mid sheen finish |
| edges | Edge banding, minor color shift at joins |
| Joints | Cam locks/dowels, routed groove for back panel, visible screw heads underneath |
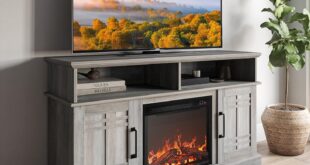
How the dimensions, adjustable stand, and clearances relate to your furniture layout
How the cabinet’s proportions and the adjustable stand work together shows up in everyday placement more than on paper. The depth and overall footprint determine how close the unit can sit to adjacent sofas, side tables, or wall panels, while the stand’s height setting changes vertical relationships—sight lines to a seated viewer, the visible gap beneath the unit, and how the top surface aligns with shelving or artwork. A preset socket notch at the rear alters where the cabinet needs to stop from the wall: it can let the piece sit flush while still allowing cable access, but it also concentrates cable routing in one spot and may require small nudges of the furniture when a plug is added or removed. Small, routine adjustments—tilting the stand slightly, nudging the cabinet forward to access a wall outlet, or slipping a cable behind a decorative leg—are common in day-to-day use and affect how the piece settles into a living area.
| Layout element | typical effect on placement |
|---|---|
| Footprint | Limits clearance to seating and adjacent furniture; affects walking paths |
| Adjustable stand height | Changes viewing angle and space under the unit; alters how it lines up with other furniture |
| Rear socket notch and cable access | Allows a closer wall fit but concentrates wire management at a single point |
| Wall clearance | Influences airflow, cleaning access, and whether baseboards or trim interfere |
- Footprint interaction: shallow placement can keep walkways open but may leave less space for devices beside the cabinet.
- Stand adjustments: small height changes often shift visual balance with nearby shelves or low tables.
- Cable routing: the rear notch simplifies hiding wires but can require slight repositioning when plugs are swapped.
Full specifications and configuration details are available at the product listing.
Viewing comfort, height options, and typical placement scenarios you’ll notice
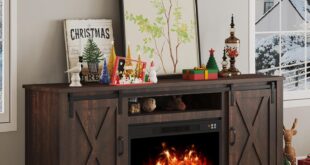
When you sit down to watch, the most immediate thing you’ll notice is how the cabinet’s height shapes your posture: screens that land near your seated gaze tend to keep head and neck in a neutral line, while lower units encourage a small upward tilt and higher mounts invite a mild downward glance. Over the course of a show you may find yourself nudging cushions, angling the screen slightly, or shifting forward on the sofa — everyday adjustments that reveal how even modest height differences change comfort. Eye level is the recurring reference point in those moments, and the pattern of small corrections tends to tell you whether the arrangement feels easy to live with for longer sessions.
Typical placement scenarios also shape what you perceive as comfortable; common setups and their effects show up repeatedly in homes:
- Living room: the cabinet often sits so the screen centre is close to seated eye height for longer viewing stretches.
- bedroom: cabinets or wall mounts can end up a bit higher because reclining shifts your line of sight.
- Dining or multipurpose areas: shorter viewing periods mean screens are sometimes placed higher or on the wall, with comfort felt in brief glances rather than sustained focus.
| Placement | Typical screen position relative to seated eye level |
|---|---|
| Living room | Near eye level for extended viewing |
| Bedroom | Slightly above seated eye level due to reclined posture |
| Dining/multipurpose | Frequently enough higher or wall-mounted for intermittent viewing |
Suitability, expectations versus reality, and everyday limitations you might encounter
Everyday use tends to expose a few small mismatches between expectation and reality. in everyday setups the cabinet sits flush to the wall but the built-in cutout for outlets doesn’t always line up perfectly with every socket type,so users often shift the cabinet a few centimeters or reroute a fat adapter to sit beside the opening. Cable concealment works in principle, yet thicker power bricks or bundled coax and HDMI runs can bulge behind the panel, creating slight gaps or a visible hump. Surfaces that look uniform in photos may show minor tone differences under room lighting,and the smooth rounded edges collect dust and fingerprints in ways that make a rapid wipe more frequent than some anticipate. Common small adjustments include:
- Rotating plugs to fit the exit cutout
- Stacking devices with thin spacers for extra airflow
- Shimming behind the back panel to level the cabinet on uneven floors
These are ordinary habits rather than failures—little routines that become part of living with the piece.
Daily constraints can also shape how the unit functions as a media hub. Enclosed shelves reduce noise and soften remote signals,so users sometimes leave a door ajar or rely on an IR repeater; heat from multiple components will build up if ventilation isn’t deliberately managed,and oversized adapters can prevent a neat front-facing arrangement. The table below captures a few recurring expectation-versus-reality notes as they appear in typical homes, without implying a universal outcome.
| Feature | Common Expectation | Observed Reality |
|---|---|---|
| Socket access | Neat, hidden routing | Works for slim plugs; bulky adapters need repositioning |
| Cable concealment | entirely invisible | Most cables hidden but thicker bundles may show at the back |
| Device ventilation | Unrestricted airflow | Closed compartments can trap heat unless left slightly open |
See full specifications and available configurations
Assembly steps and styling touches you will encounter when making it yours
When the boxes arrive you’ll start with an inventory check — lay out panels, fasteners and any small plastic bags so nothing gets lost. Most of the actual work follows a predictable sequence: panels flat on the floor, dowels and cam locks fitted, then screws tightened only after frames and doors are aligned. It helps to test-fit shelves and doors before fully tightening hardware and to keep a rubber mallet or block of scrap wood nearby for gentle persuasion of snug joints. The preset cable notch becomes part of the finishing pass: route cords through it before fixing the back panel so you’re not fighting tangled wires later. Small, everyday habits show up here too — you’ll often loosen a few screws to nudge a door into line, or reach for a level and a second pair of hands when the piece goes upright — and you’ll notice felt pads or small adhesive bumpers are handy on the underside to protect floors as you move it into position.
Once the main assembly is done, the final touches are more about how the piece sits in your room than about fasteners. The soft, rounded edges encourage looser, layered styling — try grouping a low plant, a stack of thin books and one taller accent to keep sightlines open. Use the built-in notch to hide power strips and run a single tidy cable rather than coiling cords on the shelf. A few small moves you’ll encounter while personalizing: adjust shelf spacing for taller objects,swap in baskets to conceal clutter,or dab a touch‑up marker into any factory scuff. Below is a compact reference you might consult during that last pass of assembly and styling.
| Stage | Typical time | Helpful item |
|---|---|---|
| Unboxing & inventory | 10–20 minutes | Small tray for screws |
| Main assembly | 30–90 minutes | Philips screwdriver,rubber mallet |
| Styling & cable run | 10–30 minutes | Felt pads,cable ties |
A Note on Everyday Presence
You notice,over time,how it settles into routine patterns—holding the remote between shows,marking the route across the carpet,softening into the background of daily rhythms. The Adjustable Tv Stands design Ornaments Wood Tv Cabinets Display Home Furniture Tv Cabinet quietly takes its place, its surfaces picking up faint scratches and warm rings where cups have rested and the finish mellowing as the room is used. In daily routines its scale and stance shape small habits—where papers are left,how evening light pools for reading,the way hands brush past it without thinking. it stays.