decordip Garden and patio decoration inspiration
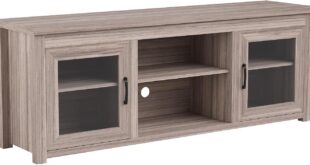
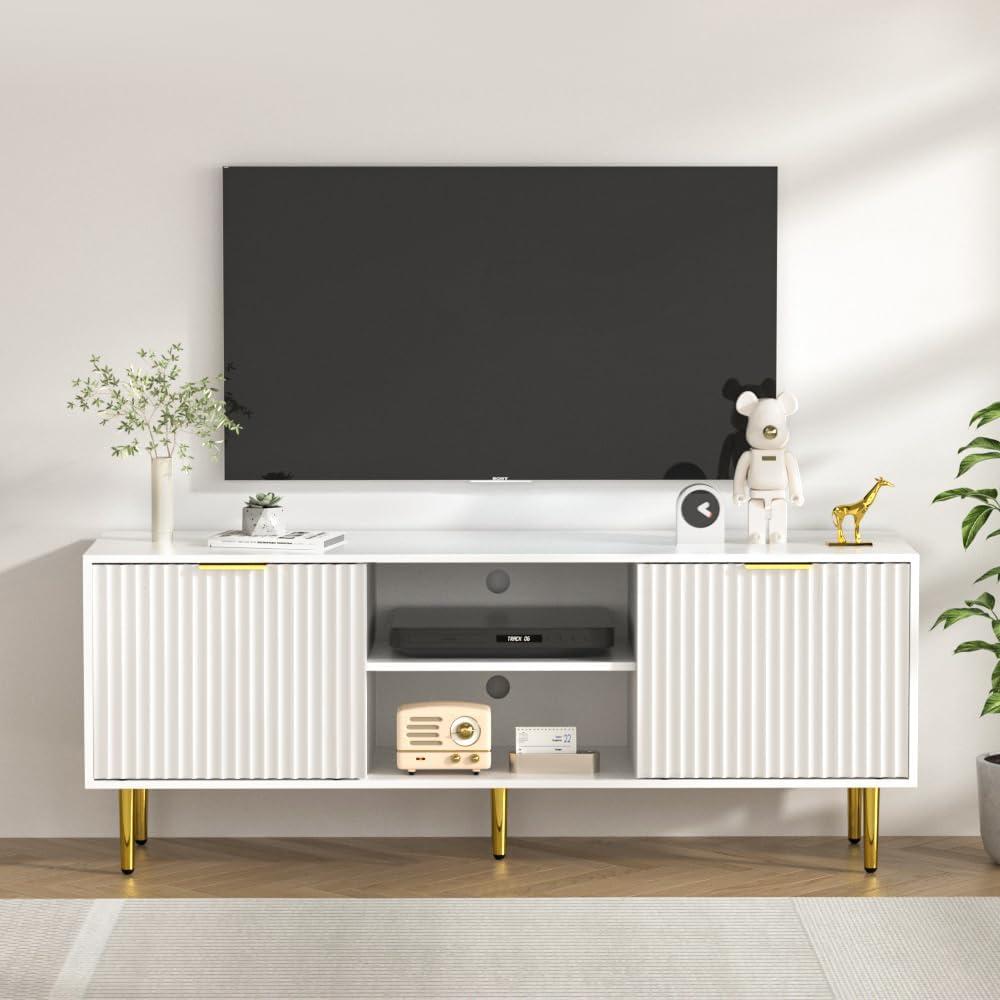
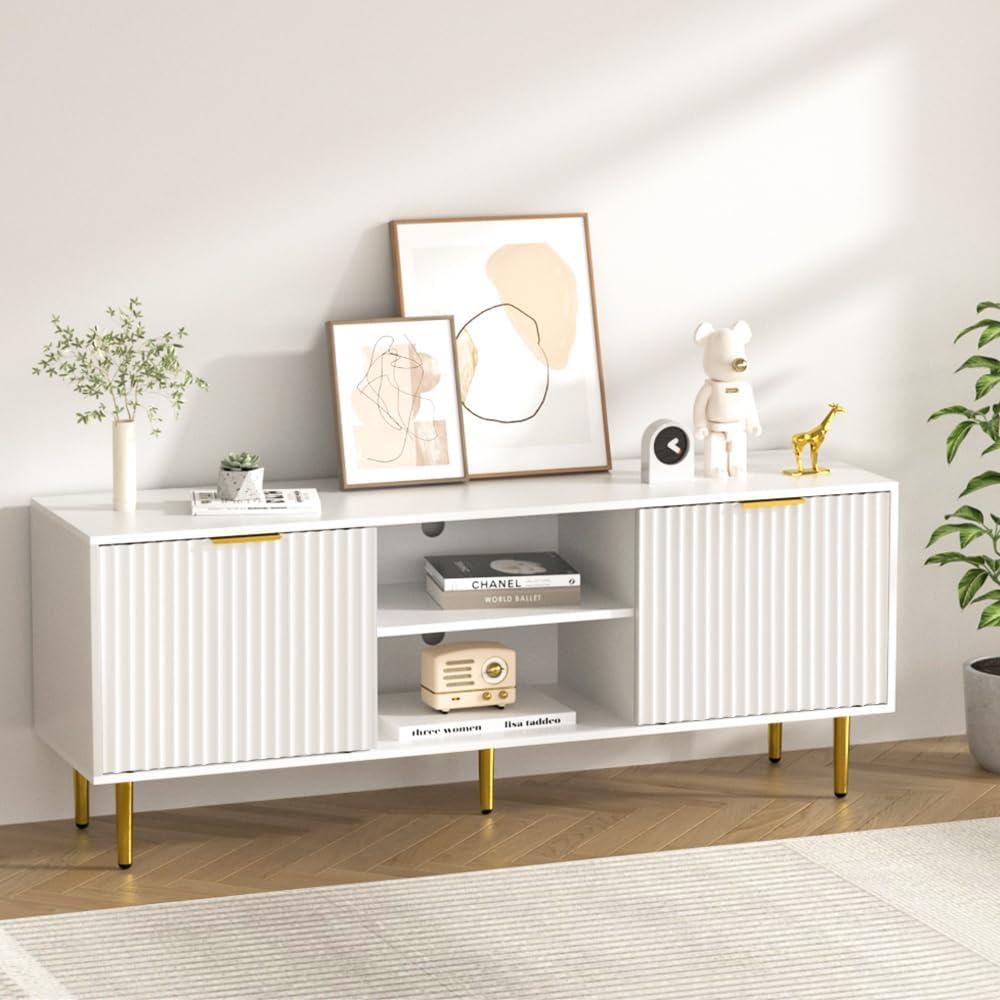
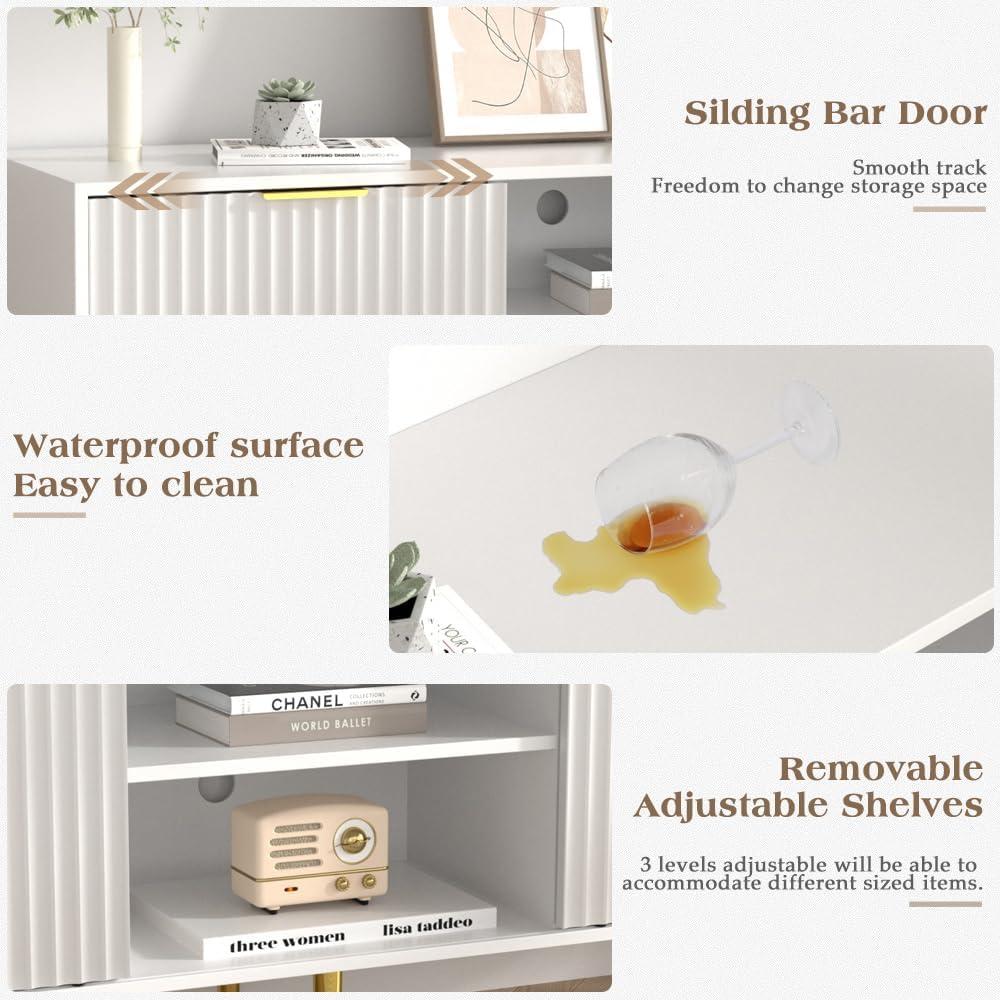
In your living room the 58” Fluted TV stand reads like a low, quiet stage — the white lacquer picks up afternoon light and the fluted doors cast thin, rhythmic shadows across the rug. Run your hand along the waveform grooves and the texture is pleasantly tactile, while the slim gold legs feel cool and reassuring under the slight give of the top. Sliding a door back,you notice the smooth,nearly silent glide and a tidy cutout for cords hidden in the shadowed cavity. Seen from the sofa it has a calm, measured presence: wide enough to fill the wall, but understated in material and line.
When you first open the box the white fluted console in your room

When you first open the box and slide the white fluted console into your room, the immediate impression is more about how it sits in the space than any single spec. You’ll notice the fluted face throwing thin shadows across the wall depending on the light, and the surface has a matte warmth that softens under lamps. There’s a faint new-board scent as the protective film peels away, and small handling marks from transit—dust on the packing, a few foam bits—are the kind of things you wipe off while you stand it where it will live. In those first minutes you find yourself nudging it an inch or two to center it with the seating, tilting your head to check how the grooves line up with other horizontal lines in the room, and running a finger along the front to feel the profile of the fluting.
Out of the box, practical details present themselves in the way you unpack and position the pieces rather than on paper: the larger panels are wrapped and nested, the hardware bags are grouped near the manual, and the base elements are tucked so you can glimpse leg positions before assembly. Small,incidental actions — peeling off stickers,setting the instruction sheet on the coffee table,balancing the unit for a fast look — reveal how the console will behave once it’s in place: it wants a moment to settle,and most people end up making tiny adjustments. Below are a few straightforward observations from that first encounter:
- Packaging: protective foam and film present, with parts arranged for easy access.
- Surface detail: fluted front shows different tones under natural and artificial light.
- Initial handling: panels are manageable but benefit from a second pair of hands when standing upright.
| First-look item | What you’ll likely notice |
|---|---|
| Top surface | Protected by film; matte finish visible once film is removed |
| Front panel | Fluting captures light and shadow differently through the day |
| Hardware and manual | Grouped together and easy to locate on initial unpacking |
How the shape grain and hardware read against your living room or bedroom backdrop
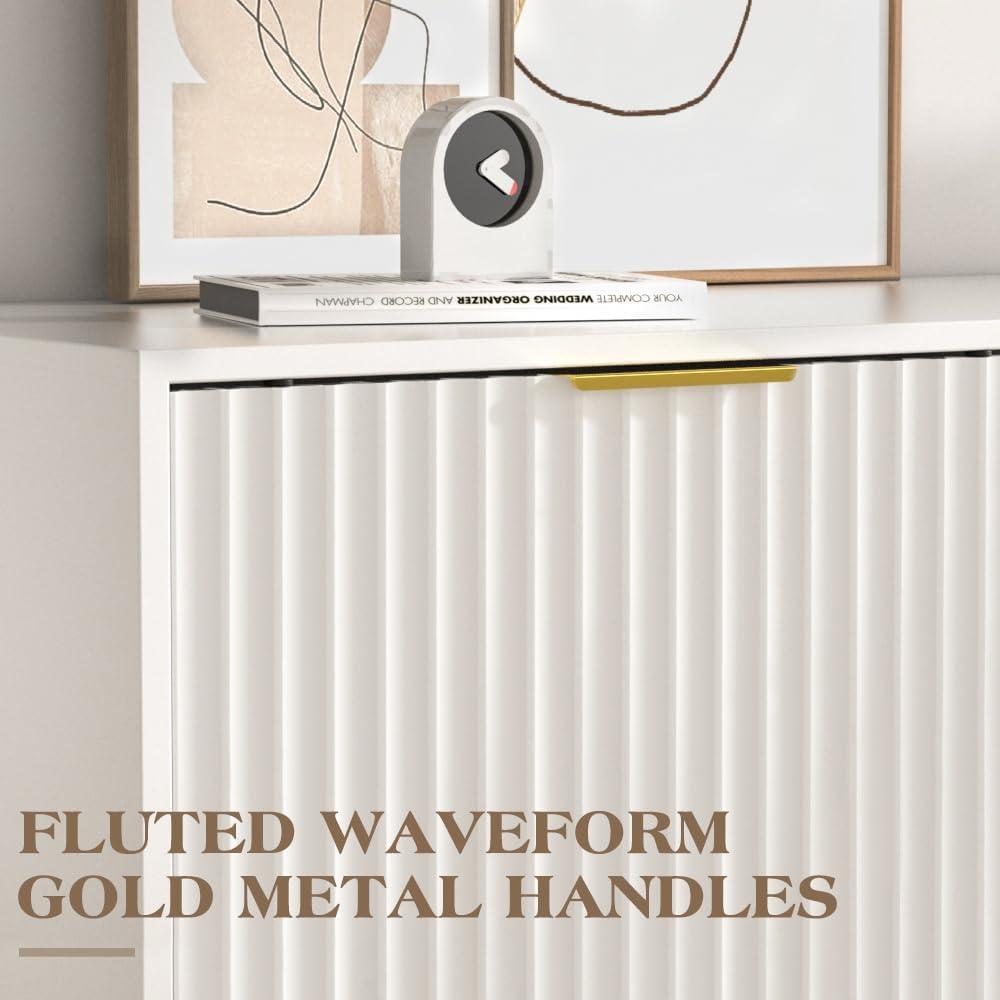
When you place the piece against a wall, the fluted profile becomes the most active element — thin ridges catch light differently as the sun moves or as you change lamps, so the door surface rarely looks uniformly flat. In softer, diffuse light the pattern reads as a quiet rhythm; under a directional lamp it throws slim shadow lines that give more visual depth. The painted or white-finished surface mutes any pronounced wood grain, so what you notice most is contour rather than grainy texture; hardware elements — legs and any metallic trim — interrupt that rhythm by adding specular highlights that move with your vantage point and the room’s lighting. You may find yourself nudging the console a few inches during rearranging, not for scale but to find the angle where reflections are least distracting in late-evening TV viewing.
How the unit sits visually depends a lot on what’s behind it. A few common backdrop interactions to watch for:
- Pale walls make the fluting read more by contrast with shadow rather than color; the hardware reads as a delicate shining accent.
- Mid-tone paints soften the overall silhouette and let the door pattern feel more integrated with the wall plane.
- Dark or textured wallpapers push the console forward,exaggerating the metallic hardware’s reflection and making the fluting appear more sculptural.
| Backdrop | How the shape reads | How the hardware reads |
|---|---|---|
| Light (off-white,pale) | Fluting appears as subtle shadow lines | Hardware shows as soft highlights |
| Mid-tone (beige,greige) | Profile blends; texture feels continuous | Hardware is visible but not eye-catching |
| Dark (charcoal,patterned) | Fluting reads bold and three-dimensional | Hardware becomes a brighter focal point |
What the sliding doors adjustable shelves and hidden compartments reveal when you use them
When you slide the doors aside the first thing that becomes apparent is how the interior arranges itself around whatever you put there. Openings and shelf lines frame a mix of kit and knickknacks so that a streaming box, a row of paperbacks, and a decorative object can sit in the same plane without looking accidental. The motion of the doors tends to mask clutter rather than erase it — you’ll find yourself nudging a tangle of cords into the rear cutouts or angling a component so its LEDs don’t glare when the door is left partially closed. The textured front panels create a contrast: the fluted exterior reads like furniture, the interior reads like storage, and that boundary becomes pronounced as you use the doors throughout the day.
Sliding and adjusting expose small, everyday behaviors and limitations.As you move shelves to different heights you notice how items settle and how much rearranging a change requires, and the back openings quietly guide cables into place but don’t hide them fully. The hidden nooks and shallow recesses reveal a few practical patterns:
- Quick stow: remotes, game controllers, and streaming sticks tuck away easily and reappear without a hunt.
- Equipment habits: routers or consoles sit nearer the cutouts so their cords and vents stay accessible.
- Maintenance cues: dust collects in lower corners and you discover which arrangements need more frequent tidying.
You’ll also notice small trade-offs in daily use — closing the doors conceals everything but can slightly limit airflow for devices; shifting a shelf opens up possibilities but sometimes leaves awkward gaps that invite trial-and-error placement. These are the practical details the piece reveals only after you live with its moving parts for a while.
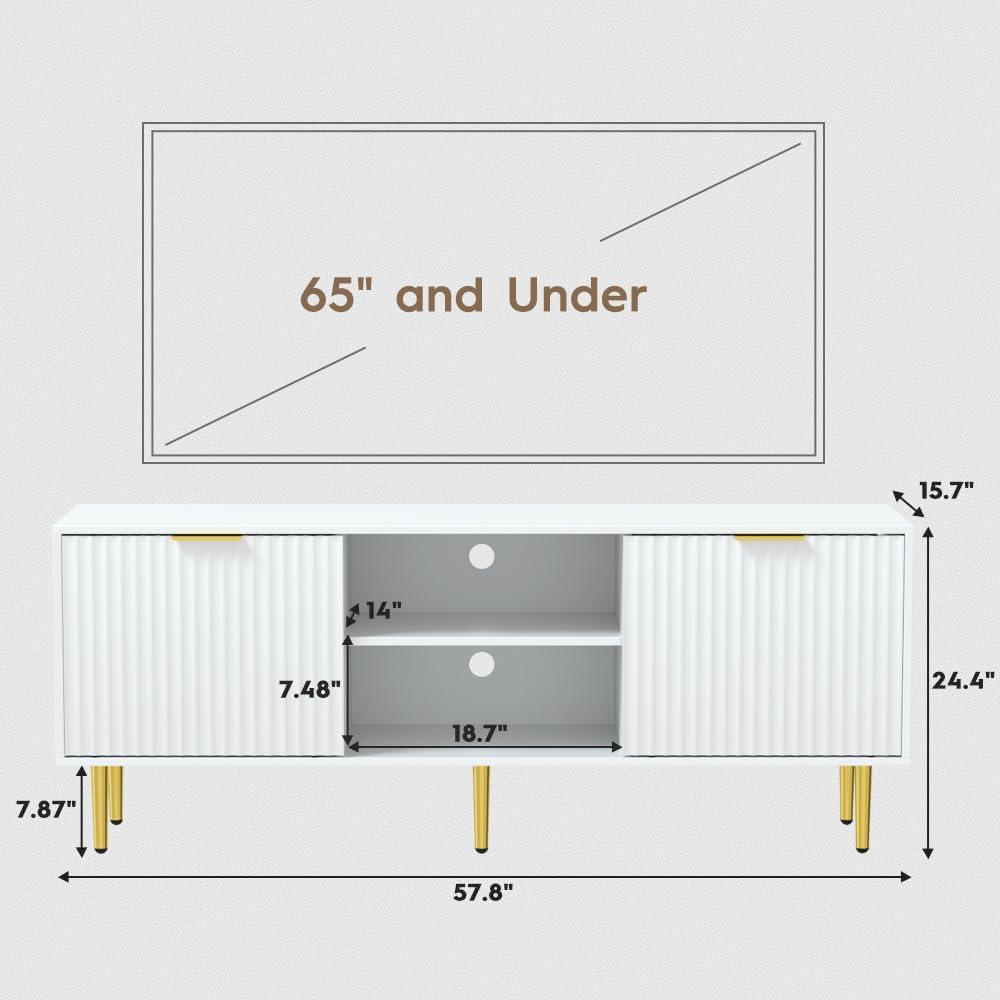
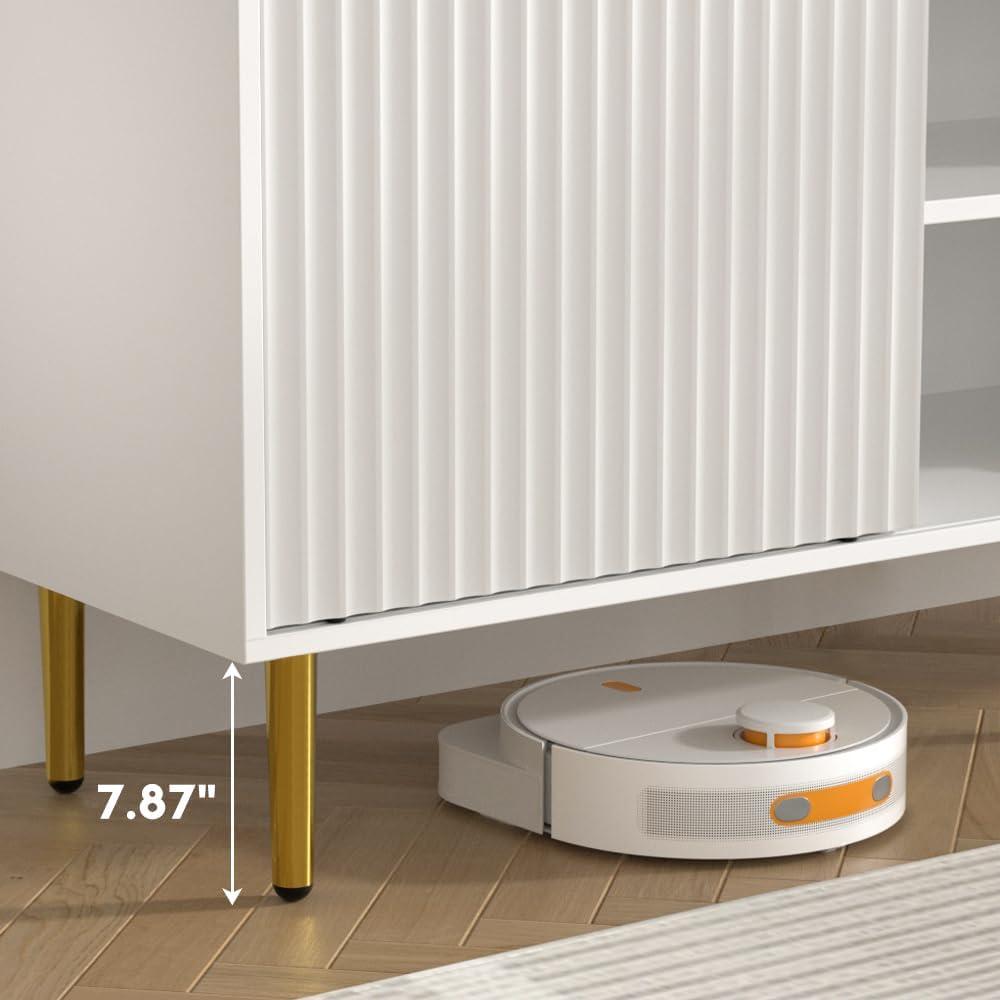
Overall footprint you’ll want to measure against the wall and walkway: the console runs about 58 inches across, roughly 16 inches deep, and stands approximately 22½ inches tall, leaving about 5½ inches of clearance under the legs. Allow a little extra depth if you plan to tuck a power strip or surge protector behind it, and factor in at least an inch or two of breathing room from the wall for the cord cutouts to be accessible. A few small adjustments — angling the cabinet slightly or nudging it away from the baseboard — are common while you’re positioning it,and those millimetres can matter in narrower media nooks.
- leg span and clearance: leg footprint and the 5–6″ under‑cabinet gap affect where a vacuum or cable runs can pass.
- front access: sliding doors don’t need extra side space but you’ll want clear floor space in front for pulling devices out of the cabinet.
Internal openings and shelf dimensions that you can note for placement and equipment fit are below; the figures are approximate to reflect typical variances once shelves are adjusted. The two rear cable cutouts are modest in size and sit toward the back of the center and one side compartment, each roughly 2–2.5 inches across — large enough for several cords but not for bulky power bricks without routing them horizontally.
| Compartment | Approx. usable width | Approx. depth (usable) | Approx. max shelf clearance (per level) |
|---|---|---|---|
| Left sliding cabinet | ~17″ | ~14.5″ | adjustable, up to ~11″ |
| Center open shelf (two levels) | ~22″ | ~14.5″ | upper ~6″–8″,lower ~6″–8″ |
| Right sliding cabinet | ~17″ | ~14.5″ | adjustable, up to ~11″ |
Note that the internal depth is a bit less than the overall depth as of the back panel and rail hardware, so deeper AV receivers or oversized speakers may need to sit forward of the back wall. If you need full technical specs or variant measurements, see the complete listing facts provided by the manufacturer for the most exact figures.
How it lives day to day with cable access ventilation and handling in real rooms you use
everyday handling of cables centers on the two back cutouts and the access created by the sliding doors. the cutouts do a straightforward job of letting power cords and HDMI leads disappear behind the console, though attention is often needed when components are pulled forward for maintenance or swaps — cables can snag at the edges or beneath the sliding tracks. Sliding doors make front-facing port access feel tidy most of the time,but moving a plugged-in device in and out will sometimes require lifting or angling the cord to avoid pinching along the door channel. Small routines emerge: powering down before rearranging, nudging cords into the cutouts before closing the doors, and occasionally tucking power bricks so they sit flat and don’t press against the back panel.
- Cable routing: cutouts hide runs but can concentrate bundles in one spot.
- Access: sliding doors allow front access but can limit lateral cable movement.
- Handling habit: periodic adjustment of cords and power strips keeps things simple.
Ventilation in daily use is passive rather than forced. The raised metal legs create a noticeable under-stand gap that lets cooler room air move beneath the console, and the back openings provide some escape for warm air from routers or streaming boxes, but the arrangement isn’t equivalent to dedicated vent panels. When several heat-generating devices are stacked, temperatures tend to run higher and components may be left slightly ajar or spaced apart more than planned; hiding everything completely behind closed doors reduces visible clutter but also limits airflow.The trade-offs show up in practical ways: a crowded back cavity keeps cables orderly but can trap heat, while pulling the unit a few inches from the wall improves dissipation at the cost of a less flush look.
| Area | Observed behavior |
|---|---|
| Back cutouts | Good for hiding runs; moderate airflow only |
| Under-stand gap | Allows passive cooling beneath equipment |
| Sliding doors closed | Neat appearance; slightly reduced air movement |
| Power strip placement | Convenient but can cluster heat in one zone |
Full specifications and cutout details are available on the product listing
How well this console matches your expectations and the limits you may face in actual use
On first use, the console behaves largely as pictured: the fluted doors and white finish present cleanly, the sliding doors run quietly on their rails, and the metal legs make the piece sit firmly when placed on a level floor. Assembly typically takes some time and a helper — many users report an hour or two with two people — and moments like aligning the doors or feeding cables through the openings interrupt the flow of setup in ways that weren’t always obvious from photos. Small practical habits emerge quickly: keeping a soft cloth nearby for fingerprints, setting heavier components toward the center of the top, and watching fingers around the door tracks during routine use. There is a readable trade-off here between the console’s concealed storage and how quickly items can be accessed once they’re tucked behind the sliding panels.
Everyday limits show up in predictable ways.the stated load ceiling influences where larger electronics or decorative items end up, and the two cable cutouts mean a little juggling when multiple devices need power or Ethernet; adjustable shelves allow configuration but often require emptying a compartment to move them. The finish and construction handle light wear but tend to show scuffs and staining more easily than some solid-wood furniture over time, so occasional care and attention to spills make a difference.Maintenance items — keeping the rails free of debris, checking fasteners for snugness after a few weeks, and avoiding uneven floors that invite wobble — are the small constraints that shape regular ownership rather than wholesale surprises.
- Assembly rhythm: two people, some patience for door alignment
- Access vs concealment: sliding doors hide clutter but slow immediate reach
- Maintenance: occasional rail cleaning and tightening of fasteners
| Practical constraint | Typical effect in use |
|---|---|
| Weight capacity | Limits placement of very large displays or heavy decor |
| Cable openings | Two cutouts require planning when multiple devices are fitted |
| Sliding-door access | Conceals media but slows swapping or quick access |
View full specifications and configuration details on the product listing
Assembly maintenance and quick adjustments you will notice during setup
When you unpack and begin assembly you’ll notice the workflow is cyclical: lay out panels, sort fasteners, and follow sequences where several connection points are held loosely at first so pieces can align before final tightening. Heavy panels or the top surface are easiest with a second pair of hands nearby, and some dowels or cam-locks want a gentle twist to seat fully — they can feel snug and then suddenly click into place. The sliding doors sit on shallow rails that are simple to place but will need a small nudge side-to-side to seat correctly; peeling any protective film off the door faces during this step also makes alignment easier. Keep a level and a small wrench handy; you’ll find that tightening in an alternating pattern (a little here, then a little there) helps corners meet without binding, and a rubber mallet is useful for coaxing stubborn wooden dowels into their holes without marring the finish.
During and after setup a few quick maintenance checks become routine: verify that shelves rest firmly on their supports, that the doors slide smoothly without rubbing, and that each leg is snug and keeps the unit level. Small, repeatable adjustments tend to show up over the first few days as pieces settle — you may retighten leg bolts or nudge a door track once or twice. Helpful checks to run right after assembly include:
- Level and leg tightness: confirm on a flat floor and re-tighten the legs if there’s any wobble
- Door alignment: slide each door several times and adjust the track seating if it catches
- shelf positioning: reposition adjustable shelves before placing heavy items
| Adjustment | When you’ll do it | Tool or action |
|---|---|---|
| Leg re-tighten | after first week, then occasionally | Socket or wrench |
| Door track seating | During setup and after heavy use | Hand nudges; loosen/tighten screws slightly |
| Shelf re-spacing | Before loading with equipment | Move shelf pins by hand |
A Note on Everyday Presence
Living with it over time, you find the 58” Fluted TV Stand, Mid-Century modern TV Console for 65/70/75 Inch TV, Wood Entertainment Center with Storage, Sliding Doors, Adjustable Shelves and Media Console for Living Room, Bedroom, White settles into the room’s rhythms rather than announcing itself.In daily routines it quietly dictates small patterns of space use — where blankets pile, how the sofa shifts, the habitual places a remote or a cup is set — and its comfort shows up in those repeated gestures more than in any single moment.Surface wear and little scuffs become part of the familiar picture of evenings and busy mornings, evidence of regular household rhythms rather than flaws. Over time it becomes part of the room and stays.