decordip Garden and patio decoration inspiration
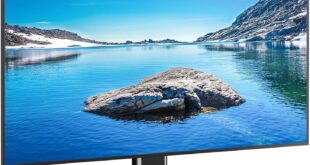
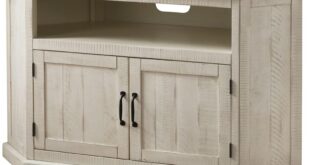
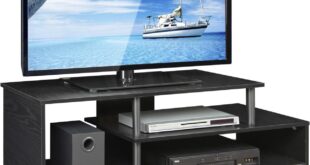
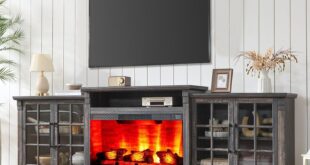
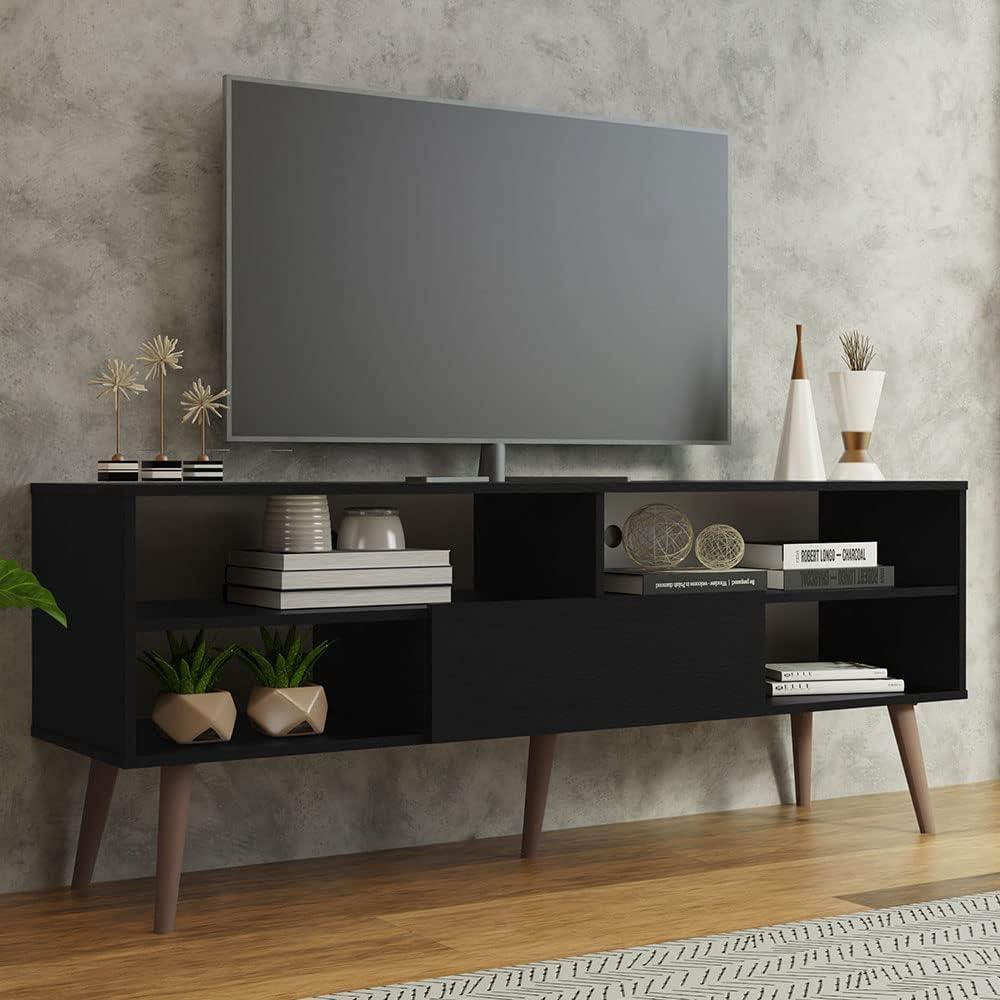
From across the room the Madesa Modern TV Stand — a black,mid-century–leaning console — reads as a low,steady presence that quietly anchors the seating area. Up close the laminate feels smooth under your hand, the particle-board core giving it a reassuring heft while the flip-down door and four open shelves set up a casual, staggered rhythm of storage and display. It stretches nearly five feet and sits low enough that the screen doesn’t dominate the sightline; the retro-style feet lift it just enough to let light and a hint of floor show underneath. as you move around it, small practical details register — the rear cable holes keep cords discreet, and the clean black finish reads more matte than glossy — so the piece feels integrated into the room rather than shouting for attention.
A quick look at the Madesa modern TV stand and its intended role in your living or bedroom
The piece functions mainly as a defined media surface that quietly organizes a small entertainment area. in everyday use it tends to act as a place to stage a television, hold a streaming box or game console, and display a few decorative items, while keeping cords and connectors routed out of sight. Routine interactions are casual — swapping devices,adjusting cable runs,or shifting decor — so the stand’s visual role is as much about creating a neat backdrop as it is about supporting electronics.Observers will often notice how the silhouette reads in a room: low enough to sit under a wall-mounted screen or to anchor seating arrangements without competing for attention.
- Living room: anchors the main media wall and groups AV components together
- Bedroom: serves as a compact media center and a surface for personal items
- Multi-use corner: doubles as a display console when not primarily used for TV
| Typical placement | Common role in the space |
|---|---|
| Under main TV | Consolidates electronics and hides wiring |
| Across from a seating area | Provides a focus for viewing and casual display |
| Against a bedroom wall | Combines media use with nightstand-style surface |
In some households securing the unit to the wall and periodic rearrangement of devices tend to be part of normal upkeep rather than one-off tasks.
View full specifications and configuration details on the product page
First impressions from unboxing to the first glance in your living space

When the box arrives and you slide the panels out for the first time, the immediate sensory notes tend to be small but telling: a thin protective film across visible surfaces, foam corners tucked around edges, and a single bag of fasteners that you’ll instinctively spread out across the floor. You notice the finish before anything else — how it reads under the living room light,whether it soaks up the soft lamp glow or picks up a faint sheen from a nearby window. There’s a faint “new furniture” scent that fades after a day, and you’ll find yourself nudging a panel just once or twice to line it up with the room’s existing shapes before any assembly really begins.
- Packaging: protective foam and plastic film, parts grouped together
- surface cues: how the color and texture change with light
- Initial setup: a spread-out hardware bag and a moment of repositioning
Stepping back to take in the piece after the basic setup, your eye tracks a few practical things: the silhouette against the wall, whether the legs sit square on the floor or need a tiny adjustment, and how any rear openings for cords appear from a normal vantage point. In certain light it can read as a subtle backdrop; in other angles it becomes a visual anchor that draws attention to the media area. You’ll probably reach behind it once or twice to tuck a loose cable out of sight, and notice how dust or fingerprints show up on horizontal surfaces depending on the day. the table below outlines a couple of quick visual notes you might make in different room lighting.
| lighting condition | What you’re likely to notice |
|---|---|
| Soft lamp light | Finish appears warmer, edges blend into room |
| Radiant daylight | Surface texture and dust are more apparent |
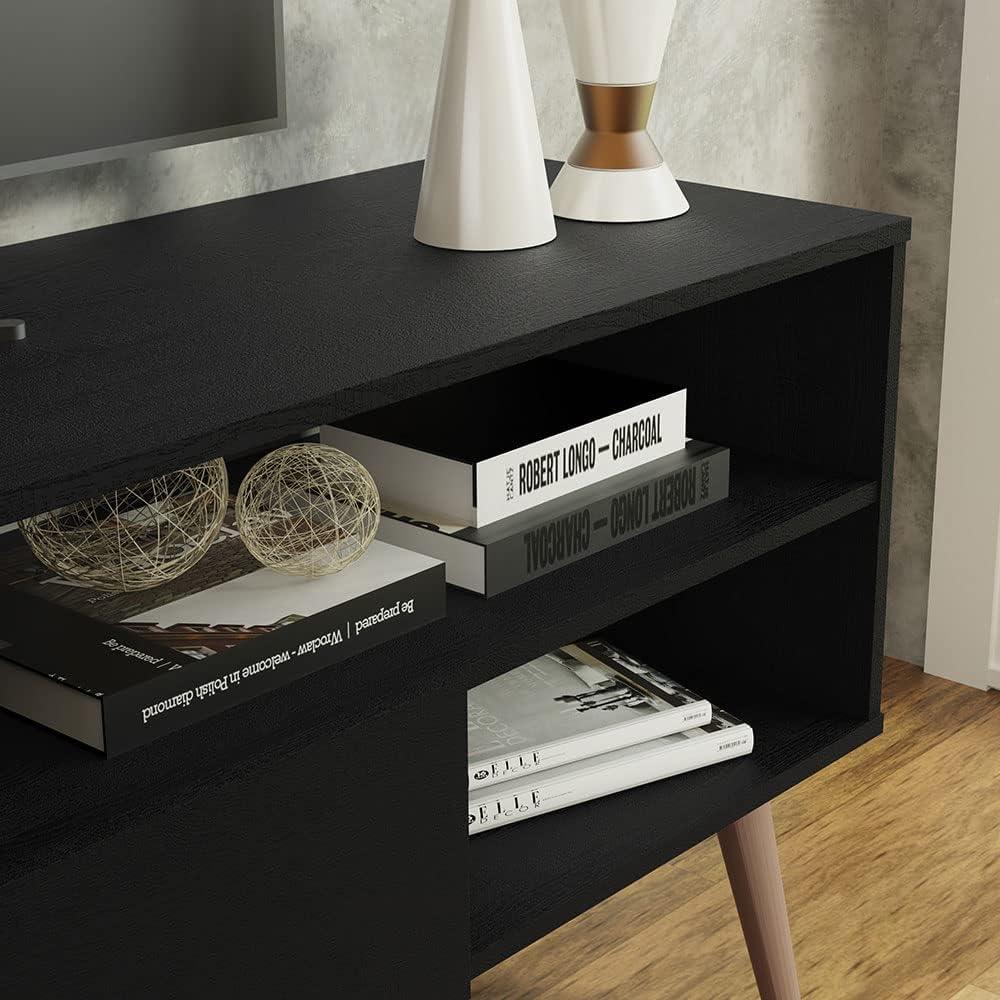
The cabinet up close: materials, finish, and the way the black wood feels under your hand

When you run your hand across the cabinet’s surfaces the first impression is of a manufactured, uniform dark skin rather than raw timber grain. Beneath that black layer there’s a particleboard core that gives a slightly hollow, even resistance under pressure; the face panels are covered in a low-sheen laminate that tends to mute reflections and reads as a consistent black rather than showing much variation.Small details come through in touch: the top is flat and almost cool to the fingertips, shelf faces feel marginally smoother than the edges, and the edge banding produces a narrow, predictable transition where two panels meet. If the piece is new in your room you may notice the faint, typical scent of recently finished engineered wood for a short while after assembly.
Move across the cabinet more deliberately and the tactile language changes—there’s no pronounced grain to follow, just subtle changes where joins, hinges, and the door meet the plane of the cabinet. A few quick notes you might pick up in ordinary use:
- Smoothness: the laminate surface is generally even, with a satin feel that resists immediate smudging but will show fingerprints in bright light.
- edges: edge banding is noticeable by touch and can feel slightly synthetic compared with the flat panels.
- Temperature and sound: the top stays cool and gives a faint, hollow thud when tapped, reflecting the engineered core beneath.
| Area | Finish | How it feels |
|---|---|---|
| Top surface | Low-sheen black laminate | Flat, slightly cool, smooth under the palm |
| Shelves | Same laminate, thinner substrate | Evener feel, a touch lighter under pressure |
| Edges / banding | plastic edge trim | Noticeable seam, firmer ridge at joins |
Measured at about 59″ long, 16″ deep and 24″ high, the cabinet generally reads as a low, wide anchor on a living-room or bedroom wall rather than a tall focal piece. The length commonly spans the width between two chairs or sits comfortably beneath a medium-height window, while the 16″ depth tends to keep the walking path in front of it unobstructed in typical lounge arrangements; in tighter rooms it can feel like a narrow corridor if seating is pushed close. The height puts the top surface near seated eye level in many seating layouts, so the relationship between screen size and viewing height frequently enough becomes an incidental adjustment — small tilts or risers on the display are sometimes used to fine-tune sightlines. One practical trade-off observed is that the long tabletop invites spread of décor and devices, which in turn requires a little forethought about cable routing and outlet placement so that the assembly sits flush against the wall without awkward offsetting.
| Measured Dimension | Typical relation to room layout |
|---|---|
| 59″ length | Usually fills a medium-length wall; often aligns with seating banks or bed widths and can visually shorten a narrow room when used across from the sofa. |
| 16″ depth | Leaves more floor clearance in front than deeper consoles, so walking paths and coffee-table placement are less likely to conflict; shelving depth limits component stacking to shallow devices. |
| 24″ height | Sits at or slightly below eye level for seated viewers in many common sofas and armchairs, affecting how screens or artwork are perceived above it. |
- cable access: Rear openings align with typical outlet heights in many homes, tho power-strip placement can force the cabinet off-center in some arrangements.
- Wall clearance: Securing the unit to the wall is commonly required to avoid tipping if the layout places heavier items at tabletop level.
- Placement habits: In practice the piece is often nudged a few inches left or right during setup to clear radiators, vents or door swing, rather than being centered perfectly at first placement.
See full specifications and configuration details
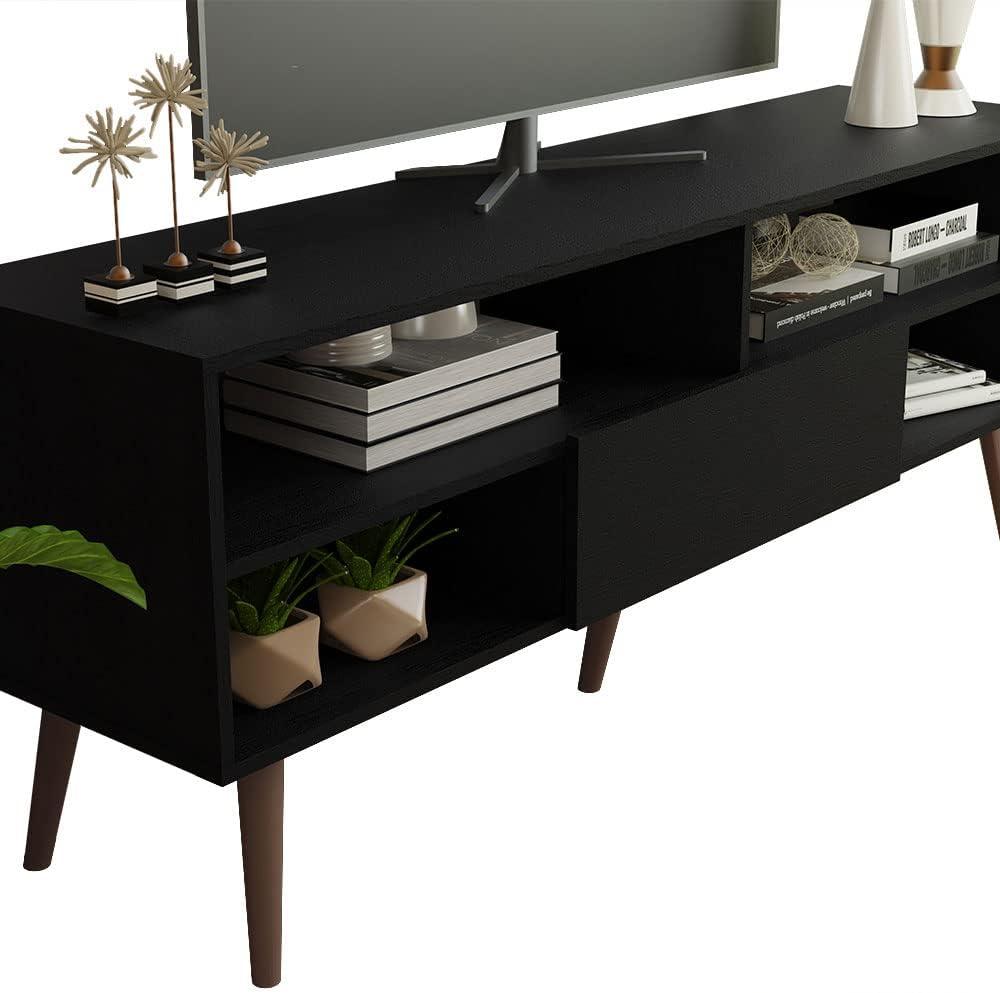
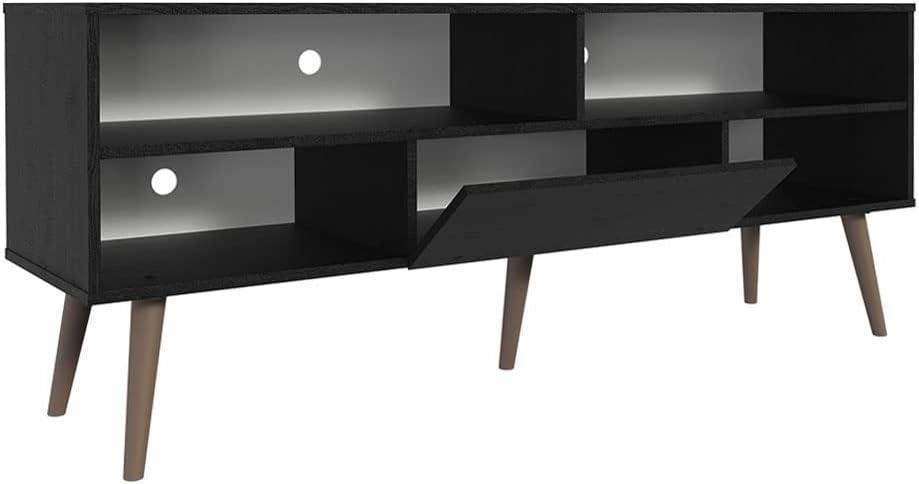
Storage in practice: the single door, the shelving layout, and how cable management plays out behind your cabinet
In everyday use the single flip-down door changes how the cabinet is approached more than it changes what fits inside. With the door closed the front reads as a continuous plane, and when opened it creates a shallow, temporary landing that can get in the way of access to the lower shelves; electronics placed behind the door are easier to hide but require the panel to be opened for cable access or to swap discs and storage media. The four-shelf arrangement spreads storage horizontally, so devices tend to sit side-by-side rather than stacked; shelves often accommodate a streaming box next to a game console with some room for a router, but tall vertical items may need to be sited at the ends or on the top surface. observations in use include:
- Flip-down door: conceals clutter but interrupts front access when open, and it changes how often the compartment is opened during routine use.
- Shelving layout: favors lateral association—stacking multiple bulky components uses more shelf depth and can consume adjacent shelf real estate.
- Top surface and end shelves: often used for oversized items that don’t fit inside the door-covered compartment.
Behind the cabinet, the built-in cable openings do what thay say but introduce practical workarounds: multiple bulky power bricks rarely fit neatly through a single hole, so they usually rest on the shelf with cords routed through, and a power strip placed along the back edge becomes a common, if visible, solution. The back openings are useful for keeping runs tidy, though their placement tends to centralize cables rather than provide multiple entry points near the sides. The table below summarizes those practical effects.
| Feature | Practical note |
|---|---|
| Back cable holes | Allow basic pass-through but may not clear large adapters without leaving plugs on the shelf |
| single door access | Hides cabling from view when closed but requires opening for most physical connections |
| Shelf depth vs. cable slack | Shallower shelves can limit where bulky bricks sit, frequently enough pushing them toward the center of the unit |
Full specifications and configuration details are listed on the product page.
How the TV stand measures up for your space expectations and the practical limits you may encounter
The piece tends to sit low and long in a room, so it often reads as a horizontal anchor rather than a vertical focal point; in many living rooms that makes it easy to layer a TV, a soundbar, and a couple of decorative items without competing with taller furniture. As the back panel provides cutouts for cables, routing power and HDMI runs is generally straightforward, though access to wall outlets and the exact placement of power strips can require a bit of shuffling once devices are in place. Items placed on the lower shelves are frequently reached for while seated or while bending down, and occasional repositioning of media players or game consoles is a common, low-effort habit to keep airflow and cable slack managed.
Observed practical limits tend to cluster around three areas that influence everyday use:
- Weight limits — the top surface accepts notably more load than the individual shelves, and overloading any single shelf can cause a tight, bowed feeling when handled.
- Component fit — shallow shelf depth makes bulkier AV equipment or oversized game console blends feel snug, and taller devices behind the flip-down door may sit close to the door mechanism.
- Cable and access management — the cable pass-throughs reduce visible clutter, but cables still collect behind the unit and can limit how flush the stand sits against the wall without extra cable ties or extensions.
| Area | Typical Limit |
|---|---|
| Top surface load | Approximately mid-range tabletop capacity |
| Each shelf | Light to moderate devices; not meant for heavy, dense equipment |
View full specifications and listing details
Putting it together and caring for it in your home: assembly, upkeep, and the signs of normal wear you might notice
When you unbox the unit you’ll notice the parts and hardware are grouped and the illustrated instructions (and QR code for a short video) are included; that tends to make the first pass straightforward. Lay out the pieces, sort the screws, and follow the step sequence rather than skipping ahead — cam locks, dowels and the back panel are easiest to align when the panels are supported flat. A phillips screwdriver and a soft-faced mallet handle most of the work; having a second person to lift the assembled piece into place reduces fidgeting and helps you align the flip‑down door and cable openings while the stand sits where it will be used. Before you finish, attach the wall‑anchor and route cords through the rear cutouts so cables aren’t pinched when the unit is pushed against the wall; also take a moment to re‑check fasteners once the stand is loaded, since a short retighten after a day or two often settles things that felt snug during assembly.
Routine upkeep is mostly low‑effort but occasional checks will keep the finish and hardware behaving as they did out of the box. Light wiping with a soft, damp cloth and a mild cleaner usually removes dust and fingerprints; avoid soaking joints as particleboard can swell if water sits on seams.You’ll probably see small surface scuffs or tiny edge nicks from normal use and moving items on and off the top — these frequently enough show as shallow abrasions or slight wear at corners rather than structural damage. Watch for a few predictable issues and simple fixes:
- Hardware: hinge and cam screws can loosen over weeks, so a periodic quick tighten is normal.
- Shelf sag: slight bowing can occur if loads exceed the per‑shelf capacity over time.
- veneer seams and edge wear: small lifting or chipping may appear where pieces meet; a dab of wood glue and a clamp or a fine touch‑up marker will frequently enough conceal it.
| Issue | Typical timing | Practical action |
|---|---|---|
| Loose screws | Weeks to months | Retighten with screwdriver |
| Minor surface scratches | Immediately to months | Clean, then use touch‑up marker or polish |
| Cable abrasion at cutouts | Months | Add a rubber grommet or tape sleeve |
How It Lives in the Space
Over time you stop thinking of it as new and start noticing how it shapes everyday movement: the way it anchors a corner, the small piles that accumulate on top, and the paths people take around it.The Madesa Modern TV Stand with 1 Door and 4 Shelves with Cable Management for 55, 65 Inch Media storage Media Console Living Room and Bedroom Entertainment Center Wooden Television Cabinet – Black settles into those routines—shelves collecting remotes and a stray book, the surface losing its untouched sheen to faint marks and fingerprints, the door quietly hiding the miscellany of daily life. In regular household rhythms you feel its presence more as comfort than statement, part of how evenings unfold, how chores are paused and resumed as the room is used.it simply rests and becomes part of the room.